Monthly Archives: February 2013
Chevron Rug
I’m just going to warn you up front, this entire post is pretty much just pictures of our new rug. Moving along…
After dyeing the couch and having it come out a surprising but not unwelcome shade of blue, I was left with the dilemma that the cheapo synthetic rug combined with the no-longer-white couch was too much dark colors in one room for me. Observe:

We weren’t particularly attached to that rug, it was really just the cheapest 8×10 rug we could find in a hurry that fit our style. It was pretty thin and I wanted something thicker and squishier anyway, since I’m imagining that there will be more time spent on the floor when we have a little one that starts crawling. I had been eying some wool rugs on Overstock and, after obsessively reading every single review and worrying about buying a rug that I had never seen in person, we finally pulled the trigger. Here it is:

Yup, it’s blue and white chevron. The room has suddenly become a lot more blue. I think the minty green walls still work pretty well though. Here’s the other side of the room:
![]()
The Lazy Boy now matches! It had been living in the spare room since it clashed with the old colors, but I had been wanting to bring it out anyway since it seems like a good “chilling with baby” type of chair.
I really like how the stripes in the rug aren’t exactly the same size, it fits with our relaxed style. Here’s yet another angle of the rug:
![]()
I’m debating adding a carpet pad underneath for extra squishiness, but for now it seems fine by itself. The rug is actually “looped” rather than “tufted”. I didn’t really know what that meant, but it’s exactly what it sounds like. Unfortunately it means that the cats can pull up loops if they use it to scratch their claws. Though they were also pretty good at pulling up tufts on the old rug, so it’s not unexpected. Here’s my attempt at a detail shot of the loops, with a few that the cats have already pulled loose:
![]()
Eh, it’s just a known hazard of owning cats, so I’m not terribly upset. At least they aren’t peeing on it. 🙂 Generally if I get annoyed at pulled up tufts/loops, I’ll just go over the rug with a pair of scissors and snip away the bits that are sticking out. Presumably this will eventually lead to bald spots, but hopefully that will be far enough in the future that I’ll be jonesing for a new rug by that time anyway.
I should mention that the rug does shed a bit, which was pretty clear just from reading the reviews before buying it. It doesn’t shed nearly as much as our pets shed though, so I’m not really vacuuming any more than I already was just to keep up with the pet hair. So all in all I’m very happy with the rug on all counts.
Outdoor Chores
It’s warmed up a bit here in the bay area, so I’ve been trying to salvage some of the horrible mess that is our outdoor space. First up, some looongggg overdue love for our little orange tree. It finally got some real sunlight this past year since we cut the mulberry tree way back. But it was extremely lopsided since it had been stuck half in the shade for so long. Dave had pruned it some last year to try and balance it out, but we didn’t want to cut away too much foliage all at once. So I figured it was time to take another stab at it. Here are the results:

Someday I’ll learn to not try to take pictures of trees in bright morning sunlight, but hopefully you get the idea. It’s still looking a bit sparse, but hopefully it’ll fill in a bit more this year.
If you lean in and squint you can see that there are actually quite a lot of fruits growing on it at the moment. They’re actually delicious, about the size and flavor of clementines, but there are a TON of seeds in them, like two or three in each section. I generally only eat them outside so I can spit the seeds out as I go. I did harvest a few ripe ones before cutting off some of the big branches:

But there are more where that came from, many more than we can possibly eat. They just need a little more time to grow.
I also FINALLY weeded and cleaned out all of the old fallen oranges under the tree. There were a bunch of random bricks placed haphazardly around the base of the tree, so I moved them to one side so I could rake, fertilize, and mulch. And then I uncovered this guy:

It’s a concrete paver with a face. At first i thought he was a bit creepy, but now that the area is more groomed I think he’s kinda sweet. He needs a name though. Fred? Marvin? I’m open to suggestions.
Speaking of the mulberry tree, here’s how it’s looking one year after being pollarded:

It did sprout and then drop a bunch of leaves, so it’s not like it sat dormant all year. And now there are many, many new branches growing out from the main limbs. The thing really is just a giant weed. But it provides some very nice shade, so I continue to resist the urge to just have it cut down. We’ll probably need to get it cut back again in the fall though.
Anyway, that ends the productive things I can report. Next on my to-do list is attempting to fix up the front and back lawn. The front lawn is actually looking a bit greener and less sparse, but there are still some big sections that are dominated by weeds. Here’s the area by the fence:

I’m actually tempted to turn that area into a row of flowers or something since it gets such good sun and it’s hard to mow. But for now I just have to get rid of those weeds! And here’s the rest of the yard; the weeds are a bit hard to see in the photo (sorry!) but trust me, they are abundant, especially along the edges where we didn’t get good sprinkler coverage and all the grass died:

Our neighbor must have finally weed-whacked his paver-stoned area (to the left of the picture) because it used to match our weeds a lot better. And OF COURSE all of the rest of our neighbors somehow effortlessly keep their lawns looking loverly, so we stick out like a sore thumb. Waa. It’s okay, they all have grown-up kids and think our attempts at responsible homeownership are cute. 🙂 Luckily, they can’t see our back yard, which is even worse:

Allow me to highlight the especially silly-looking areas:
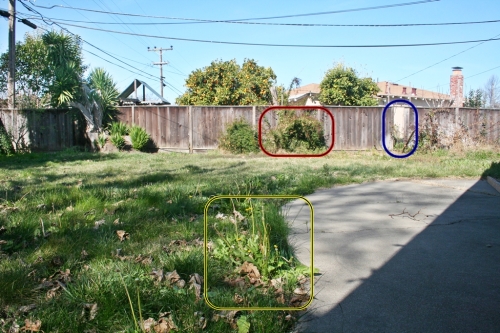
In the yellow box we have my thriving dandelion garden. This is yet another spot where all of the grass had died over the summer, and the dandelions took over during the winter. And they’re so tall, I’m sure the roots are going to be impressive. Sigh.
In the red box is the crazy jasmine/bougainvillea growing back together again to form a crazy chimera-like monster. I had gotten that under control over the course of last winter/spring, but growing things have this tendency to, you know, GROW. It’s still not nearly as bad as it was, but I want to deal with it pretty soon before it gets completely out of control again. Maybe I’ll wait until the jasmine is done blooming in a month or so, because it’s so nice for a few weeks when it blooms, but there aren’t any flowers on new growth, so we didn’t have any last year after I cut it back. It would be sad to miss out on flowers two years in a row.
in the blue box is a spot where a few fence slats have fallen down. Boooo. In fact they’re leaning against one of the rose bushes… I’m such a bad plant mom. 😦 We’ll probably just nail those slats back into place with the help of a supporting cross-piece, because I’m still trying to stall before we replace the whole fence.
I’m not even going to take a picture of the side yards, because they are just flourishing weed jungles at the moment. I guess I should also save the apple tree from weeds pretty soon and maybe fertilize while I’m at it, but otherwise I plan to pretty much ignore the side yards. Well, maybe if I need to let out some pent up aggression I’ll attack a chunk at a time with the hoe. We’ll see. 🙂
Bathroom Remodel Progress
We bought this house almost exactly two years ago, and at that time we knew that the biggest change we wanted to make was to redo the master bathroom/closet area. The original setup was a mini-hallway leading from the bedroom with a reach-in closet with sliding doors on the right and a doorway leading to the itty bitty bathroom on the left. After living in the house for a year our feelings on the matter were unchanged, so we started the demo. And then, as is our habit, we got distracted by other things and let the demolished bathroom sit for months… and months… and months. It helps that we have another, fully functional bathroom in the house, but eventually having our clothing piled in baskets all over the bedroom got the best of even clutter-happy people like us. Having a baby on the way may also have motivated us. So we got back to work.
The general plan is to create a new doorway to the bathroom leading directly from the bedroom and close off the “mini-hallway” to instead make a mini walk-in closet. We also plan to steal a bit of closet space for the shower so that we can have a shower bigger than a high school locker. 🙂 Here’s a post about the old shower before we destroyed it. Perhaps someday I’ll get organized and post some before and after floor plans, which will probably make more sense than my descriptions.
Anyway, all of the pictures I’ve taken of our progress are pretty bad, though I tried to improve them as best I could with post-processing. There really is not much lighting to be had and the spaces are all tiny. Ah well.
First up, we needed to frame the new closet doorway. Here’s a picture of the original “mini hallway” opening, taken from roughly the back wall of said hallway. The bedroom is hiding on the other side of the plastic sheet. What used to be the closet is on the left, the bathroom is out of the picture on the right.

Step one involved cutting the hardwood (*gulp*) for the added bit of wall around the door:

And then nailing in the bottom plate with our swanky new nail gun:

And then the top plate:


After that I actually put the camera down and helped Dave put in the verticals. So here’s the finished shot:

We were able to salvage a fair amount of lumber when we first demoed the space, which is why the boards are different colors.
Next up was framing the new shower bump-out. Again this involved cutting some hardwood:

That picture was taken while I was standing in the middle of the bathroom looking out into the closet. The bedroom and the new closet doorway are out of the picture to the right. the studs and plumbing on the left side of the picture will eventually be removed and the empty space directly in front of me will become a wall. Anyway, a whole lot of ceiling drywall had to come down, since this was all we had removed thus far:

And here’s the first wall starting to be built:

The horizontal board is for the top of the built-in shelf that will reside along that wall.
Coming soon… framing the rest of the bathroom! Mostly that will entail closing up the original doorway and framing out the new doorway. We are also planning a pony wall between the toilet and the shower, so there will be a little more building going on there. And then we have to get the plumber in to move the pipes for the shower. After that it’s building the shower pan and then on to tiling the shower!
The baby is due at the end of March… what are the chances that we’ll be even close to done at that point? 🙂
Eco-Toilet Upgrade
The flush-lever on our toilet broke. It’s the only functional toilet in our house since we’re remodeling the other bathroom. And of course it broke fairly late in the evening, after stores had closed. So we rigged a quick fix to get us through the night:

Here’s what it’s supposed to look like. You know, in case you’ve never seen a toilet before:

Once we got to the hardware store the next morning I was suddenly enamored by the idea of installing a dual-flush handle. That’s one of those doohickeys where you have a less-water option for liquid waste, and the normal flush option for solid waste. It’s a little more involved than just buying a new lever, but the store had an “everything included” kit that wouldn’t break the bank, so we went for it.
Of course when we got home we discovered the kit only worked with certain toilet setups, but the extra conversion kit to get the correct setup was also fairly inexpensive. (Though it did require another trip to the hardware store.) Just to keep things annoying, the original kit had a broken piece in it. So that required yet ANOTHER trip to the store, though Dave didn’t have any issues getting it exchanged. It’s a good thing that we live conveniently close to multiple hardware stores though.

After all that, the installation was pretty easy. Unfortunately I don’t understand these newfangled contraptions as well as I do old-school toilet tanks, so hopefully this will work forever and never break until the end of time. Ha! Here’s how the toilet tank used to look. This at least looks familiar to me:

And here’s how it looks now. Crazy:

Usage is simple enough: pull the lever up for the half flush, push it down for the normal flush. Since it looks pretty much like a normal flush-lever, we won’t have confused visitors yelling for help while doing their business. We hope. The lever isn’t exactly a piece of artwork, but it’s straightforward enough:

Pulling upward for the half-flush is slightly weird because you have to hold it for an extra beat for it to work, but pushing downward works exactly as it did before. All in all it works perfectly so we’re happy for this easy little improvement.
And I’m just going to stop now because there’s only so much I can say about a toilet.

