Monthly Archives: September 2013
Coming Soon…
I’m setting a goal for myself to produce two blog posts per week from now until the end of the year. I’ve jotted down some ideas and I think it should be totally doable, I just need to commit to it. Some of the potential posts should be pretty easy… Like for instance this post totally counts as one of the two for this week. 🙂 But I don’t just want to post cute pictures of Dakota all the time, (too easy!) so I need to get cracking on some of these projects I’ve been talking about but never actually doing.
Since Dakota is almost crawling we need to get a lot of things picked up and stored away, so I really need to get moving on some of the built-in storage I’ve been planning… At the top of the list is a bench for the foot of our bed, because the bed frame down there actually has some exposed wood that probably wouldn’t be considered baby safe.

We currently have an old ottoman stuffed halfway under there because Loki needs the help so he can get up on the bed. We’ll make sure the bench is low enough for him to jump onto. 🙂
We’re also planning a built-in banquette for the corner behind the dining table, it’s the only way to fit seating all the way around our table, and I refuse to downgrade to a smaller table. And since it’ll be there anyway, the banquette will have some hidden storage too.
The banquette would provide seating under the window and also on the back wall.
The other thing I’ve been contemplating is some sort of storage under the window in the living room. I know the room is a bit small to begin with, but under the window is kind of a dead space right now that just accumulates extra blankets and PS3 controllers and such, so maybe a narrow hinge-top bench that fits between the couch and the wall and runs under the window? I could almost just re-use the plans for the foot-of-the-bed bench!

So what are the chances I can get any of these projects done by the end of the year? 😉

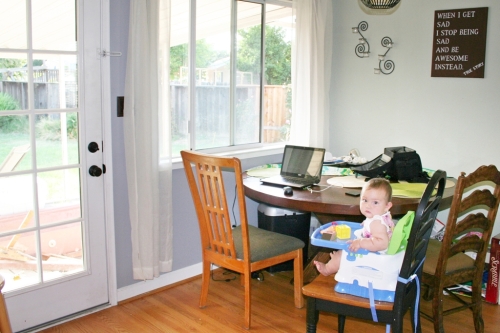
Dakota: Six Months Old
So Dakota has mastered rolling both ways finally, but luckily she was in a very chill mood during today’s photo shoot and was content to lie there and stare bemusedly at the camera. She’s still not quite crawling, but she’s started to scoot backward on her belly (which generally moves her farther away from her object of interest) so crawling is probably right around the corner.
Here’s the picture!

And previous months:


re-posting this many past photos is getting a little silly… I guess maybe moving forward I’ll just post the most recent 6 months’ worth of photos? Or maybe I’ll only include even photos on the even months and odd photos on the odd months? Decisions, decisions. Anyway, the legwarmers this month are actually themed for once, since I thought the football legwarmers were super cute but it would be weird to use them before football season started.
Maybe at some point I’ll do a collage of all the pictures with the fire lizard/belly sticker all the same size, so her growth is more obvious. I made a deliberate decision to not try to do that separately for each photo though, because I knew it would drive me bonkers. 🙂

Front Yard Landscaping Options
Our front yard is mostly grass. Here’s a reminder:

That’s from a few months ago. It’s a little more uniformly green now, but otherwise it’s pretty much unchanged. It’s a pretty small yard though, so pretty much all I do with it is cut across it at the end of my daily walk. Oh and I have to water and mow it every week. There’s plenty of grass in the back yard for playing bocce and rolling around and whatnot, so I’m leaning towards getting rid of the front yard grass entirely and replacing it with something that’s hopefully low maintenance, especially when it comes to water needs.
Pretty much all of the homes in my greater neighborhood area are similarly sized with fairly small front yards, so on my daily walks I get a pretty broad view of the potential options for us. A LOT of homes still have grass in front, but here are a few of the common non-grass options that I see.

This is an all-succulent ground cover. I believe this one is an ice plant, or at least something similar. I feel like this is probably the most ecologically responsible solution for our area if you really, really want a lot of “green”. I don’t think you’d want to walk on this at all though, so it’s pretty much just keeping the weeds at bay and keeping things green-looking. Also, to me kinda looks like an alien invasion or something.

Some people go with just a small amount of grass with rocks or mulch around it. This lawn is somewhat amusing to me because in this case it’s not even real grass, it’s artificial turf. It certainly saves on the watering and mowing! But it’s not like there’s enough of it to kick a soccer ball around or anything, so I guess it’s just once again the attachment to having a green flat space in front of your house. Not for me.

This front “yard” is pretty much all hardscaping, and quite clean and pretty. A lot of it would be considered “patio” rather than “yard”, though there are a few plants surrounded by small rocks. My problem with the “small rocks” solution is that I see a lot of yards with weeds growing up among the rocks, and it seems like it would be frustrating to keep the weeds at bay without using some sort of herbicide. And while quite a few of our immediate neighbors have converted at least part of their front yards into areas for entertaining, (with seating and such) I don’t really see us going that route.

This is a nice functional yard. The trees are citrus (orange and lemon I believe) and right up against the fence are some rose bushes. I definitely don’t dig the chain link fence though, and I wish the citrus trees were closer to the sidewalk so I could grab some fruit while walking by. 😉 It would be nice to have some sort of tree in our front yard since our big picture window gives a nice clear view of our living room from the sidewalk, especially at nighttime. So we tend to always keep the blinds down, which pretty much negates the point of a picture window. On the flip side, our neighbors are awesome and watch out for each other, so I like that they have a clear unobstructed view of the entire front of our house in the event that a suspicious person is lurking around. So I guess that’s a “no” for the front yard trees for us. (Back yard is a whole different story!)

This is probably my favorite yard that I’ve seen on my walks. I wish I had gotten a better picture, and I wish I had gotten it in the spring when it’s completely in bloom, but even in the middle of summer it still looks nice. I believe pretty much all of these plants are purple african daisies. I see one or two of these plants (and sometimes yellow ones) in a lot of yards, but I love how this entire yard is filled with them. I feel like once a yard like this was established, I would hopefully just have to spread a thick layer of mulch maybe once or twice a year, and occasionally walk around and pull some weeds.
I don’t think I’m ready to start killing our grass quite yet, but I like talking through the possibilities and ruminating on what I think I’d like the best. Maybe someday we’ll actually make the change.
Adventures in Cloth Diapering
I started writing this very long and detailed post of all the trial and error I went through figuring out what cloth diapers I wanted to use and how to make it work for me, but it got very long and rambling, so I’m just going to keep things simple. Here is how the whole cloth diapering thing is working for us right now.
I am using colorful waterproof (specifically, polyurethane laminated fabric) covers that snap onto baby, and laying an absorbent pad (known as an “insert”) inside of it. For the absorbent insert, I have some large squares of thin cotton (also known as “flats” in cloth diapering land) that I can fold a bunch of times into the right shape. I also have a bunch of much smaller squares of many-layered cotton (known as “prefolds”, since most of the folding has been done already) that I can just do a quick fold and tuck and then they are in the right shape. Here they are, drying happily in the breeze:

The diaper covers are in front, then you can see some of the flats looking big and loose behind them, then the smaller, more compact prefolds drying in the back. Here’s another shot so you can see the prefolds (on the left):

The flat inserts are nice because they’re super cheap, they clean easily and dry pretty fast. The prefolds take quite a while to dry, but once I take them off the line (or out of the clothes dryer) I can just toss them in the shelf under the changing table, while with the flats I have to take the time to fold them to the right size. I like having some of both, but if I want to keep hanging them on the line to dry through the fall and winter I’m going to have to start using the flats more.
Here’s how they look folded into a diaper cover and ready to snap onto baby:

The flat is on the left and the prefold is on the right. Once they’re folded like this they look and function pretty much exactly the same.
I also have a few high tech “stay-dry” inserts that are mostly microfiber with a miscrosuede top layer. The microsuede wicks moisture away, keeping the skin fairly dry. It’s still not as crazy dry as the gel stuff in a disposable diaper, but I use the stay-dry inserts for night time since I have no interest in changing diapers in the middle of the night and I don’t want wet baby skin all night long. I also have some disposable inserts that I keep in the diaper bag and the car, in case I run out or (more likely) forget to refill the diaper bag with cloth inserts.
I feel weird mentioning brand names on my blog, since I don’t feel like I should recommend any specific products unless I’ve exhaustively tested every possible brand. But what I have is working great for me, so I have no interest in trying other stuff. For covers, I’m using Flip one-size covers and Diaper Safari one-size covers. I looove the color options for both, and have mostly stopped putting pants on Dakota and instead have just been letting the diaper be part of her outfit. For prefolds I’m using Cloth-eez size small, which I received second-hand for free from a super-generous local mom. (Lucky me, otherwise I probably would have bought a cheaper and not-as-nice brand.) I’m still testing out the flat inserts, but for now I have Flip daytime inserts, which are a jersey knit, and Ozocozy, which are a birdseye weave.
Enough words, here’s a cloth diaper on my baby!

I generally alternate between two diaper covers throughout the day; since the polyurethane is on the inside of the cover I can just give a peed-in diaper a quick wipe and lay it out to dry, switching to the other diaper cover and a new insert. The wet/dirty inserts and any pooped-in covers go straight into the diaper pail, which for me is just a trash can lined with a polyurethane laminate pail liner. (I like the Grovia drawstring pail liner, since I’m throwing out brand names left and right anyway.) I’m doing diaper laundry pretty much every other day, so I just grab the whole drawstring liner, empty it into the washing machine, and toss the liner in as well since it’s machine-washable. Since we’re still exclusively breastfeeding the poop is all completely water-soluble (and surprisingly not very smelly at all) so I “soak” the load first by running a quick wash/rinse cycle on cold with no detergent. Once that’s done I run a hot wash cycle with a cold rinse and add an extra rinse just to make sure all the detergent is completely washed out. Then I generally hang everything out to dry, though we’ll see if that continues as the weather gets cooler.
With this routine, and especially since baby is a once-every-other-day pooper, I need about 8 diaper covers and 24 inserts of various sorts. I’m hopeful that this will actually last us all the way through the end of Dakota’s diapering days. I know once she starts eating solids her diapers are going to get considerably more gross, and from what I’ve read the most common way to deal with it is to install a hand-held bidet on the toilet so you can spray the dirty diaper before tossing it in the diaper pail. I also figure that she will start peeing more heavily and less frequently as her bladder gets bigger, but I’m hoping that I can double up on the inserts that I already have if I need to, especially since I won’t need as many for individual changes at that point. The other possibility is of things wearing out. I’m hopeful that since I’m line drying things that the cotton inserts will last for a loooong time. The covers are more questionable, especially from what I hear the leg elastic tends to give out first. For now, if the cover has just been peed in I’m rinsing it out and washing it with our regular clothes on cold, and then hanging to dry. I’m hoping this will help the elastic last longer.
Too many words again! More baby!

So how much would all this cost using the brands I’m now familiar with?
- 8 diaper covers – between $72 and $120. The Flip brand is much more expensive than Diaper Safari, but you can buy a bundle of Flip covers with the stay-dry inserts or the daytime flats and save a little if you so desire…
- 12 Cloth-eez small prefolds – $28
- 12 flats – between $20 and $60. The Ozocozy ones are the cheapest that I’ve seen, Cloth-eez makes some highly recommended ones for a little bit more, and if you really want to break the bank you can get a bunch of the (admittedly very nice) organic Flip daytime inserts.
- 3 Flip stay-dry inserts – $15
- Grovia pail liner – $15 (Although honestly you should really get two, so you have one in the pail while the other one is in the wash)
- A whole lot of laundry detergent – ??? hopefully you buy in bulk. 🙂
And since you’re doing all this laundry anyway, you might as well use cloth wipes too, right? cutting up some old T-shirts and wetting them with water from a squirt bottle works awesomely, in my experience. Anyway, a little arithmetic says you can buy all the stuff I listed above for somewhere between $150 and $240, depending on how fancy you want to get. That’s your start-up cost, and then you have the ongoing cost of increased laundry detergent and water/energy usage. All of this to say that I’m not going to try and figure out if I’m actually saving myself money by using cloth diapers instead of disposable. Even if I knew exactly how much my water consumption increased and how much I would have been spending on disposables, I still don’t know if this setup will last all the way until my already very big baby is out of diapers for good. And it took me a while to figure out that this works best for me, so I’ve spent money on other types of cloth diapers here and there until I settled on this system. Again I was lucky, the same lady who gifted me the prefolds gave me a bunch of newborn-sized cloth diapering stuff as well, which gave me a chance to figure out what I liked without breaking the bank.
At the end of the day, I love cloth diapering and I have every intention of continuing if at all possible!

Pot Roast Success!
We like to fill up the freezer with a big box o’ beef (aka a split half) that we order from a semi-local farm. I’ve gotten pretty good at cooking up the different types of steaks and finding uses for the pounds upon pounds of ground beef, but I’ve been sucking a lot with the roasts. I’m pretty sure that roasts are supposed to be easy, but I have a history of drying them out and making them inedible. I have a kick-ass beef stew recipe, so for the past year I’ve been cutting roasts up and making stew out of them. Cutting 3+ pounds of beef into bite-sized chunks gets old pretty fast though, and I don’t really like stew in the summer, so I decided to buckle down and figure out how to make a good roast. And to make my life easier, I got an awesome new enameled cast iron dutch oven. Behold:

I already have a slow cooker and a big oven-safe pot that probably could have handled a pot roast, but the dutch oven worked great and was super easy to clean.
I used this recipe, which is both an entertaining read and very satisfying because I almost always have all those ingredients on hand. Carrots, onions, and celery (not in the recipe, but I felt safe adding celery) last forever so I almost always have some lying around. I make beef stock in large quantities and freeze it into ice cubes:

But we pretty much always have a few bottles of cheap wine, so I used that to deglaze the pot after browning the meat. And then I added more wine, and only then did I throw a bunch of beef stock ice cubes into the pot. And for the herbs I can just walk out the back door to get some fresh rosemary and thyme! Yaaaay. Oh and I used butter instead of olive oil. (of course!!)
I especially like how much wiggle room there is with the cooking times, because I managed to prep this and get it into the oven with frequent interruptions from a fussy baby. She mostly gets to sit and watch me attempt to cook like so:

And I take breaks from cooking to round up all of the toys she threw on the floor and put them back on her tray. And then the cycle repeats itself. 🙂
Now I just need to find some more things to cook with my awesome dutch oven. In the meantime it gets to sit on the shelf in the kitchen and look glamorous.

Just Some Flower Pots
The front door/patio is still pretty boring at the moment, and I wanted to bring in some flower pots to sit on either side of the front stoop. There isn’t a whole lot of space between the step and the railing on the right, but I eventually found some inexpensive plastic pots that were the right size. Unfortunately they were a pretty boring color:

Matte black with some silver “highlights” so it looks a little more like metal and a little less like plastic. And there weren’t any drainage holes in the bottom, which I fixed right away.
I picked out some “outdoor” spray paint… it claimed to be all-surface but recommended a plastic spray paint primer if I wanted to use it on plastic. Easy enough! A couple coats of primer and a few of spray paint, and the hardest part was waiting for them to dry between coats. Behold:

Oh, yeah, and I picked up chrysanthemums to actually put in the pots. They have so many great color options… these were labeled “bronze”. Nice. And I loooovvveee the blue spray paint color. I may have to buy more if my swing set refurbishing makes it as far as the painting stage. Here’s the patio withe the new flower pots:

They’re a little low and small looking, but you can see that with the space I had to work with on the right I couldn’t have gone much bigger. And I didn’t want something tall and skinny, so these are just what I wanted. They’re so cheerful once you get up onto the patio:

The biggest problem is that the doormat is looking rather dingy in comparison. Sounds like I should go find a new doormat! 🙂
I have bigger things that I still want to do to the front patio: Paint the door red, switch up the columns and railings for something all geometrical and fancy, tile the concrete… But I fear commitment and I fear screwing up. So in the short term I’ll just keep adding fun decorations when the mood strikes.
Swing Set: Fix it or trash it?
When we bought this house, one of the selling points was a “play structure”. Turns out it was faded and rusty, and I declared that we would trash it ASAP. But we had plenty of yard space and it sat over in the side yard, gathering cobwebs and weeds. Since there isn’t a direct window looking out on it, it didn’t really impinge on my consciousness very often. Now that we actually have a kid and I spend a lot more time at home, attempting to fix it up actually sounds like a potentially fun challenge. But is it beyond salvaging? Here it is, and please ignore the crazy plant life around it as best you can…

So we have a metal frame with very rusty bolts and once-shiny paint in various stages of fading. From left to right there is a swing, a rope ladder, a “trapeze”, a glider, and a plastic slide.
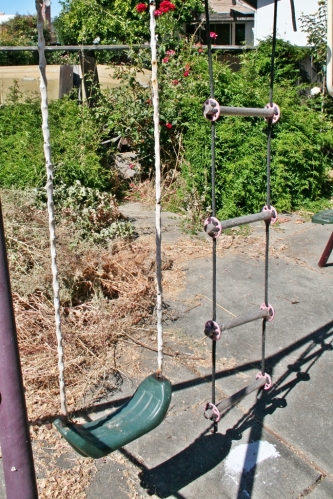
The swing chain definitely needs to be replaced at the minimum, and a quick internet search reveals that I can probably get a sling-style swing complete with vinyl-coated chain for possibly as low as $15. The rope ladder is pretty gross looking, and in fact doesn’t look to be original to the set, seeing how it’s attached:

the trapeze and glider both look like they just need some cleaning and a good coat of paint. The slide seems a little unstable the way it’s currently attached… I’d probably have to replace the bolts at a minimum:

Poking around online it looks like I can get a similarly sized metal swing set for maybe as low as $100. I’m not sure how good the quality would be, but then I’m not sure how good the quality of this thing would be even after I fixed it up. When you add up a new swing and ladder, several cans of spray paint and possibly primer and sealer, and various replacement bolts and steel wool and who knows what else, this project might end up being more than $100 anyway. So I guess this comes down to a) whether I think it’s even possible to fix it up, and more importantly b) will I have fun attempting to do it? I guess at the bare minimum I can clean it off and see if the rusty bolts will even budge. I can pretty much scrap the whole project if I get tired of it anyway. 🙂

