Category Archives: crafts
On the Needles
I finished the longies!

They’re still not quite high enough in the back to cover Dakotas nighttime diaper though.

I have enough leftover wool yarn that I may try for a shorts version with even more short rows in back. I ended up settling on vaguely capri-length legs when I realized that if I didn’t hurry up and finish it would be too warm for wool pants anyway. The cabling was fun, and I like the I-cord drawstring.

My new project is a little short-sleeve tie-front crop shrug thing. My default daily uniform is a tank top because my armpits like to breathe, so I like having a few options to cover up my arms a little more at various points during the day. This is my first time working with yarn thinner than worsted weight, and it’s not a horrible failure so far. Yay.

I’m also still poking along with the boucle yarn sweater that I mentioned last month, it’s my “sitting in front of the TV” knitting project.
On the Needles
I’m hoping to get more knitting projects done this year, so I thought I might try to plan some regular progress reports to hopefully keep me motivated. I also found a local knitting group that meets at the nearby Panera several times a week, so that should help motivate me too. 🙂
My first attempt at a wool diaper cover for Dakota is doing its job, but it’s not high enough in the back:

So I’m trying a different pattern that uses short rows in the back for hopefully a better fit. This pattern also just so happens to have cables down the side, which I’ve never tried before. It’s working pretty well for me though! The pattern is for either “shorties” or “longies”, aka pants. I only had one skein to start with and honestly that probably would have been enough for shorties, but I went ahead and bought more yarn early on, so I’ll probably just keep knitting the legs until I hit the correct length for pants or I run out of yarn, whichever comes first.

I made the dubious decision to knit both pant legs at the same time on a really long circular needle. I was inspired after seeing someone way more experienced than I doing two mittens at once. I think it’s probably going to be a bit slower going since I have to keep switching yarns and such, but since I often have to put my work down very precipitously, I’m hoping this will help me keep track and stay consistent between legs. And I know they’ll end up with the same number of rows, if nothing else. 🙂
I started another project to try and use up some of my existing stash of yarn. I’m trying to make a fuzzy sweater for myself out of this ridiculous “boulce” yarn that looks awesome but, somewhat unsurprisingly, is a bit of a pain to work with.

The problem with this yarn is that I can’t really tell if I’m on a purl stitch or a knit stitch, but I figure if I mess up it’ll be pretty hard for anyone else to tell too. 🙂 Once I get past the ribbing and start doing rounds upon rounds of stockinette, it’ll go a bit faster.
Fun Little Doormat
Our old doormat was looking pretty beat up, so I figured it was time for a replacement.
Since I’ve been having so much fun with stencils of late, I ordered a plain mat and printed out and cut some letters.

I’ve seen some awesome original ideas for doormats, but I wasn’t feeling particularly witty, so I figured I’d keep it simple.

I used some spray paint to paint the letters on. It looks a bit blurry in person, but it’s still cute. 🙂

On the Needles, on the Hook
Ah ha! a new opportunity for blog fodder, with the added bonus of hopefully inspiring me to actually finish more of my yarn projects!
I haven’t managed to get motivated to do much knitting or crocheting since Dakota was born, Especially when the wool diaper cover I was knitting her was comically too small within a few weeks. 😦 I never even finished the leg cuffs, as I realized her chubby thighs wouldn’t even fit through the openings.

It looks pretty slick though, so I’m thinking I’ll undo it and maybe try for some knit pants with the same yarn. Here it is with Dakota as a size reference. I know knit stuff is stretchy, but not that stretchy. 😉

I also was in the midst of making a bunch of wool dryer balls. I have no idea if these things really reduce drying time, but I got the cheapest possible wool yarn (with an omnipresent coupon of course) and rolled quick balls, and then crocheted around the outside so they wouldn’t come apart in the wash. And then both the dog and the baby decided they’re great toys, so I haven’t actually gotten around to trying them out in the wash! I still have one more to do just to use up the yarn, but maybe I’ll get some fun colored yarn and make some more just for the baby to play with. I did a really ugly job on the crochet since they will felt up in the wash, but if I do something multicolored I might need to try a little harder to keep my stitches even..

My new project is a knit xmas stocking for Dakota. I picked yet another pattern with wool that is meant to be felted, so again it doesn’t really matter how ugly my stitches are. Dave wasn’t a fan of a contrasting color for the heel or the toe, so it’s just an off-white cuff and a green body. Maybe every year I can add a little bit of embroidery or applique to it… Dream big, right? 🙂

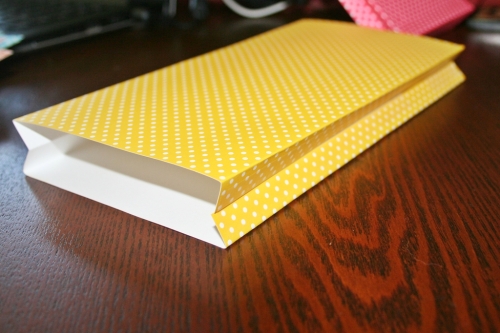
I do have one last thing I’m knitting, and it’s double-knit, so my progress is slooowwwwww. I think it’ll be done in time for xmas though! I can’t go into too much detail since it’s a present, but here’s a little teaser:

That’s all for now! Hopefully with the xmas stuff out of the way I can have new projects for more blog fodder next month.
Colorful Advent Calendar

I think it’s safe to say that I barely knew what an advent calendar was before Pinterest came along. Now I can’t live without one! Darn you, Pinterest! 😉
Anyway, last year’s calendar was a bit late and not too exciting looking, but we still thought it was awesome. This year I stuffed my pockets with coupons and headed out to Michael’s… Not exactly with a plan, but with some vague ideas of what I wanted to do. Here’s what I ended up with:

Three dollars worth of colorful card stock and some quick googling on how to fold a piece of paper into a baggy. And since the camera was handy, here is my garbled attempt at explaining how to fold a paper bag…
Fold in half and tape the edge opposite the fold:

Fold both of the long sides in a little bit (I cut a piece of scrap paper as a guide to keep the fold sizes consistent):

Unfold and refold the sides so the middle folds point inward. You know, like the sides of a paper bag:
Now fold the bottom up (I used the long side of my piece of scrap paper to keep this fold a consistent size):

And brush off your mad origami skills to press open the bottom so it looks like this:

Then fold the open edges in so they overlap, and tape them together:

Now you have a bag! Mine is tall and narrow so I can fold the top down:

I also picked up a number stencil while I was at Michael’s, and after some contemplation I put the numbers on little circles of white card stock. I used a shot glass to trace the circles.

To hang, I knew we had plenty of ribbon and twine around the house so I didn’t have to buy anything. We settled on twine… And I have tons of clothespins, so that was a no-brainer.
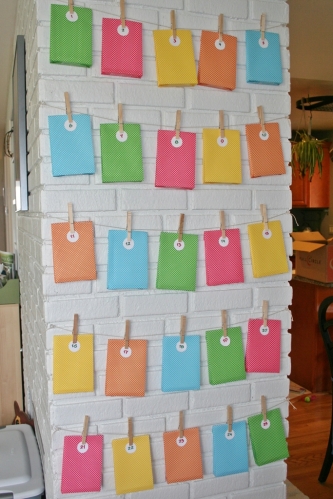
For now we’re just putting chocolate in the bags for us grownups, but maybe I’ll add more fun stuff in future years. Whatever will keep this little one entertained!

Pikachu Costume Complete
I blogged earlier this month about how I was in the midst of sewing a Halloween costume for Dakota. To recap: I decided on making a pikachu costume by modifying a Simplicity costume sewing pattern. I was able to sew the body of the costume out of yellow fleece by just following the pattern instructions, so what was left was to modify the ears and add a face, tail, and back stripes. Modifying the ears was pretty straightforward:

I just drew right on the tissue paper to extend the original ears a bit. The red lines are for where I wanted to switch from yellow fabric to black.
I needed to move the ears farther back on the hood to make room for Pikachu’s face, so I pinned them on and then spent a while shifting little tissue paper circles around on the hood until I had everthing more or less where I wanted. George the stuffed animal served as my costume model:

I used the exact same fleece fabric in different colors for the eyes and cheeks, and just left the edges raw since fleece doesn’t fray. I hand sewed them (and the brown stripes for the back of the costume) in place using a running stitch in a matching color thread. This actually worked amazingly well and went pretty fast, even with my sloppy hand-sewing. You have to get your nose up close to even really see the individual stitches, and even then the unevenness doesn’t really detract in any way. And as advertised, no fraying! I may just use fleece instead of felt for future craft projects, since I’ve had bad experiences with felt coming apart when I try to sew with it. And actually I probably could have machine sewed the pieces directly on, but the pieces were so small it probably would have taken me longer to wind the bobbins and thread the machine than just sewing it by hand.
Finished pictures in a moment, but first I want to talk about the tail. After much waffling I decided to add a pipe cleaner inside for support and make it detachable from the costume. Here’s my free handed sketch that I used as a pattern:

And here’s the finished tail:
I machine sewed the two sides together inside out along the top, turned it right-side out and inserted the pipe cleaner and bent it in the right spots, and then hand sewed the bottom closed. In hindsight I probably should have machine sewn the whole thing right-side out and left the raw edges visible, because trying to get all those sharp corners to turn right-side out cleanly was a pain in the butt. I attached two yellow buttons to the tail, one at the top corner and one at the base, and attached two loops of yellow cord to the body of the costume.
Unfortunately, but not unexpectedly, the tail was a bit of a flop, literally it just flopped over to one side while attached. Ah well, I did get a few cute pictures with it on, after detaching the top button:

Oh, for the mouth I just hand-sewed using a back stitch, and then I sewed another line of back stitches right next to it to make it thicker. Anyway, here you can see the back of the costume:

And then I took the tail off and we went to various Halloween parties. 🙂
Here’s a close-up of Dakota sitting. The costume is a little large on her, especially since it was warm enough that she didn’t need to wear much underneath it:

And here she is still not quite crawling, but at least demonstrating that she has decent mobility in this thing:

In that picture you can see the little yellow cord loop where the tail was attached to her butt.
The fleece was a little warm during the day since the temperatures got up into the 70s, but she was able to wear the costume pretty comfortably for pretty long periods without complaint. I liked the way the elastic along the top of the hood worked out, it kept the hood mostly in place without really getting in her way. And in case it wasn’t already obvious, I really loved working with fleece, and I definitely plan to use it again in future projects. The tail was a little bit of a bummer, but this isn’t my first time dealing with floppy costume appendages, so I wasn’t at all surprised by the failure and I don’t think the missing tail really detracted from the overall costume much at all. Now I can’t wait for next year!
Costume Sewing Progress
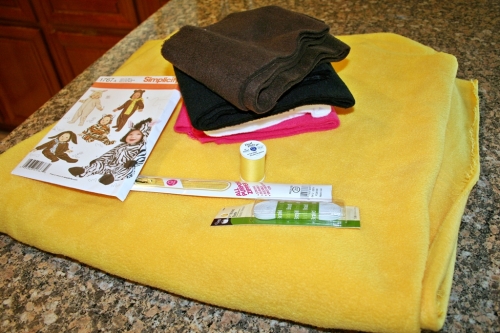
I had entertained vague notions of sewing a Halloween costume for Dakota, figuring I had better let my creative juices loose now because in a few years she will have an opinion on the matter and insist on being whatever the equivalent is at that point of Rapunzel from Tangled. (My non-scientific poll of three different little girls has determined that 100% of them want to be Rapunzel. Sigh.) But I hadn’t thought seriously about it until another mom at a playgroup we attend turned to me and asked what Dakota was going to be, adding that she had already bought a ladybug costume for her daughter. This was the last week of September, and my first reaction was, “What? So early…” But then again it’s not really that early if I actually want to sew something. So Dave and I had a Very Serious Discussion about what Dakota should dress up as, and we settled on… Pikachu!
I searched around and found a Simplicity pattern (1767, in case you’re interested) for a hooded, footed baby costume that had a few generic baby animal variations, figuring I could modify the ears and add eyes and cheek circles to the hood. I went out and bought some bright yellow anti-pill synthetic fleece (that was luckily on sale) and small amounts of the other necessary colors in the same material. The pattern also calls for a zipper (gulp) and some elastic:
I’m not a sewing expert or anything, but I have mostly gotten over my fear of using patterns. This one is just about my speed: two halves of a front, two halves of a back, two sleeves and two halves of a hood:

In terms of other trickiness, the sleeves have elastic in the cuffs, and the “feet” are made with a single pleat, pretty straightforward. The pattern even helpfully suggests using a “narrow zig-zag stitch” for fleece fabrics. I wasn’t quite sure I was using the right setting on my machine, but it produced a zig-zag, and after a few practice runs on some scrap fabric I figured I had it close enough, so off I went!

I’ve never worked with fleece before, but it doesn’t fray or unravel, and it seems to slide through the machine pretty evenly, so I’d say I’ve been pleasantly surprised with how easy it has been to work with.
I’ve also never actually had to attach a zipper before. I avoided it on my wedding dress by kludging together a lace-up back and duct taping myself into it right before the ceremony. 😀 But miraculously I still have the zipper foot that came with this sewing machine! I didn’t do the most even job of sewing the zipper in, but I think the fleece is poofy enough to mostly hide the unevenness:

At this point I could finally see how it was fitting:

A little big, but the way she grows it may fit her in two weeks. 😉 Anyway, now I have to attach the hood, and then I have to start working on the Pikachu-specific stuff. I think I have the ears modified to what I want. Should I add a tail? It has a pretty distinctive zip-zag, so I would probably either need to use craft foam or wire to make sure it retains its shape.
Well, if all else fails she can just be a fuzzy yellow monster. 🙂

