Category Archives: decor
A Little Shopping Goes a Long Way…
We are forever in need of more storage space, so I bought these bookshelves from Ikea a while back to try and make some use of the walk space between the dining area and the living room:
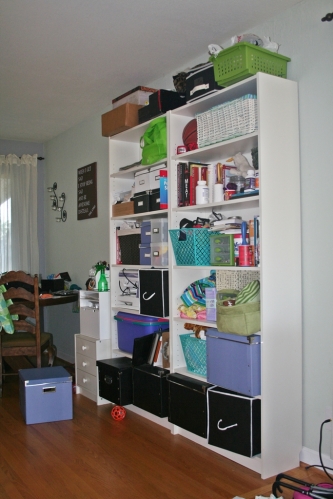
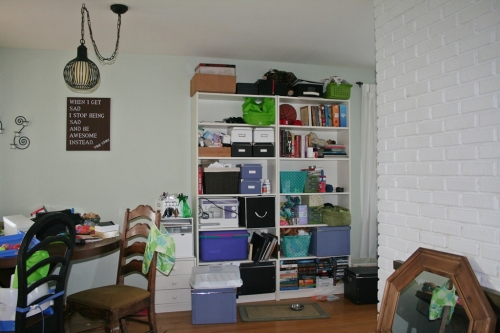
They hold a lot of stuff but they’re super messy. Here they are as seen from the kitchen/dining area:
Last weekend we made a “babyproofing” trip to Ikea, and we picked up doors for these shelves as well as some door inserts for the TV console. So here’s how the shelves look now:
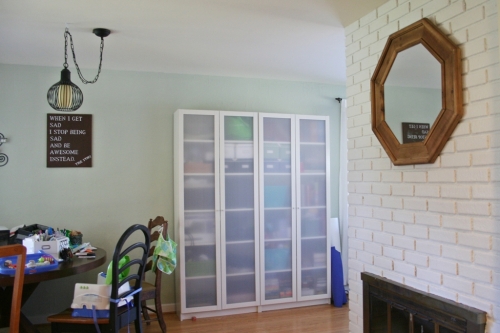
So much neater, though I had to find new homes for a lot of stuff that was sticking out too far to fit behind the doors. And so the “not enough storage” shuffle continues… We’re thinking of maybe trying to stick some sort of decorative paper behind the doors since they’re translucent and rather white and boring at the moment. We’ll see.
And perhaps you noticed the AWESOME mirror we have hanging over the fireplace now? A new Home Goods opened up nearby, so we stopped in and made a few purchases that I’m super pumped about. The mirror is one:
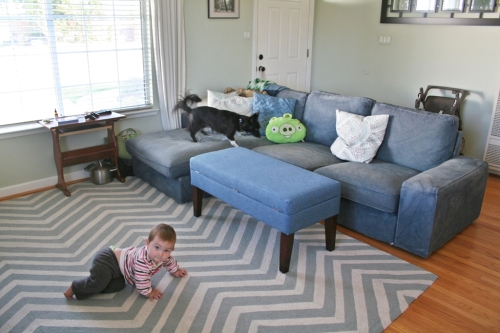
And we also got this great storage bench/ottoman which is a little too tall and a little too blue, but totally amazingly useful. We can set food trays on it super easily, I can vacuum under it, and it’ll be pretty nice for Dakota once she’s pulling up on things. I’m thinking maybe I’ll try reupholstering it once the cats inevitably claw it to shreds? it’s probably the easiest shape possible for a novice reupholsterer, so it should be a fun challenge:
 The white patterned pillows were also Home Goods finds, and I didn’t get a good picture but they go great with the couch and rug. Yaaaay pillows.
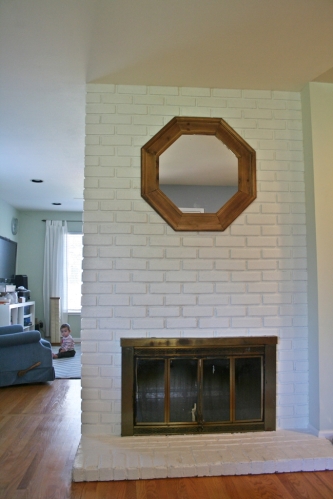
And to finish things off, here’s the living room as seen from the front door:
 I hung my biggest frame (cool picture of a waterfall) on this side of the fireplace. It looks a little sad and small, but I bet it would look great with a chunky mantel and a few candlesticks or something on either side of it. The bookshelf doors are looking pretty slick from this angle too, so I’m just all around in a good mood about our living space at the moment.
Next up, replacing the fireplace grate that’s begging to be pulled over, and finish up making the TV console all nice and baby friendly!
Quick Decorating
I was totally going to blow off my second post for this week, but it’s way too early to be failing at my two-a-week goal! But I’m just going to keep this simple.
I haven’t been feeling very inspired for decorations lately, but I’ve acquired enough over the past few years to have a whole storage tub labeled “Fall Decorations”. So right before heading down to LA I pulled the tub into the living room and suggested that Julie throw something together. Here’s what she came up with:

This built-in shelf is probably going to be the only spot for dedicated decorations at least until we get past the toddler stage, so I actually went in after she was done and squeezed some non-fall related stuff in to make room elsewhere in the house for more practical stuff.
Here’s the front patio:

Hopefully those pumpkins will actually get carved, because that’ll give me material for another blog post. 🙂 The chrysanthemums already lost all of their flowers, (sigh, I probably didn’t water enough after potting them) so I pruned them and they get to just be little bushes for the time being.
I’ll probably bring out the pumpkin head lights for the 31st, but seriously, I’m just not getting the decorating bug so far this year. So thank you Julie for making it happen!
And since I must include a photo of the baby, here she is this morning trying avocado for the first time. I’m not sure she likes it. (yet)

Yellow and Grey
Julie has been living with us for almost a year now, but I never got around to talking about her oh-so-stylish room makeover, mainly because it’s in that perpetual “not quite done” state. But it’s pretty darn close to done now, so I figured I should talk about what we did before I forget all of the details completely.
Our second and third bedrooms are both pretty small, and the one we stuffed Julie into is almost exactly 10 feet by 10 feet square with a built in closet cabinet thing. Until she moved in it served as our dumping ground for random household items and off-season clothing. I couldn’t find a picture, but hopefully you can imagine a room full of random junk. I did however find a picture of the ceiling on my phone, which is nice because pretty much the first design decision Julie made was to put yellow stripes on the ceiling, with grey walls. This ended up being a great compromise because while Julie loves bright wall color, the rest of the walls in the house are pretty muted. But a lot of people don’t even notice the ceiling right away, so it’s a nice surprise when you do finally look up at it. Here’s the blah beige before:

And here’s the finished look:

Julie actually picked out the curtain fabric first, (it’s a citrus-y lemon and orange pattern) and then we compared paint samples to the fabric until she found the right color yellow paint. Once we had the yellow, Julie decided she wanted light grey on three walls and dark grey on the final wall. Works for me…
When we pulled down the flourescent tube light we discovered that whoever had installed it hadn’t bothered to put in an electrical box. Tsk tsk. So as usual, the simple “replace the light” step became slightly more complicated. Ah the joys of home ownership. 🙂 The new light is one of those inexpensive paper things from Ikea, and it works great.
Onward! Here’s a shot of the room as seen from the doorway:

The bed frame is a simple DIY made pretty much entirely out of 2×4’s. The legs are painted black and we have plans to upholster the horizontal boards with yellow fabric. Thus the weird half-finished white batting and bare wood styling that is currently happening. 🙂 There isn’t really room in here for a dresser, so Julie got a bunch of fabric bins that fit nicely under the bed. I’m too lazy to spend much time tidying rooms up for pictures, so sorry Julie, some of your clothing is showing. 🙂 In fact all I did before whipping out the camera was open the curtains, crazy woman actually makes her bed. Weird.
The black and white prints on the walls were something I suggested that Julie try after reading about using engineering prints for big, inexpensive artwork. You can read through for details in that link, but basically it worked great for Julie. She ended up buying a 1″ thick white foam board from the hardware store and using red duct tape as the edging, since this stuff didn’t cut as cleanly as the pink insulation board that was used in the link. I like that she has something big and bold hanging over her bed, and I like even more that it’s made out of foam and super lightweight. When you live in earthquake country you have to take these sorts of things into consideration.
Moving along, here is a shot of the side table by the window:

We found the table and the lamp at the thrift store. The ittiest bittiest of side tables was a must for this room. 🙂 And you can see the citrus pattern on the curtains pretty well. Don’t ask me, Julie picked it out.
Here’s the other side of the room, on the wall with the doorway:

The desk is juuust deep enough to hold a laptop, built out of plywood and 1×3’s, and painted with the same stuff we used on the ceiling. Here’s how it’s supported:

Just some brackets against the wall and two desk legs that we bought at Ikea. The chair was a thrift store find. It looks pretty nice in the pictures but it’s actually badly in need of refinishing. Someday… maybe…
The little black bookshelf (as well as lots of random odds and ends on the desk and shelves) was something we had owned for awhile and were getting ready to donate, so Julie was able to grab it for free.
And here’s the final wall:

We keep going back and forth on the closet. The stain may very well be original to the house and is actually in fairly good condition. I’m not particularly fond of stained wood though, and it doesn’t make much sense to me considering how modern the rest of the room looks. We’ll probably leave it alone because we’re lazy and we have plenty of other things we’d like to get done.
The mirror is just something Julie grabbed (yet again) from Ikea. We could probably DIY some sort of snazzy modern-looking frame for it, but I actually like the simplicity of it, especially considering all of the stuff that’s going on everywhere else in the room.
That’s everything! So maybe some day I can do a post on upholstering the bed frame, but maybe we’ll just never get to it.
Chevron Rug
I’m just going to warn you up front, this entire post is pretty much just pictures of our new rug. Moving along…
After dyeing the couch and having it come out a surprising but not unwelcome shade of blue, I was left with the dilemma that the cheapo synthetic rug combined with the no-longer-white couch was too much dark colors in one room for me. Observe:

We weren’t particularly attached to that rug, it was really just the cheapest 8×10 rug we could find in a hurry that fit our style. It was pretty thin and I wanted something thicker and squishier anyway, since I’m imagining that there will be more time spent on the floor when we have a little one that starts crawling. I had been eying some wool rugs on Overstock and, after obsessively reading every single review and worrying about buying a rug that I had never seen in person, we finally pulled the trigger. Here it is:

Yup, it’s blue and white chevron. The room has suddenly become a lot more blue. I think the minty green walls still work pretty well though. Here’s the other side of the room:
![]()
The Lazy Boy now matches! It had been living in the spare room since it clashed with the old colors, but I had been wanting to bring it out anyway since it seems like a good “chilling with baby” type of chair.
I really like how the stripes in the rug aren’t exactly the same size, it fits with our relaxed style. Here’s yet another angle of the rug:
![]()
I’m debating adding a carpet pad underneath for extra squishiness, but for now it seems fine by itself. The rug is actually “looped” rather than “tufted”. I didn’t really know what that meant, but it’s exactly what it sounds like. Unfortunately it means that the cats can pull up loops if they use it to scratch their claws. Though they were also pretty good at pulling up tufts on the old rug, so it’s not unexpected. Here’s my attempt at a detail shot of the loops, with a few that the cats have already pulled loose:
![]()
Eh, it’s just a known hazard of owning cats, so I’m not terribly upset. At least they aren’t peeing on it. 🙂 Generally if I get annoyed at pulled up tufts/loops, I’ll just go over the rug with a pair of scissors and snip away the bits that are sticking out. Presumably this will eventually lead to bald spots, but hopefully that will be far enough in the future that I’ll be jonesing for a new rug by that time anyway.
I should mention that the rug does shed a bit, which was pretty clear just from reading the reviews before buying it. It doesn’t shed nearly as much as our pets shed though, so I’m not really vacuuming any more than I already was just to keep up with the pet hair. So all in all I’m very happy with the rug on all counts.
Quick, Cheap Advent Calendar
We procrastinate on everything, so on December 3 when I was suddenly struck with the idea of making our own advent calendar, (I blame Pinterest) I was not at all deterred by the fact that we were already 3 days late. So I stopped by the drugstore and picked up $4 worth of holiday greeting cards and $10 worth of chocolate. My plan was simple enough: number the envelopes and tape them up on the wall in the shape of a tree.

I was hoping for more colorful envelopes, but for $2 for a pack of 15 cards/envelopes, I’m not complaining. My backup plan was to pull the greeting cards out each day to slowly make the tree more colorful. Here’s how it looked right after I finished my taping job:

The white envelopes each have an individually wrapped chocolate square in them. The red envelopes were too small to fit any chocolates into. Here’s how it looks today:

And here’s a wider view. It’s watching benevolently over our dining table:

Yup, and there’s our excuse to add a little extra chocolate into each day this month.
Halloween Decorations
This post is a little late, but you know, that’s me. 🙂 We managed to start decorating a little earlier this year than last year, and we managed to add a few more decorations this year. Mostly we decided that our front walk is a bit dark, so we found some light-up decorations to spice things up. We put up some orange and purple “xmas lights” lights over the garage:

They were only up for for less than a week, but since we left up the gutter hooks from last xmas, they were very quick to put up and take down. And it gave Dave and excuse to see how the solar panels are doing.
Our other illuminating addition was a series of cheap plastic light-up pumpkin heads on stakes:

They served their purpose admirably. And that reminds me! I transplanted the allysum and chrysanthemums to border the front walk here. The chrysanthemums had already been transplanted earlier this year in around the lavender, but the lavender suddenly decided to have a growth spurt so things were looking crowded. They’re still going strong, though they are overdue for some deadheading. Hurray for “annuals” when it never freezes. 🙂 Here’s the front walk from the other end:

That one allysum in the front looks like it won’t survive the transplant. And I need to sweep the walkway. Sigh. But everything was looking pretty halloweeny, huh? Here’s a closer view of the front patio:

It looks more or less like last year, though we did upgrade the ghosts from the “rags and sharpie” things we had before:

And we did add a last-minute giant spider web to go with our giant spider:

I wish I could say I was talented enough to tie together a spiderweb out of yarn, but I found it in the clearance section already pre-tied. Much easier.
Anyway, we had a good halloween and we have some leftover candy to enjoy, so we’re all happy here.

Dyeing a Whole lot of Couch
We finally decided to replace the old “bachelor pad” couch, the main virtue of which was that it was extra long and could seat four people comfortably. To maintain the extra seating capacity we wanted a sectional, and after some debate we settled on the Ikea Kivik. I’ve seen/heard some people decide against it because they think it looks boxy and cheap, but we really like the functionality of wide, low arms and the width was just right for our living room. I also really liked the idea of removable slipcovers, but was really frustrated that the next cheapest slipcover after white was $70 more expensive. In fact, the covers that were my favorite were actually $150 more expensive than the white slipcover. Now, we know perfectly well that we aren’t really white couch people, but I was annoyed about the price difference. So I figured we’d get the white slipcover, try it out for a few weeks, and then maybe dye it or use it as a template to make my own.
I have to apologize here, as I didn’t get a before picture of the white couch. But after just a few weeks we had already spilled a few drops of wine, and Loki had managed to steal a slice of steak off of my dinner plate and eat it, juices dripping on the couch. Ewww. And of course let”s not forget that we have three animals with black fur and one with gray fur. Living with the white couch was a good learning experience overall, as it showed just how quickly the couch got dirty, something that was difficult to discern on our dingy old couch. Anyway, I decided to move forward with my dye plan. The biggest problem? There was a LOT of fabric to dye. Observe:

it took two very full loads in the washer to clean all that fabric. I was a bit nervous about trying to separate the pieces and dye them in two or more batches, so I started researching how best to attempt one single massive dying effort. Multiple Google searches kept leading me back to “fiber reactive dyes”, with many recommendations of this website in particular. I browsed around for awhile, and after a week of waffling, said “what the heck, adventure!” and I went for it. Our supplies:

I didn’t actually take the slipcover off of the couch until the day we had designated to dye it, so I was totally guessing on the total fabric weight when I placed my order. From the site I listed above I got 8 ounces of dye powder in “Gunmetal Grey”, which ended up being about the right amount for what ended up being 15 lbs of fabric. I figured we could work with pretty much any grayish end result, and I was predicting a high likelihood of fudging the process, and thus a high likelihood of not actually ending up with the exact intended dye color. I also ordered Calsolene Oil, which was listed as optional, but recommended for large amounts of fabric. (Umm, yes, that applies to us.) My final online purchase was two pounds of soda ash, which as I understand it makes the entire solution very alkaline and helps the dye fix to the fabric. Here I miscalculated and did not get enough for the amount of fabric we were working with. Ah well, close enough for our fudge-tastic project.
I did not order the salt online, which turned out to be a bit of a mistake, because I foolishly thought it would be easy to get non-iodized salt in large quantities from the grocery store on the planned dye day. We went to several grocery stores, Target, and Walmart, to no avail. We finally found some boxes of non-iodized kosher salt, and bought them up. If I had been willing to delay a few more days I could have easily ordered the salt online… I hear pickling salt is actually the best option for this sort of project. But I was impatient, so we worked with what we could find. I didn’t try very hard to figure out the volume conversion from regular to kosher salt (kosher is much coarser) but we figured to just go with three 3lb boxes and call it close enough.
We had one last very important piece of equipment:

We were originally going to buy a 32-gallon trashcan, but when we got to the hardware store and saw this big storage tub (with wheels! and a lid!) we realized that it would be nice to buy something that would be useful even after our project/experiment/potential-failure-in-progress was complete. So we ended up with this lovely 45-gallon tub, that will move on to probably hold lots of gardening supplies. It still wasn’t technically big enough, since we were supposed to use 3 gallons of water per pound of fabric. Filling say, a 60-gallon tub with 45 gallons of water probably would have been best. But we were already calling a lot of things “close enough”, so we figured this would just be yet another thing to fall into that category. Oh, and we also bought a nice sturdy wooden dowel for stirring.
On to our process. We pretty much followed the steps here, but I want to add more pictures to this post, so here are the the steps we took… First we dissolved the powdered dye in warm water:

We used a convenient bucket that we had lying around. From what I managed to research, this dye is supposed to be fairly non-toxic, but in general it’s probably a bad idea to inhale strange powders, so we both wore dust masks and I stayed far away aside from this one quick picture. The powder didn’t really blow around or anything, but it never hurts to be overcautious.
Once the dye was all dissolved, we poured it into the tub, which we had already filled with water:

We also added the Calsolene Oil at this point, though it didn’t make for a very exciting picture. After that, we added all three boxes of salt:

And then, finally, we added the fabric:

From here it started to get pretty exciting, because 15 pounds of dry cotton is “whoa heavy” once it’s completely wet. In hindsight, we think we might have had more stirring/agitating success if we had used some long rubber gloves and just used our hands. Or maybe putting so much fabric in a too-small tub would have been pretty unmanageable no matter what we did. Well, we refused to give up, so we took turns doing our best to “stir gently, but frequently, for 20 minutes”. At that point, the fabric was a purplish-black shade:

The beige-ish color in the dye bath in the picture above is actually a reflection of Dave and our house. The white parts of the fabric are the lining and the velcro, none of which are visible once the slipcover is attached to the couch and the cushions are in place.
I didn’t take any more pictures since it was pretty much more of the same. Dissolving the soda ash in a little water caused some brief geeky interest, since I guess it must be an exothermic reaction and produced some noticeable heat. After that, we slowly poured the dissolved soda ash into the tub, attempting to stir and disperse it evenly. We then continued to trade off turns of some tired, half-hearted stirring. The directions called for “30 minutes for light colors, 1 hour for deep colors” at this point. I think our “Gunmetal Gray” qualified as a deep color, but after 30 minutes the sun was setting and we figured we’d be okay if the color didn’t end up as deep as originally planned. Have I mentioned that our motto for this project was pretty much “eh, close enough”?
Anyway, we weren’t done yet, because then we spent quite a bit of time with the garden hose trying to get the excess dye out of the fabric. After a while we moved to the laundry area and ran the fabric in two loads with a cold wash and no detergent. And then we did it again. We may have even done a third cold water wash, but eventually we gave in and ran the final hot wash with laundry detergent. (In case you were wondering, the washing machine did not change color at all, so yay for that.)
Once the fabric was finally done washing, we quickly realized two things.
- The fabric had dark lines and a somewhat “marbled” look to it, because we weren’t able to keep it from folding and bunching up when we stirred while it was dyeing.
- It was blue! kind of a slate blue color.
So we scratched our heads for a bit and shrugged, and proceeded to wrestle the slipcover back onto the sofa. It took me a few days to decide if it just looked silly or what, but pretty much everyone else that’s seen it claims that they really like it. I’m still adjusting, because our color scheme in the living room up to this point has been mostly shades of green, with some white and black and a little red here and there. The minty green walls go with the new couch color just fine, but some other things, most notably the rug, are going to have to change. I’m not too sad about the rug, since it’s pretty thin and scratchy, and we’ll want something more crawling-baby-friendly within the next year anyway. Anyway, enough blabber, here’s the finished result:

I think in this picture you can make out the “marbled” texture especially along the arm closest to the camera. And of course you can see just how very not-gray it is. Actually, the rug doesn’t look too clashy in this picture. I think in person the overall effect is just too many darker colors competing with each other. Ah well. Here’s the view looking back at the TV:

As a point of reference, the front door is on the right-hand edge of the picture above.
Hm, looking at that picture maybe it makes more sense to center the rug on the couch instead of on the TV, since right now it just looks like the couch is hanging off the end randomly. Thanks, blog! Again here you get a pretty good view of the marbled look. I’m not even sure if “marbled” is the right term, though I did try to Google to see if there was an official term for it. It’s kind of a single-color tie-dye effect, I guess. Anyway, here’s one last shot with Loki in one of his preferred spots:
That spot where he hangs out along the bottom of the couch gets covered in black fur quite quickly. It was very noticeable with the white fabric and not at all noticeable with the blue. That’s more than enough of an improvement for me to call this whole experiment a success. 🙂 And now I have a good excuse to budget for a new carpet, so double success. Oh, and I guess I should list out a rough breakdown of what we ended up spending:
- Dye – $12
- Soda Ash – $3
- Calsolene Oil – $5
- Textile detergent – $4
- Shipping on the above – $9
- 9 lbs of kosher salt – $9
- Tub – $30
- Wood dowel – $3
That totals up to $75, though $30 of that was the storage tub, which has moved on to the non-watery purpose for which it was originally designed: storage. All in all, not the cheapest weekend project ever, but overall I’m really happy to have a functional, non-white couch. And we’ve given it a slightly quirky, unique look to make it all our own. 🙂
Bedroom Curtains
When our bed was pushed up against the window, our plan had been to put up some sort of decorative wood paneling on tracks that could be closed to completely block the light, sort of a faux headboard. But now that we’ve rotated the bed, we’re thinking about some sort of more traditional headboard, and with that, window paneling made less sense. The pictures of the finished bed made the window look particularly sad and bare:

So we headed out to the store for curtain fabric. I wanted to stay in the blue/white/brown color scheme, and I didn’t just want a single flat color. But I didn’t want too small of a pattern since our bedspread already has a fairly small pattern on it. Unfortunately, the only patterns we were really seeing in the right color schemes were stripes, and with blue and white that just looks way too nautical-themed for my taste. We were close to giving up entirely when we found this fabric:

Perfect! Or at least, close enough for me. I’m really not very decorative/creative in this realm, but this fit the color scheme and the requirements of 1) not too small of a print and 2) not nautical. So we bought five yards and carted it home, where I got acquainted with my new best friend, the rolled hem pressed foot:

I hate hemming. I’m convinced that I’m somehow making it harder than it should be, but I can’t seem to find a shortcut. So whenever I give in and hem something, I end up spending hours measuring, folding, pinning, ironing, folding again, ironing again, and then finally sewing. And that’s for each edge. But a few years back during one of my web searches for shortcuts, I stumbled across this gem of a device and immediately ordered one. It arrived and sat untouched in its package for a long time while I avoided any and all hemming. But I whipped it out today and, somewhat uncharacteristically of me, I actually practiced a bit before trying it on my actual fabric. It’s a good thing too, because it took a bit of practice to get the hem started. You have to make your best attempt at pre-rolling it and starting an inch or so down from the end of the fabric. But hopefully you can kinda see in the picture (sorry about the bad focusing) that the fabric is feeding into the front of the presser foot, rolling over on itself, and coming out the back as a very small, tidy hem.
I wont say it was easy as pie, since I still managed to sew a few wrinkles into the hem, but it’s so neat and narrow that you’d have to hold it a few inches from your face to see the imperfections. And while it still took a decent chunk of time to sew 12+ yards worth of hems, cutting out all of the ironing time made a huge difference. So yeah, I’m pretty proud of myself. 🙂 Here’s a gratuitous shot of me being industrious, either that or Dave really wanted to take a picture of our flowers:

Perhaps someday I’ll have a better spot to sew than the dining room table.
Moving along, the next dilemma was how to hang the things. We wanted the hardware to be pretty nondescript, so we decided we wanted white rings and rod. Internet searches quickly revealed that, especially for a six foot wide window, the most economical option was Ikea, even when you counted the $5 bridge toll it would cost us to get there. So a trip to Ikea (and a few extra dollars spent on “oh we could really use _____”) later, we had a white curtain rod, white brackets, and… Off-white ring clips. Sigh. You actually can’t tell that they’re off-white unless you know to look for them, (and who stares at curtain rings?) but if it starts to annoy me I’ll just spray paint them white. The finials on the rods were pretty silly looking, so I’m thinking I’ll pick up some wooden or plastic spheres at the craft store and make my own.

I still haven’t sewn the bottom hem on the curtains, and I may actually do the more laborious measure, fold, iron, etc method since the fabric is so light and a little extra weight on the bottom should help them hang straight. Here’s a nighttime shot:

As usual, sorry for the bad picture quality. Window photos are tough for clueless non-photogs like me, but I think I might be improving ever so slightly despite myself…
On the light-blocking front, the new curtains just barely cover the whole window when they are closed. I’m planning to eventually add a layer of (white) blackout fabric behind the patterned fabric to make these curtains fully functional at light-blocking. The stuff I’ve seen online that sells by the yard is 54″ wide, so I’m debating maybe leaving it that wide and hanging it so that it looks like there’s a stripe down either side of the patterned fabric. But maybe that will just look silly, so I’m leaving my options open.
A few house presents
My sister Sharon got into the housewarming spirit with my xmas presents… First we have the “I’d never buy it for myself, but it’s totally cute” lawn gnome:

(I can't decide if the anime eyes are creepy or not...)
I set him up between the two lavender plants right where our driveway meets our front walk.

He looks pretty happy there. But then he got rained on that night, so he may be less happy now.
Sharon also got us a “I’d totally buy this for myself but I’d never admit it” Angry Birds pillow:

The camera loves this thing. I even post-processed it to make it look LESS neon green...
Anyway, we also got lots of other awesome stuff from various family members, so don’t feel too unloved, family. I just can’t really justify devoting a post to how much I love chocolate. The more practical presents will probably be making appearances soon though. 🙂
Holiday Decorations, Part 2
When I saw this light-up penguin, I knew we had to have it:

(Loki was a bit freaked out when he first saw it.)
I wish I could say I was really cool and made it myself, but no, it was just a totally-worth-it splurge. 🙂 It has a strand of white lights strung up inside to light it up, and we’re contemplating doing some surgery and replacing the old-school lights with LEDs. It shouldn’t be all that hard, the way they’re attached.
And then there’s our monster wreath:

(I'm pretty sure there's still a door behind it somewhere...)
Most of the wreaths we were seeing in stores were either pretty small (and by small I mean normal-sized) or already decked out in red decorations. But I held out, and finally found a wreath I approved of. I added the silver and blue parts, and we hung it!! It hasn’t fallen off so far, and the door still swings normally, so I’m calling it a success. here’s the front of the house all put together:

(And I'm finally getting better at photo editing, so the entire front patio isn't gloomy shadow.)

