Category Archives: building
Full-Sized Loft Bed DIY
We’ve just had a full-sized mattress on the floor of our kid’s bedroom (really it’s just the playroom, shhhh) from the start. But I’m all about maximizing space, oh and I had a loft bed growing up so I’m sold on their fun-value. Thus the whirlwind decision to completely custom build a loft bed frame. And here it is completed!!

The room is pretty small, so I knew I wanted to save as much space as possible, with two sides bolted into the wall rather than freestanding on 4 legs. On the flip side I loved the idea of a hidey-hole and some different areas for playing and hanging out. Thus the idea to have stairs leading up to a platform, and then just a short ladder going the rest of the way to the bed.

The stairs have storage cubbies underneath of course.

And under the platform is the hidey-hole. I got some glow-in-the-dark stars for us to eventually add in there, and it could probably use some oversized floor pillows, but for now it’s just a blank slate.

I scoured the internet and Pinterest for ideas on how to construct the whole thing. I got some great inspiration, but in the end I pretty much made it up as I went along. Here are a few progress shots on the construction, but honestly even contemplating writing up a full how-to is overwhelming, so I’ll pass on that for now.
The initial bed platform:

Adding legs:

Bed and lower platform each bolted to the wall:

Adding trim to the stair cubbies:

The room already had yellow stripes on the ceiling, but Dakota loves purple. That back wall used to be a dark gray, but it was in need of some major touch ups before we started this project. So we decided to keep it dark but repainted it purple instead of gray, and then worked the yellow, purple, and white in for a super-colorful piece of construction!
I just plopped the road rug and some existing toy bins down for now, I guess we’ll see how this space evolves over time. Maybe some shelves or a small art table? The one thing for sure that needs to happen is some new lighting. I’ve already bought a flush mount ceiling light to replace the current drum shade, and we’ll probably get some sort of tube or twinkle lights for under the bed and inside the hidey hole.

And we’re contemplating some sort of covering/guardrail for the window, probably not too surprising considering the platform location and height. Also I need to give the closet area on the opposite wall a makeover; I’m leaning toward painting the trim white and the interior purple, kinda mirroring the stairs. Also, since I ditched the clunky closet doors, maybe I could add a curtain of some sort to hide the mess when we want to pretend to be tidy people. 😉

Bonus: the big green rug that’s been in there forever doesn’t fit anymore (it’s probably for the best because despite being very high quality, it really didn’t match the yellow and purple) so we’re trying it out in the living room. I’m expecting it to be ruined in short order like all our other living room rugs, but who knows? For now it looks great.

Helper Tower
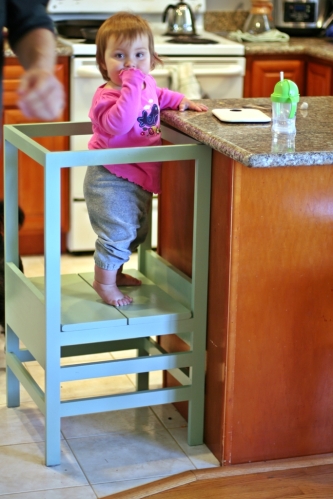
Various companies make these things with names like “Learning Tower” and “Kitchen Helper”, and they seem to generally cost between $100 and $200. But DIY plans exist, and this one in particular seems quite popular and successful.
Of course me being me, I immediately started modifying the plans. I skipped the curved rails and lowered the overall height to 34″ so it would fit under the counter overhang and be more out of the way when not in use. Since it’s shorter, I skipped the highest rail for the platform floor to rest on, so hopefully Dakota can climb in without bumping her head.
At that point I measured out how many boards I would need, and realized that if I used all 1x2s instead of having some of the horizontals be 1x3s, I would only need four 8-foot 1×2 boards, plus one 6-foot 1×8. That brought the cost of lumber down to about $26. I even shelled out for the “select pine” instead of my usual rough-cut furring strips. Fancy.

I screwed all the joints with pocket holes using my Mini Kreg Jig, which I’m liking quite a lot, and I’m not regretting getting it over the full Kreg Jig setup. The Kreg face clamp that I splurged on was pretty key though, and I’m using it for way more stuff than just pocket holes, so it was a good purchase. I have some more normal screw-to-tighten clamps, but they’re 12″ wide and I think I need at least one 18″ wide clamp if I do another project similar to this one. I was able to make it work with what I have though, i think attaching the two sides with the 1×8’s first was the key trick:

Just bringing the boards home my overbuilding self was worried that this would end up too flimsy, but it’s solid like a rock! The 1x3s were definitely not necessary.

For now the platform floor sits on the tallest rail, but we can lower it as Dakota gets taller. I didn’t cut it to be super snug, but it doesn’t move at all once I set it in place. I pulled it off in this picture so you can see how it’s not attached:

Dakota figured out how to push the thing around the kitchen right away, but she hasn’t figured out how to climb in and out of it yet.

She’s super happy when I just set her in it though. It was getting really tough to make dinner or clean dishes because she always wanted to be up in my arms so she could see what was going on. Now I’m already way more productive.
We haven’t had any issues with her stepping sideways and slipping, in fact she looks very coordinated and confident with her hands on the rails, I almost forget that she can’t stand/walk unassisted yet!

Just briefly, my mods call for the following cuts… Cut one 34″ piece and one 16.5″ piece each off of the four 8-foot 1×2 boards. Then cut ten 15″ lengths out of the remaining 1×2 pieces, you should be able to fit three per board, and you have a ~30″ piece left over in case you crack a board or something. 🙂 Then cut two 18″ lengths and two 16.5″ lengths out of the 1×8, and you have all your pieces! You can pretty much follow the original plans that I linked to above after that, just skip the rail that’s 19″ off the ground. Here it is all screwed together, but before I filled the pocket holes with wood putty:

I painted this with leftover matte paint from a tester pot I had purchased (I’m probably going to be painting the spare room that color). It’s the darker shade on the same color card as our living room walls, so I figured it wouldn’t clash. I sealed it with some nontoxic glossy topcoat stuff I already had. I used the same paint plus sealer on the busy board, and it’s holding up great so far… The helper tower is going to be getting a lot of abuse though, so we’ll see how it goes. It wiped up great after a run-in with some smushed strawberries, so that’s promising…

Overall I’m just amazed at how quickly and easily this project came together. The painting was by far the most annoying part, but then again I’m not a very patient painter. I’m actually going to try making another one for a friend, so hopefully my success the first time around won’t turn out to just be beginner’s luck or something.
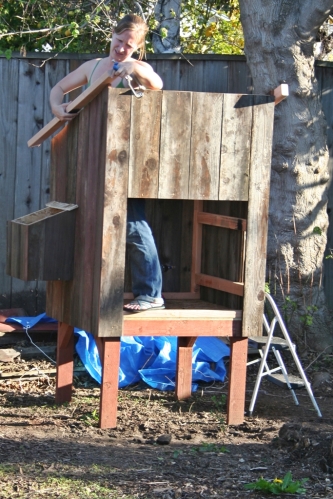
The Coop!
The chicken coop is… functional!

I won’t quite declare it done because it needs a roof that’s a bit more weatherproof. We’re also going to dig in a mesh apron around the base to discourage digging predators, and I’ll probably paint it and add trim to pretty it up at some point. But the chickens are moved in and doing great, so yes, it’s quite functional. To refresh your memory, here’s my post with my original plans. Picking up from there, I got the frame for the coop built and moved it into place in our back yard:

I made the nesting box by just gluing some OSB together:

And then I started adding the old fence slats to the sides. You can actually see the pile of slats that we inherited when we bought this house in the background of some of these outdoor photos. It turns out we had 4(!) different varieties in that pile… some had lapped sides instead of tongue and groove, some had V-shaped grooves, some had U-shaped grooves, and some were a good 1/4″ thinner than the rest. Sigh. It was an adventure finding enough pieces in good enough condition that actual fit together for each side.
For the sides that sloped at the top, I cut the slats longer than needed and attached them, then had Dave come through with a portable circular saw to cut the diagonal line all the way across:

Then I attached the boards to support the roof directly onto the siding, thus avoiding having to figure out any angles for miter cuts:
The roof for both the main part of the coop and the nesting box is just OSB for the moment. I’m going to add some sort of vinyl roofing or something eventually, but it rains so rarely here that it isn’t much of a priority at the moment. Although it is actually raining as I type this, so I guess the joke’s on me… Anyway, here is the coop with the siding completed, roof attached, and even the doors in place:

Here’s the inside as seen from the main door. That’s the nesting box in the back, and the roost overhead. For the roost I used a big wooden closet rod from when we re-did our closet, but I may need to rethink it since I don’t think the chickens are actually using it currently. I’m pretty sure they’re both just sitting in the nesting box to sleep at the moment. Well maybe the rod won’t be too high once they’re a little bigger. And they won’t be laying until July so I guess it’s not a big deal if they sleep in the nesting box for now…

After finishing the coop, it was on to the run! I ran 2×4’s along the ground (we’ll see how long they last…) And even unrolled the hardware cloth around the 2x4s so the chickens could get some sun while I worked:

Unfortunately I was way too focused on the getting the run put together to take progress pictures, but I attached 2x3s to make a frame and then painted them with some white exterior paint I had. Since they aren’t treated I’m hoping the paint will help them last a little longer…
I did get this one picture of Dave helping me attach the last of the hardware cloth. It was a bit of a pain, though we found that screws and washers worked quite well to get it attached, and hopefully they’ll keep raccoons out…

Here’s a shot from the end of the run looking back towards the coop:

The entire end is actually a door so I can get into the run if needed:

I put hasps and twist-lock carabiners on all 4 of the outside doors to the run and the coop. The twist carabiners are pretty stiff, I have to work at it a little to get them open, so I hope they’ll stump the raccoons.
Here’s the other run door, it’s to access the food and water, which hang underneath the coop:

And here’s the “pop door” which allows the chickens access to the run from the coop:

Hopefully you can see there’s a string running from an eyebolt in the door to a bolt high up on the coop to keep it open. This allows me to open the pop door without having to actually go into the run. Here’s the pop door when it’s closed:
 I drilled a hole through the frame and added another hole in a board on the other side of the door. The plan was to have some way to secure the dowel in place, (perhaps yet another hasp that closed over the outside hole?) but for now I give the dowel a good twist and it’s actually quite a tight fit.
So that’s it! Yes, we still need to do the anti-digging apron, a better roof, a window for more ventilation, and perhaps some paint, but for now I’m taking a break. Whew! Here’s how it looks from across the yard:

Maybe I shouldn’t paint it, it blends so nicely! In person the white run with the unpainted coop looks a little weird though. Hmmm.
For posterity and anyone else trying to figure out if this is something they want to try, here’s a breakdown of costs:
- 6 Pressure treated 2x4s – $28 (3 for the coop platform, 3 for the base of the run)
- 16 regular 2x3s – $26 (8 for the coop walls/roof, 8 for the framing for the run)
- 1 4′ x 8′ sheet 7/16″ x OSB – $9
- 2 25′ rolls of 2′ wide 1/2″ hardware cloth and 1 10′ roll – $70
- 4 hasps, 4 carabiners – $25
- 5 sets of exterior grade hinges of various sizes – $30
- washers for securing the hardware cloth – $9
- Exterior grade screws of various sizes – maybe $10?
- Fence slats, paint, primer, closet rod – already owned
The hardware cloth total includes enough for a two foot wide apron around the whole thing, which adds a lot to the cost. Hopefully nothing will eat my chickens though!
 I think they agree. 😉
Chicken Coop Plans
We have chicks!

But they’re actually not that exciting at the moment, so this post isn’t really about them. It’s about the chicken coop that I need to have ready for them in about a month.
They say you can build a chicken coop out of pretty much anything, especially here in California where it rarely gets below freezing or above 80 degrees. But our suburban lot is less than a quarter acre and we share fences with 5 different neighbors, so I want to have something neat and tidy looking to hopefully minimize the likelihood of complaints as much as possible. I also figured that trying my hand at a nice-ish little coop would be a fun project, and maybe good practice for a future kid’s playhouse or something.
I did some poking around the internet, and holy cow are there tons of gorgeous DIY chicken coops out there! I did my best to keep track of what would work best for my situation, and then I started drawing up my own plans. Here’s what I came up with:

I wanted to keep costs down at least a little and also try to keep the thing from being super heavy, so I’m going with 2×3 studs and trying to keep the number of boards for framing to an absolute minimum. A lot of coop plans I saw used 2x4s AND plywood for the walls, but that sounded like crazy overkill for my situation. I also have a pile of old but serviceable fence slats in my back yard from a previous owner, so I’m going to grab a bunch of them to use as siding.
The chickens will only be “free ranging” around the back yard when I’m here to keep an eye on them, so I’m also drawing up plans for a secure run for them to hang out in during the day. I want to get the coop finished first though.
I managed to get a little bit of building done in the last few days, so here’s the base! I’m planning on sticking it directly on the ground. It’s made out of pressure treated 2x4s, so hopefully it won’t rot away too fast…

I’ve started work on the walls, but I’m going to need a day without rain (and with Dave available) so we can pull the table saw out and cut the plywood, since I’m using it for the floor and the walls will then get screwed down after the floor is attached.
Gotta get on it, the clock is ticking…
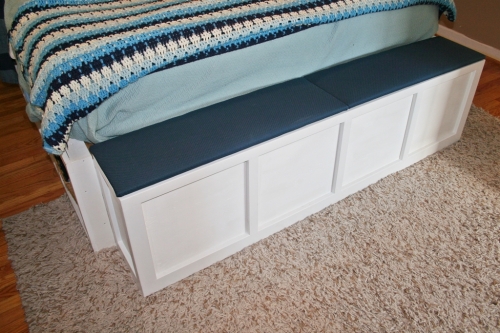
Storage Bench (For the Foot of the Bed)
We left the foot of the bed frame open so we could store rarely-needed stuff (like newborn supplies and maternity clothes) underneath. But for a while we had an old ottoman stuffed in the opening to give Loki a step so he could get up onto the actual bed. Here was the odd-but-functional setup:

I’ve had vague plans to make a storage bench to match the bed frame, and I was finally able to work on it, in fits and starts. I designed it to be not quite as wide as the actual bed, but at standard chair/bench height. By making the top in two pieces, I was able to cut everything out of a single sheet of 1/2″ plywood. Here are the pieces after painting:

And here they are assembled, minus the top since that gets attached with hinges at the end:

Pretty boring, so I trimmed it out with the same stuff I used on the bed frame: 1×2 and 1×3 pre-primed MDF:

Then there was some puttying, caulking, and painting to make it all look seamless. And then there was this:

The simplest upholstering job in the world, though I still managed to mess it up a lot. Anyway, I didn’t take any pictures, but after a whole lot of bent staples and some cursing, I managed to get the batting and fabric attached.
I found some awesome hinges that were small enough, with short enough screws, to work with 1/2″ plywood. Dave caught a picture of me screwing them into place:

Although he had a lot of “help” that he had to work around. 😉
 Anyway, this was actually a fairly quick project in terms of actual work hours, it just took a long time working around baby and life and such. Here’s the finished bench in place!

I feel like it looks a little odd being slightly taller than the actual bed frame, but I guess it helps keep the mattress tucked in, and it’s perfect sitting height. Here’s another view:
I mentioned that the top is split in two so I could fit it all on one 4×8 sheet, but I actually really like having two smaller pieces to lift, it works great. Here’s all the stuff I’ve already filled it with:

And here’s Dakota checking things out while Loki tries to snooze:

Our bedroom is pretty small, but this bench is narrow enough that we can still move around just fine. It’s such a relief to have even this much more storage space to work with. Now I’m debating making another almost identical bench for the living room under the big window. Hmmm.
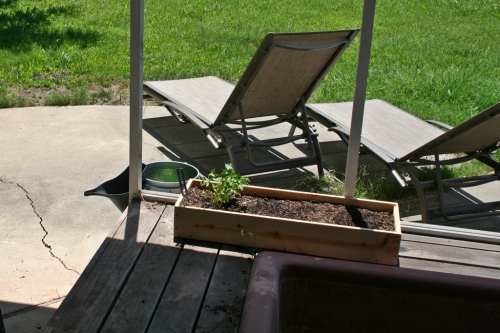
Another attempt at gardening
My first attempt at growing herbs in little pots two years ago bombed… because I didn’t water them enough. Now that I’m home full time though I figure I can probably keep up with the little daily things a bit better. This time I thought instead of pots I’d try for a mini square foot garden, more like the garden box I made last year with limited success. This time instead of fancy 2×4’s I realized I could save a few bucks and use cedar fence slats. I wanted to make two boxes that were 3 feet by 1 foot, so all I needed was five 6 foot long slats. Here they are after a few quick cuts on the miter saw:

The bottoms of the boxes were just two boards side by side, which left a convenient exit for water between them. I wish I could say I thought of that beforehand, but I was just being lazy since I didn’t want to have to cut plywood for the bottoms. I only realized my brilliance afterward. Here’s a completed box:

Not the most beautiful bit of carpentry, but whatever, it works. Maybe I’ll paint the outside or something if I decide they’re too ugly. In the meantime here they sit on the back patio:

I found the little metal labels on clearance at Target. Sadly there wasn’t a label for cilantro, which I’m growing from seed since I managed that with no trouble last year, even with my limited watering. The other two empty looking spots are for garlic (I just stuck a few cloves from my CSA in the ground) and green onions. I really have no idea if I’ll get anything from them, but I wanted to stick to stuff that I used really frequently, since I figured I’d be more motivated that way.
The bucket of water is great since I only have to refill it about twice a week instead of running to the tap every day. I fill the little gray watering can from it.
The whole setup is in easy view of the kitchen. In fact here’s what I see when I walk out the back door:
I know from past experience that if I don’t make this as easy as possible I’ll start to let it slide and then I’ll be left with yet another pile of dead plants and/or weeds. This way I at least have a shot of being successful. I guess we’ll see how it goes!
Bed Frame: Done!
I first mentioned that we were building a captain’s bed frame to give us storage space underneath it in this post. And I showed some progress photos of the building process here. But just to recap… neither of us really like dressers, so we’ve been keeping our clothing in baskets. Here’s how it’s more or less looked like for the past year:

(Note the bed placement, because it's going to change...)
The mattress was on the floor, and there were baskets with clothing all over the bedroom. So we bought a bunch of plywood, and every few weeks we’d get a tiny bit more done on our bedframe. The pieces pretty much took over the garage:

(This is after the plywood was assembled, but before the trim was attached.)
It was basically a masterpiece of procrastination, quite possibly our finest work. 🙂 But today, nearly a year after buying the plywood, we finally finished!!! I have to apologize ahead of time, because we set it up in the evening so the lighting was less than ideal for pictures. So here we go…
Here are the painted pieces after we moved them into the bedroom:

(We rotated the bed to make both sides more accessible. A definitely improvement, but you'll have to take my word on it.)
And then we connected the pieces:

(We almost ran out of screws, but I scrounged up some more. Crisis averted.)
Then we put a piece of plywood across the horizontal planks, to make it even more over-built. But I didn’t take any pictures at that point because it was really boring-looking. We also put one of those grippy carpet pads on top of the plywood to keep it separate from the mattress, which was also too boring to take a picture of. So clearly, let’s move straight to the after shots!

(At last. At last.)
Hm, it looks a little funny because of the open space at the foot. Well, the plan is to build a storage bench to match the bed frame, and that would hide the opening. So at the rate we’ve been going, it should actually be built sometime next year. 😀 Here’s a closer shot of the storage:

(ooooooh. ahhhhhh.)
The nightstand is a little away from the bed because otherwise it blocks that last basket. So I guess we also need to build floating bedside tables or something. Oh, and a headboard, now that the bed isn’t up against the window.
Anyway, I’m pretty happy with it, though I haven’t actually tried sleeping in it yet. I’m a little concerned that I’ll roll over to get out of bed and let the dog out at 4am and fall off because we’ve been sleeping with the mattress on the floor for so long. But I’ve managed to avoid that when we’ve been in hotels and such, so I’ll probably be fine…

Bed Building, Part 1
We have the table saw, at last… and we’ve had the lumber… for months now. 😛 So we’re finally building our storage bed. We’re basing it on this design from Ana White… except… well, we want a storage bench at the foot of the bed, so it makes more sense for the cubbies to go all the way down each side,right? So I started drawing and re-drawing… I was being really indecisive on dimensions, so the final deciding factor ended up being whatever dimensions managed to fit the most efficiently on 4×8 sheet of plywood. After much drawing and erasing, I had this:

Okay, so it’s basically impossible to see what’s going on. Ah well. Essentially we’re building two long/skinny platforms that go along each side of the bed, with 2x4s connecting to two across the middle.
First we cut all of the plywood. Then the next weekend we put the two platforms together. It was a lot of pre-drilling, gluing, and screwing, with some side discussions of the pros and cons of buying an air compressor and nail gun.

At any rate, all of the plywood pieces came together with just the normal amount of adjusting, aligning, and annoyed cursing. 🙂 Here it is all put together:
If you can imagine the platform on the left facing the other way and a bunch 2x4s connecting the two, you may be starting to see how our bed will end up looking. We already have basket cubes ready to be stowed away in each cubby, now we just need to finish! Next up: trim, wood filler, and paint.

