Monthly Archives: March 2013
Last Open-Walled Bathroom Update
I’m a little bored of taking pictures of wall studs. But I did want to document this process after all, and the drywaller is here today so this was my last chance to show the work we’ve been putting into this project up to this point.
First up, the doors, all framed! Here is a picture taken from right by our bedroom window. The closet door is on the right, the bathroom door is on the left:

This isn’t a load-bearing wall, so the big header boards (I believe they’re 4×6’s) are total overkill. But we just re-used them since they were in there originally.
Here’s the bathroom, looking in from the doorway:

Sorry for the picture quality… early morning camera work. 🙂 The shower is on the right, the toilet goes under the window on the left, and the sink will be out of the shot on the left. And Dave added insulation to all of the exposed exterior wall shortly after I took this. So at least this one little piece of wall will be warm in the winter, I guess?
And here’s the shower floor: (Oh man, so not exciting)

If you’re feeling really enthusiastic, you can compare it to this picture, which was how it looked before we moved the drain and added the curb and plywood.
Moving along, here you can see a bit of PEX tubing peeping up from underneath the house before it switches over to copper for the shower water supply lines:

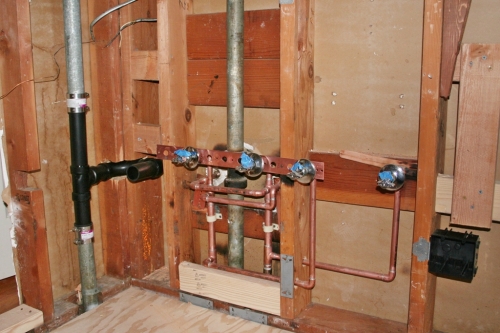
And here’s the rest of the plumbing work for the shower:

It’s going to have a rainfall shower head, so the attachment point is extra high. Directly below that we have the diverter for the handheld shower, which will come out of the wall to the right side of the main valve. On a side note, if you get a new valve installed, make sure you install the cartridge and close the valve, otherwise your hot and cold water will mix and you won’t be able to get any hot water ANYWHERE IN THE HOUSE. The plumber came back first thing in the morning and fixed it when we called and said we didn’t have hot water. He was very sheepish and apologetic.
Okay, so turning around back towards to bathroom entrance, here we have the sink! Or at least, where the sink is going to go:

Wooo. Pretty much right after I took that picture Dave crawled up into the attic and ran the electrical wire for the vanity lights and boxes, in case you were wondering. He’s been a busy bee! Here’s a closer shot of the new plumbing:
The new sink has two faucets and only one drain. The plumber was able to tie the new hot and cold lines into the ones that already go to the hallway bathroom sink on the other side of the wall. It looks like a crazy game of Pipe Dream, but hopefully it will all work correctly…
Unfortunately we weren’t able to tie the drain in with the existing drain for the hallway bath, so instead we were able to notch the studs and bring the old drain around the corner. yeah, that took awhile. Adventure! Or something.
It’s a “floating” sink, so we added some extra 2×4’s for blocking so all of our anchoring screws will be going into actual wood and not just drywall.
So that’s the state of things. The drywall is going up as I type this, and everything should get mudded and textured tomorrow. Hopefully we can start painting a day or two after that! We still need to buy a light fixture for the closet, but even without a light, once it’s painted we will have storage space again!!! Meanwhile, Dave will get to start on the final big project: tiling. Well actually first he gets to make a shower pan, so we will still be a single-shower household for a little while yet. Perhaps we could install the sink first?
Pregnancy Photo Shoot
My official due date was two days ago, but I’ve been assuming all along that I’d see it come and go with no baby. So I figured a good way to keep me from feeling too bummed would be to go out and take a bunch of pictures of my round self. I felt a bit weird getting pictures taken while attempting to lovingly caress my belly, but it was a fun afternoon distraction. What follows are a handful of my favorite pictures, though we took over 100 and narrowed it down to 30ish that we both liked. You don’t have to read the rest of the text for this post, it’s mostly just there to separate out to pictures a bit. 🙂

It was a good day for outdoor photography, cloudy but not cold, and just a little windy, which occasionally did weird things to my hair and my skirt. Ah well.

Dave enjoyed it because I think it’s been quite a while since he’s really had the time to take some artsy shots. I think he took a little while to get comfortable taking tons of photos, considering I think back when he took Photography in high school they had to develop their film themselves, so a ton of photos would probably be annoying to deal with. Ah… technology!

Unfortunately Dave is not so good with getting humans to pose and fixing their clothing and such. I guess I have high standards after many years of ballet photo shoots. It’s pretty hard to evaluate myself when I’m attempting to pose though, so a lot of pictures got rejected because my hair was doing a weird bump thing or my bra line was showing or whatever.

The park we went to is 5 minutes from our house and not particularly picturesque or anything. This just happens to be a good time of year for random flowers and greenery I think. The yellow flowers in the first picture above are actually just a huge shoulder-height patch of weeds that happened to be flowering this week. The wisteria in these last few pictures was a totally lucky find, it was growing over the fence of a private residence bordering the park. I hadn’t even realized that wisteria was in bloom yet.

Yes, we got a few pictures with Loki too.

I’m not quite sure what I’m going to do with these or the 30-odd other pictures I saved, I don’t particularly feel the urge to get an album printed or anything, especially since I’ve only bothered to post-process these 6 so far. I guess I could at least load them all to a Facebook photo album or something.
P.S. Mom- if you want any of these, I have higher-res versions that I can send you. 🙂
Floorplan Fun
This is just a little visual aid that I whipped up a while back using Floorplanner.
Here’s the master “suite” plus the hallway and hall bathroom as they looked before we started redoing the master bathroom:

The closet on the top left was a reach-in closet with sliding doors that we immediately removed. (I hate sliding closet doors.) There was a random open area between the closet and the bathroom that was just a waste of space in my mind. The bathroom itself had an itty bitty corner shower and an awkwardly placed linen closet with doors that blocked the main bathroom door when opened.
Here’s our new (well, in progress) layout:
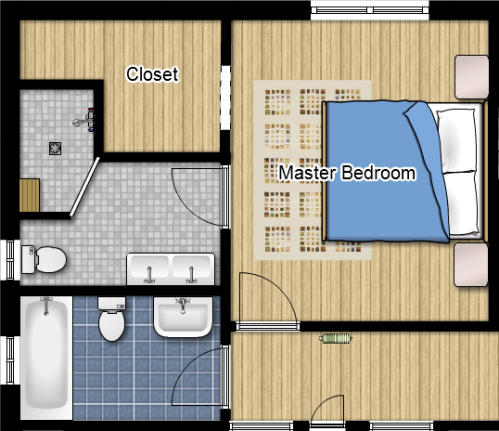
We’ve moved the bathroom door so we can close off the closet and make it a walk-in. We’ve moved the sink to a different wall and are replacing it with a bigger one. We’re stealing a bit of closet space to bump out the shower and make it more spacious. Hopefully the loss of the linen closet will be offset by the additional storage space under the sink. (The original sink was a pedestal without any storage space underneath at all.) The tiling will actually be a bit different than what’s pictured, in the shower the floor tiles will be 1″ square and in the main bathroom area they’ll be 12″. Also the new sink is just one long basin with two faucets but only one drain. But hopefully you get the idea.
There are about half a dozen guys here today efficiently tearing out our old pipes and installing new ones. Unfortunately we goofed and didn’t buy the new rough-in valve that we need for the hallway shower. I foolishly thought we’d find the one we needed at the home improvement store. I’m getting one shipped overnight so hopefully it’ll show up tomorrow in time for them to install it, otherwise we’ll be doing a bit of plumbing work ourselves after all.
Bathroom Update: Plumbing and More Framing
For a while there it seemed like we were in some sort of plumber communication black hole. Of course it didn’t help that we waffled indecisively for a long while before even attempting to contact anyone, but even when Dave started leaving voice mails, he wasn’t getting any responses! Perhaps it’s because what we’re looking for is actually a pretty big job…
We knew even before we put an offer on this house that the plumbing was a bit of a mess. First, we knew the hot water heater would need to be replaced fairly soon. (it’s still trucking at the moment, but I’d rather replace it before it fails completely.) Also, at some point some enterprising person had gone through and replaced some of the original galvanized steel piping with copper piping, probably as they did things like update the kitchen and add the shower in the hallway bath. The problem with having both copper and steel in the same plumbing system is that you get an electrolysis effect (think battery electrodes) that corrodes the pipes. It’s not like this issue is a big secret in the plumbing world or anything, and the way you’re SUPPOSED to deal with this is to install a little adapter between the two metals instead of letting them contact each other directly, but no one bothered to do this on our house. Unfortunately, our weird piping has clearly been in place for a while, so the corrosion is pretty far along. Here’s where the copper piping from our water heater connects to the steel pipe leading into the house:

I’m not entirely sure, but I believe the rust stains running down from the connection are a bad thing. And I’m told that the pipes under the house are ten times worse than this. Long story short, almost from day one we were saving up to re-pipe the whole house with PEX tubing. We’ve been a bit enamored with PEX since we started seeing it used in home improvement shows a few years ago. It’s a little funny to me that we’re planning on switching to plastic while living in California (aka the heartland of OMG PLASTIC IS EVIL) but Dave is a polymer scientist/engineer after all, so he did his research and we’ve decided we’re a-okay with it.
The nice thing about the amount of foot-dragging we’ve been doing on this bathroom remodel is that we’ve had a whole extra year to save up for the re-piping, and we can get the plumber to move the fixtures that we need for the bathroom at the same time as he’s doing the re-pipe, which will save us a little money. And all of the bathroom pipes are completely exposed at the moment, which will make his life easier too. The downside to our procrastination is that we didn’t even really get the option of trying to do the plumbing ourselves. (PEX is a bit easier than copper for brave DIYers; check out these awesome people for example.) Actually, considering the potential for massive failure, some might consider being forced to hire a professional to be an upside, not a downside. 🙂
Enough background. So we finally got an estimate that we’re happy with for replacing the water heater plus the re-pipe plus moving the bathroom fixtures. That last bit will entail putting the sink on a different wall and adding a second faucet, moving the shower drain and fixtures about 2 feet, and replacing the shower valve in our hallway bath. Here’s the existing shower valve for our hallway bath, conveniently accessible since the two bathrooms share a wall:

The plumber says whoever installed this was very flux-happy but couldn’t be bothered to clean up the excess, thus the corroded green areas. We’re actually replacing the valve anyway because the new valve trim we’ve been wanting to add isn’t compatible with this valve. Don’t worry, the new trim is still big enough to hide that weird-shaped hole in the tile. Sigh… Anyway, the main cost for actually moving/replacing bathroom fixtures will be moving the shower drain and the sink drain, since the rest of the fixtures were essentially being replaced with the re-pipe anyway. We’re pretty comfortable with installing toilets, sinks, shower heads and such, so the plumber will only need to do the rough-in portion.
Enough plumbing, the title of this post implies that I have something to say about how the framing is going! We’re almost completely done with the shower, which now boasts a pony wall separating it from the toilet:

The toilet will be to the left of the picture above, under the window, while the opening to the shower is on the right.
Dave even managed to cut and cap the old shower pipes, so he could remove those last few studs and we can really visualize how awesome our new shower space is going to be. The main thing left for the shower framing now is to frame out the built-in bench. Oh and Dave’s going to reinforce the pony wall with a sheet of 1/2″ plywood, because it’s going to be tiled on one side and we don’t want that sucker to move AT ALL. Here’s how things are looking right now:

The thing covered in green tape is the old shower drain, the pony wall is to the left, and the beginnings of the built-in bench are at the top. You can see the holes in the floor a foot or so to the right of the drain where the shower pipes used to be. The new shower is about 3′ by 5′, minus the angled doorway. The drain will be centered, so it needs to move about 2 feet to the right in the picture above.
We had a bit of a scare with a cracked hot water pipe when Dave removed the old shower fixtures, so we left the old sink fixtures in place pending the re-pipe, meaning that we still can’t frame out the new bathroom doorway since one of the pipes is in the way. But hopefully our experience framing the new closet door will allow us to get the bathroom door framed pretty quickly once the pipe is out of the way. Here’s the current opening:

I was standing in the shower looking back at the master bedroom to take this picture. The old sink pipes are on the bottom right, with the left-most pipe juuusst in the way of where the king stud needs to go for the new doorway. The new sink will be along the wall out of the picture to the right.
The plumbers will supposedly be completely done by next Tuesday! Next up: Ummm I think laying the plywood subfloor?
Spice Storage
Hm, I searched through the archives, but it turns out I’ve never actually blogged about our spice storage in the kitchen. Shame on me, as I’m sure that there are people out there that are just DYING to know all of the minutia I have to share on this subject.
I’m not super fond of just leaving spices in their original containers, because once they start to accumulate it’s hard to see what is what and I’m not good at keeping track of just how long ago I bought them. Actually, my biggest pet peeve is that I can’t stick a measuring spoon directly in most standard spice containers.
We don’t have much storage space in the kitchen, so for my first organizational attempt I bought a bunch of wide-mouthed cylindrical containers with magnets on the back, and I stuck them on the side of the refrigerator. I didn’t actually take a picture at the time, but here’s a rough reenactment that I threw together for this post:

This setup had a few issues. For one, some of the magnets were pretty pathetic, so after a few hours the containers would slide down to the counter. For another, it always looked a little cluttered and messy, and I’m not obsessive enough to whip out rulers and levels and line everything up evenly. Most importantly though, we don’t like putting anything on the actual refrigerator doors, so this side of the refrigerator got taken over as a space to post up notes, reminders, various magnets and such, crowding out the spice containers.
For my next attempt, I stuffed all of the spices in the drawer just visible in the bottom of the above picture, one of the very few drawers in the entire kitchen:

This drawer had various utensils that were useful to have near the stove, which I squished over to the right side. It also had oven mitts, which we have since hung on hooks on the back wall above the counter, which is working fine for us. I liked this setup because I could see very easily how much of each spice we had, and they spent most of their time tucked out of the way. The problem is that since the jars are so squat-shaped they take up a lot of room, so we quickly ran out of space and had to start leaving some spices in their original containers, making it much harder to see what exactly we had. Given the depth of the drawer, the low height of the metal containers didn’t really make sense. They were too short, and it just wasn’t a very efficient use of space. But I still wanted something I could stick a measuring spoon into and label the top of. So I spent a while searching around on the internet, and I eventually ended up settling on some taller oval-shaped containers:

I had a pretty difficult time making a decision, because very few jars for sale listed much in the way of dimensions besides actual total volume. I needed to know the exact height, (to know that it would fit upright in the drawer) as well as the dimensions of the opening, to better judge whether a spoon would fit inside. Anyway, it’s a tough life, yada yada, but I eventually took the plunge and ordered a pack of 12. They fit very nicely in the drawer:

And one of our tablespoons even fits inside:

The other tablespoon we have doesn’t quite fit, but really I’m okay with it as long as most of the other measuring spoons work. 🙂
For now I’m writing the purchase dates for the various spices on the side of the container with a grease pencil, as seen in that first close-up a few pictures higher up in this post. (It says “Jan 2013” in green, in case you couldn’t tell…) I’m also using some labels that we had lying around to write the name of the spice on the top. These labels are by no means waterproof, but we have a whole lot of them and are unlikely to use them for anything else. For now I’m using them as a proof-of-concept, and I can buy more suitable labels once I’m sure this new setup is working for us. Here’s another shot of the spices in the drawer for your viewing pleasure:

We’ll give it a week or two, and if this is still making us happy, I’ll probably shell out for another dozen or so of the same containers, so we can transfer the rest of the random spices into lovely matching containers.
Saving the Yard
Both our front yard and back yard held up fairly well through our first summer, but last summer both of them were looking pretty miserable by the end. The grass was pretty prickly and had given up entirely in quite a few spots. In the front yard this was probably due to the in-ground sprinklers crapping out and my pathetic attempts at buying and using above-ground sprinklers not working so well. But the back yard was doing pretty badly too. I made an uneducated attempt to overseed in the fall, but I didn’t really research it enough and used a warm season seed mix, which unsurprisingly did very little in the way of growing. In my defense, the vast majority of advice and how-tos on lawn care assume you live somewhere where it rains a lot and freezes for part of the year. Sigh.
I hope that I’ll be able to spend a lot of this coming summer enjoying the nice weather outdoors, but if our lawn looks like it did last summer I won’t really want to spend any time on or near it. So after some much more obsessive researching on the topic, I’ve settled on the following plan of action: aerate, topdress with compost, and overseed. Oh and actually figure out how much water our sprinklers produce and adjust accordingly. All of this needs to happen soon if we want a useable yard this summer, and with a baby set to appear at any moment, I kicked it into high gear. For aerating, we already owned this manual tool:

In case it’s unclear, you hold the handles at the top, place the hollow spikes on the ground, and give the horizontal bar at the bottom a good stomp. I actually bought this thing last year, but in the fall our lawn was as hard as concrete so I quickly gave up. This time around, with softer soil from the rainy season and an extra 50 lbs of weight to use to my advantage, this actually worked quite well. It took me all of last week working in fairly short sessions each day just to do the front yard, but of course I wasn’t pushing myself, and I was pretty happy to get some sun each day and listen to podcasts as I worked. I’m still working on aerating the back yard, and I finally came up with a method to keep my holes more or less straight. We have these plastic yellow poles that I can move over to the leading edge of holes as I make each new pass down the yard:

The dirt to the far right of the picture above is my attempt to fill in some of the dips in our yard with the most potential to break an ankle. Hopefully when I put grass seed down on the dirt it will actually grow, but non-broken ankles are more important than a pretty lawn. 🙂
Next up, I needed compost. After pacing out the lawn and doing a little math, I figured I needed just about 2 cubic yards to top dress all of the grass with 1/4″ of compost. About a third of it would be for the front lawn, and the rest of it would be for the back. There seem to be quite a few landscaping companies around that sell compost in bulk, with options to bag it ourselves or have it delivered. I ended up going with the company that seemed to be the most friendly to non-professional DIY types, based on the reviews I read. They actually had an option to rent out a dump truck so we could really do IT ALL by ourselves, but we have so many other things going on, so we decided to pay the extra money to have it delivered. And since the delivery price was a flat charge, we also decided to order 3 cubic yards of mulch. We normally end up buying bags upon bags of the stuff from the hardware store anyway, so buying it all in once in bulk should save us some money in the end.
Anyway, the delivery date we picked was supposed to be rain-free, but of course by the evening before, the forecast had changed to “80% chance of rain, chance of thunderstorms”. Being the optimistic sort, I didn’t change the delivery date at the last minute, so this morning the truck arrived, leaving this in our driveway:

We immediately covered the compost (on the right) with the tarps since we figured we wouldn’t get to it today and we wanted to protect it from the impending rain. Dave had already left for work, so Julie and I hauled out the wheelbarrow and shovels and got to work. Actually the above picture is after Julie had to stop and go to work, so we had already moved maybe a quarter or so of the mulch to the back yard. Actually most of the mulch is going to be used on the “utility” side yard, (where we keep the trash cans and such) which was crazy overrun with weeds. We did manage to start tearing through some of the weeds last weekend, but there are still many tall weeds in the way, so we mostly piled the mulch up for now:

The area on the right of the picture is where we already hoed away all of the weeds. Hopefully the rest of this area will look like that soon.
I took a nice nap after Julie went to work and then proceeded to get the rest of the mulch out of the driveway, with still no sign of rain. It did finally rain in the evening, but there wasn’t any thunder to speak of. Ah well.
Oh! and I found some baby snakes hiding under a board. Adorable!!

Anyway, the landscaping people recommended that we let the compost “cool off” for a few days. So I guess I’ll get back to aerating and hoeing, and maybe I’ll start working on my topdressing skills sometime next week… If I’m still feeling energetic next week…
Update on Life, Bumming Around at Home
I’ve been off work for two weeks now, but I’ve managed to keep more or less of a routine at least so far… No sleeping in until noon yet! I’ve actually enjoyed getting up right around when Dave gets into the shower and cooking up some bacon and eggs for the two of us.

It’s not an every day thing, but it’s often enough that I’ll take credit for effort. 🙂 I’ve even been slicing up whatever fruit we have lying around as a side dish. Of course this time of year that means mostly citrus, but it certainly looks fancy!

After that my day gets pretty random. I generally spend a good chunk of the morning browsing the web. My preferred spot is at the end of the couch, right by the big window:

It’s a north-facing window, but the whole living/dining area gets a ton of ambient light so I normally don’t even bother turning on the indoor lights during the day. This means I can spend a big chunk of the day inadvertently spying on our neighbors. Julie says I make a pretty good “creeper” since I already have most of their routines more or less figured out. We also have quite a few neighborhood cats that seem to have pretty consistent movement patterns as well.
Julie’s work normally starts at 2pm, so she wakes up a few hours beforehand and we hang out for a bit. If I have any errands I want to run I’ll generally time them so that I can drop Julie off at work and then get the errands taken care of. But sometimes I don’t feel like going out so I just make Julie bike to work, because I’m a big meanie. 🙂
The rest of each day has been pretty much up in the air. Last week we had lovely weather so I spent a lot of the week weeding and aerating the lawn. I also spent a lot of the week goofing off. This is what I really love about not working during my last month of pregnancy: I can really take the time to listen to my body. When I’m feeling energetic I get some chores done or take Loki for a walk. When I’m feeling tired (which is sometimes five minutes after I start in on a chore) I just lie down and read or take a nap or whatever.
There’s no way I can write about bumming around the house without mentioning my furry compatriots… Loki definitely prefers to keep me nearby while I’m in the house, but he hasn’t been following me from room to room, thank goodness. Mostly he just chills on the couch waiting to see if I’ll take him for a walk:

I shift around a lot so generally none of the animals really try for my lap when I sit down, but Loki often will at least attempt to curl up next to me. This is only bad when I’m lying on my side and he goes to curl up against my belly. Any pressure at all there feels unpleasant so I have to push him away. When I’m at the computer he curls up against my back.

The cats spend most of the day doing what cats do best: sleeping. They mostly hang out in the extra room since that gets the best morning sun, and it’s the room that the rest of us go into the least. Here are the boys in their preferred spot on top of the cat tree:

And here’s Callie giving me her best “What are YOU looking at?” face.

All in all, staying at home has been pretty nice. Sometimes I get bored by myself, but Dave has been very good about responding to texts even if I’m probably just distracting him with silly conversation for no reason. I know everything will change once there’s a baby in the picture, but for now at least I’m enjoying this brief period of calm before the storm.

