Monthly Archives: October 2013

Dakota: Seven Months Old
Still no crawling! Instead this month Dakota decided to focus on figuring out how to get from her belly to sitting up. She’s gotten pretty good at it, but she needs a little room to move backwards to accomplish it, which sometimes leads to her backing up under a chair or something and getting herself stuck.
Photography-wise, the living room is getting noticeably less ambient light during the day, so I’m going to contemplate how I want to bring in more light to keep these pictures consistent. Anyway…

And the rest of the odd numbered months:


I wasn’t exactly intentionally alternating which side she was facing each month, but I guess it worked out that way. Might as well keep it going!
Quick Decorating
I was totally going to blow off my second post for this week, but it’s way too early to be failing at my two-a-week goal! But I’m just going to keep this simple.
I haven’t been feeling very inspired for decorations lately, but I’ve acquired enough over the past few years to have a whole storage tub labeled “Fall Decorations”. So right before heading down to LA I pulled the tub into the living room and suggested that Julie throw something together. Here’s what she came up with:

This built-in shelf is probably going to be the only spot for dedicated decorations at least until we get past the toddler stage, so I actually went in after she was done and squeezed some non-fall related stuff in to make room elsewhere in the house for more practical stuff.
Here’s the front patio:

Hopefully those pumpkins will actually get carved, because that’ll give me material for another blog post. 🙂 The chrysanthemums already lost all of their flowers, (sigh, I probably didn’t water enough after potting them) so I pruned them and they get to just be little bushes for the time being.
I’ll probably bring out the pumpkin head lights for the 31st, but seriously, I’m just not getting the decorating bug so far this year. So thank you Julie for making it happen!
And since I must include a photo of the baby, here she is this morning trying avocado for the first time. I’m not sure she likes it. (yet)

Road Trip with Baby
Last weekend we drove from our home in the San Francisco area to visit some friends in the Los Angeles area with almost-seven-month old Dakota in tow. For the trip down we stopped twice for gas, once for lunch, and once for me to nurse Dakota and switch from the passenger seat to the back seat because she was Not Happy. Once I was in the back seat it was actually pretty easy to keep her entertained and happy until she finally fell asleep. Well, probably most of the credit goes to a Starbucks cup with ice in the bottom. This is her favorite chew toy/rattle, but not one I’m willing to let her play with unsupervised.

While she was awake we pretty much had to stick to her preferred music CDs (Putumayo and Kindermusik) but once she was asleep Dave and I were able to listen to podcasts and have normal conversations, only slightly weird with me in the back seat.
On the ride back I spent the whole trip in the back seat and we had much less fussing. We also took a longer lunch break, with Dakota trying out the booster seat at the diner:

It didn’t have a seat belt though, so once we got our food we switched her to a high chair, though she got to keep the spoon:

She had a nice long nap after that, though she would occasionally open her eyes, give me a good once-over, and go right back to sleep, so it was probably a good thing that I stuck to the back seat.
Both the ride there and the ride back took about 6 hours, which worked out conveniently for us because we were able to leave right after morning traffic died down and arrive before afternoon traffic got too heavy.
In what I’m sure is going to become a common occurrence during future trips, we got to visit a few playgrounds during our stay. Dakota would still rather eat dirt and leaves (and try to lick the concrete!) rather than explore a play structure, but she did get to test drive some swings for the first time:

She hasn’t exactly fallen in love with swings yet, but I’m sure it will happen. 🙂
Costume Sewing Progress
I had entertained vague notions of sewing a Halloween costume for Dakota, figuring I had better let my creative juices loose now because in a few years she will have an opinion on the matter and insist on being whatever the equivalent is at that point of Rapunzel from Tangled. (My non-scientific poll of three different little girls has determined that 100% of them want to be Rapunzel. Sigh.) But I hadn’t thought seriously about it until another mom at a playgroup we attend turned to me and asked what Dakota was going to be, adding that she had already bought a ladybug costume for her daughter. This was the last week of September, and my first reaction was, “What? So early…” But then again it’s not really that early if I actually want to sew something. So Dave and I had a Very Serious Discussion about what Dakota should dress up as, and we settled on… Pikachu!
I searched around and found a Simplicity pattern (1767, in case you’re interested) for a hooded, footed baby costume that had a few generic baby animal variations, figuring I could modify the ears and add eyes and cheek circles to the hood. I went out and bought some bright yellow anti-pill synthetic fleece (that was luckily on sale) and small amounts of the other necessary colors in the same material. The pattern also calls for a zipper (gulp) and some elastic:
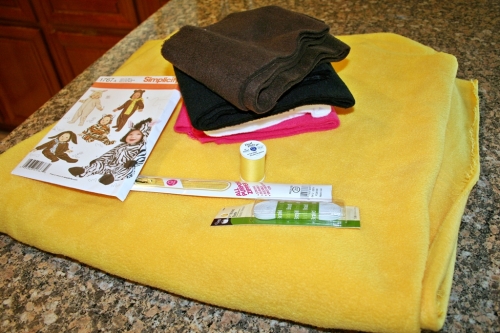
I’m not a sewing expert or anything, but I have mostly gotten over my fear of using patterns. This one is just about my speed: two halves of a front, two halves of a back, two sleeves and two halves of a hood:

In terms of other trickiness, the sleeves have elastic in the cuffs, and the “feet” are made with a single pleat, pretty straightforward. The pattern even helpfully suggests using a “narrow zig-zag stitch” for fleece fabrics. I wasn’t quite sure I was using the right setting on my machine, but it produced a zig-zag, and after a few practice runs on some scrap fabric I figured I had it close enough, so off I went!

I’ve never worked with fleece before, but it doesn’t fray or unravel, and it seems to slide through the machine pretty evenly, so I’d say I’ve been pleasantly surprised with how easy it has been to work with.
I’ve also never actually had to attach a zipper before. I avoided it on my wedding dress by kludging together a lace-up back and duct taping myself into it right before the ceremony. 😀 But miraculously I still have the zipper foot that came with this sewing machine! I didn’t do the most even job of sewing the zipper in, but I think the fleece is poofy enough to mostly hide the unevenness:

At this point I could finally see how it was fitting:

A little big, but the way she grows it may fit her in two weeks. 😉 Anyway, now I have to attach the hood, and then I have to start working on the Pikachu-specific stuff. I think I have the ears modified to what I want. Should I add a tail? It has a pretty distinctive zip-zag, so I would probably either need to use craft foam or wire to make sure it retains its shape.
Well, if all else fails she can just be a fuzzy yellow monster. 🙂
Closet Storage Happiness
Closets aren’t the most exciting thing to read about, nor are they terribly photogenic, but our house has so little built-in storage space that I am now going to spend an entire blog post gushing about the improvements we made to the master bedroom closet. You have been warned.
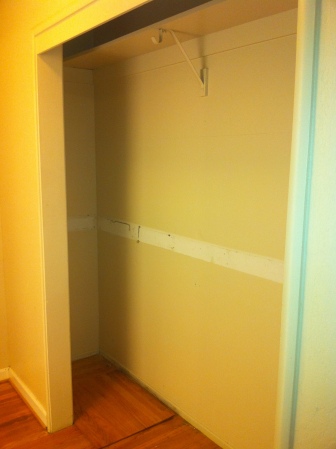
First, here’s a little recap of how the closet used to look, complete with pictures from old blog posts. When we bought the house it was a reach-in closet with sliding doors, accessed via a mini hallway that also had the door to the bathroom on the opposite side from the closet. Here’s the closet as it looked on the day we got the keys, right after I removed the sliding doors and pried out the waist-height shelf:
That mini-hallway is really just wasted space, so almost from day one we were talking about moving the bathroom door and making a small walk-in closet when we remodeled the master bathroom. Check out this short post showing the before and after floorplans if you need the visual.
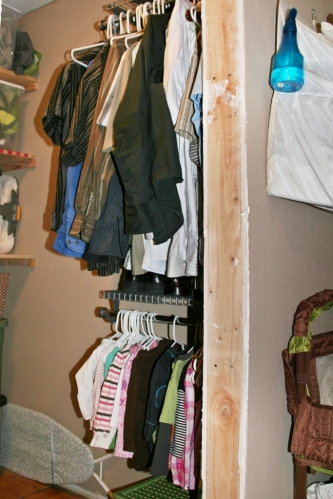
In the mean time though we added some modular wire shelving that we had bought for a reach-in closet in a previous apartment and kept with us when we moved. And for about a year the view from our bedroom into the closet/mini hallway looked like this:
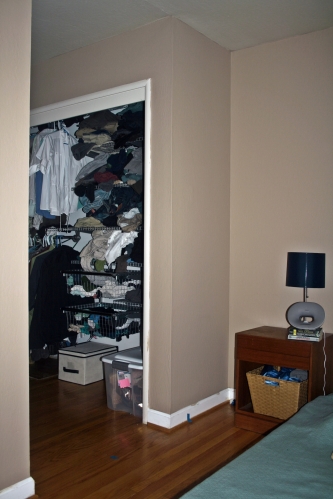
In the picture above you can see a piece of blue painters tape on the floor and one on the floor trim, marking where we wanted the eventual walk-in closet doorway to be. Anyway, fast forward yet another year and we finally got around to tearing the bathroom down to the studs, moving the bathroom doorway out of the mini-hallway and over to the bedroom proper, and framing a doorway for the improved closet. We actually bumped the bathroom out into what used to be the back of the mini-hallway to make more room for the shower, and this left a 30″ wide, 40″ deep cubby in the back of the new walk-in closet. This is because that’s the access point to the crawlspace under our house (you can see the raised square of hardwood in the first picture of this post) so we didn’t want to build a shower over top of it.
The closet is probably as small as you can make it and still call it a “walk-in”. With a 2-foot wide doorway, it’s just wide enough to fit 12″ deep shelving on the left and 24″ deep hanging room for dress shirts and such on the right.
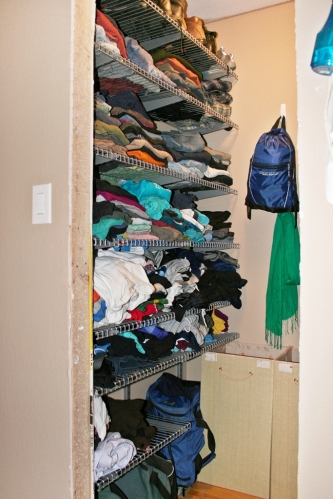
Yup, we’re still using that same modular wire shelving, it reconfigured from a reach-in to a walk-in closet quite nicely.
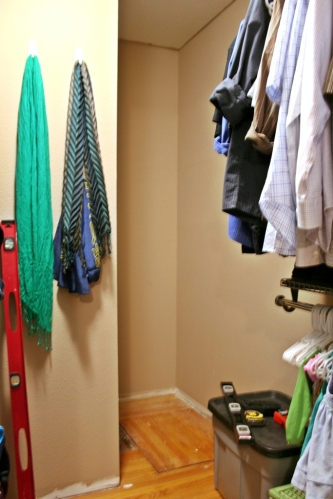
I’m not a big fan of hanging clothing, so we’re fine with having just a tiny bit of rack space. Though in a weird (for me) twist, I actually prefer to hang Dakota’s clothing for now, it’s much easier to see everything that fits her and even hang stuff in order from smallest to largest, so every few weeks I can grab the smallest stuff off the hangers and pack it away in the “too small” box.
We aren’t completely settled on what we want to do with the back wall. For now we have our laundry hampers there, along with some hooks for hanging small bags and scarves and such. We could potentially put a full length mirror there, or perhaps some sort of wall-mounted necktie or shoe storage. Or we could just add a lot more hooks.
On the back right is the aforementioned cubby with crawlspace access. Here it is still empty:
It’s a good size for storage tubs and we can fit them two-deep if we turn them longways, so I added 1×2 boards (they were labeled as furring strips) as cleats:
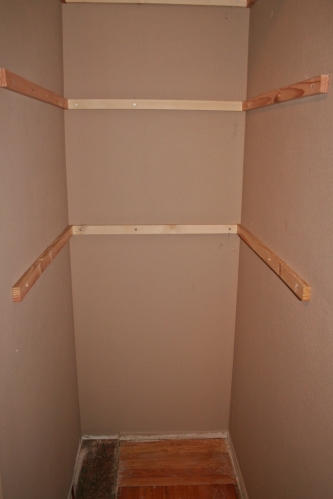
And then we cut some 3/4″ plywood to make some heavy duty shelves, and filled them with big ol’ storage tubs (2 deep, so there are actually 10 tubs there even though you can only see 5):

We do occasionally need to access the crawlspace, so I actually didn’t screw the shelves into place. That way we can move some of the tubs and remove one or two of the shelves if someone needs to go in and out of the crawl space a lot and doesn’t want to have to worry about ducking to avoid hitting the shelves.
There are still a few small todos for this space, not counting deciding what we want to do with the back wall. First, the ceiling was primed but not actually painted. On the one hand, I’m glad we got the closet filled and usable as quickly as possible after getting the drywall up, on the other hand, clearing everything out to actually paint the ceiling is probably going to be a pain in the butt. The other thing we need to do is finish the doorway and add floor trim. We sized the doorway to fit a standard sized 2-foot door, but we’ve lived with cats long enough to know that we’d never actually shut the closet door anyway, so we plan to just add trim and not bother with a door. Trim shouldn’t be that hard, but we just have to work up the motivation to break out the nail gun. I’m thinking I probably want to paint those plywood shelves at some point as well.
But in the meantime, this closet is fully functional!
Painting the Fireplace
I’ve been talking about redoing our double-sided faux brick fireplace almost since we moved into this house. Someday I’d really like to rip the brick veneer off entirely and maybe tile it, but when it comes to actual construction we have many higher priority projects waiting to happen. So I finally decided to just paint the sucker. I figure that I actually kinda like the look of painted brick, so if we never get around to tiling I’ll at least have something that I don’t hate. And painting is a fairly easy project to do by myself, and I can start and stop it fairly quickly for those times when the baby’s naps are shorter (or longer!) than expected. As a refresher, here’s how the fireplace has been looking, as seen from the front door:

And here’s the dining room side:

I snapped these shots during the late afternoon, thus the weird sunlight pattern going on…
Anyway, the urge to get rolling on this project came over me somewhat suddenly, so I grabbed the primer and a discarded paintbrush that we had sitting in the garage and slapped on the first coat over the course of maybe three Dakota naps. Then I did a single coat of semigloss latex paint, the same stuff I’ve been using to ever-so-slowly repaint the beige trim and doors all over the house. I think it ended up taking about a half a gallon to completely cover both sides, in a single thick coat. I tend to actually paint coats on too thinly when doing walls, but the brick is so textured that after the primer coat it was easy to see that brush strokes really wouldn’t stand out at all, even with semigloss. So I really loaded up the paintbrush and did my best to get paint into all the nooks and crannies. The paintbrush was kaput by the end of it all:

And even with all the smooshing, there were still quite a lot of dark crevices that really stood out once the whole fireplace was white:

See the black spots around some of the bricks? Since these weren’t real bricks stacked on top of each other, there were a bunch of spots that had gaps between the brick veneer and the backsheet thing that they were attached to. So I picked up some paintable caulk and went to town caulking the worst looking cracks. Here’s that same angle after caulking:
 I quickly discovered that the caulk blended really well. It has a slightly different finish, but you basically have to have your nose an inch or so away from the bricks to see it. So there isn’t even any need to paint over the caulk, and I can just caulk over a spot or two at a time as the mood strikes me.
Anyway, here are the finished shots!

And from the other side of the living room:

and from the dining room:

And even from the kitchen!

It’s amaaaaazing. Especially from the living room, which is on the north (i.e., dark) side of the house. The room is just so much brighter.
Now of course I need to decorate the darn thing. I have the perfect framed photo for the living room side ready to go. For the dining room side I’m thinking some sort of mirror, since there aren’t any mirrors over there and the room is a bit on the small side. I’d like a non-rectangular mirror with a cool frame, but Dave has vetoed any and all “sunburst”-style mirrors, which is cramping my choices a little. 🙂 I think he saw way too many of them in the staged homes we visited while we were house-hunting. He’s otherwise almost always open to my weird decorating inclinations, so I’m okay with him having this one hard veto, no matter how much I like sunburst mirrors. I’m also debating whether we should build a mantle… I like boring straight lines anyway, so we could almost just mount a single chunky piece of lumber without any adornment and call it “modern” and/or “rustic”. That would mean figuring out what’s going on behind the brick veneer though, so we’ll probably just leave a mantel on the wishlist for now.
My final to-do on this would be to install a gas fireplace thingy in there. The gas line is actually already set up, but there just isn’t an insert at the moment. Along with that I’ll probably want to replace the covers on both sides, since the one on the living room side is a bit too ornate for me, and the one on the dining room side is really beat up and kinda ugly in general.
Anyway, since I promised to my family members that there would be Dakota pics in all my posts, here’s Dakota enjoying (ignoring) the new fireplace color:

Fun Dog Sport: Flyball!
What is Flyball, you ask? It’s a relay race! Each dog in turn races over four hurdles, triggers a box that releases a ball, and then carries the ball back over the four hurdles to the start/finish line. Two teams of (usually) four dogs race against each other at a time. Makes sense? Here’s our team (not Loki, he’s still in training) during a tournament this past weekend:
It’s fun because there are a ton of training/focus challenges for the dogs, and there’s a strong sense of camaraderie among the humans on the team. Training-wise, getting a dog to do anything on command while there are seven other dogs off leash in the immediate vicinity is a challenge right off the bat. Then there’s the difficulty in getting a dog to run away from you and perform a specific task at a distance. (One of the Flyball rules is that the human handlers have to stay back behind the start/finish line, so once you release your dog he’s on his own until he gets back to you.)
Generally when a dog starts learning Flyball you start him at a distance from you (being restrained by another human) and you just get him to run straight to you when you call him. Then you start upping the ante by having other dogs around (that he has to ignore) when you call him, then you start adding hurdles for him to jump over as he runs to you. Loki made slow but steady progress at this, and now he’s almost always very good about ignoring other dogs and jumping hurdles when he’s focused and knows it’s time to be in “Flyball mode”.
From there you can have the dog run away from you, grab a ball, and bring it back to you. For Loki that was a big challenge at first because he’s not really a ball-motivated dog. He is however very strongly motivated by treats, so we started out having him touch the ball, get a treat, then mouth the ball, get a treat, then spit the ball into my hand, get a treat. After several weeks of this slow progression we worked up to a point where he will chase a ball and bring it back, but he expects a reward of some kind at the end! This is actually pretty useful because he’s not attached to the ball at all, he’s bringing it back and immediately giving it up because he wants the treat. It still boggles my mind slightly that it took weeks to train a dog how to play fetch!
The second big challenge is teaching the dog to trigger the box. It makes a loud clang as the mechanism releases the ball, so at first we just had to desensitize Loki to the loud noise. Easy enough, just have him sit near the box and give him a treat every time there’s a clang. 🙂 But if you want the dog to have a pretty good race time, you want him to be able to trigger the box, catch the ball, and spring off of it as quickly and efficiently as possible. Here are some of the dogs with the best box turns on our team:
And here’s Loki:
Sigh. He’s just not very coordinated. Ideally when you’re teaching a dog the box turn, you first shape the movement without a ball. So in this case you want to dog to land on the box with all four feet, already halfway turned, and then push off with all four feet to complete the turn. (It’s often compared to how a swimmer turns and pushes off the wall in the pool, if that makes sense.) It takes a bit of extra motivation, but we can get Loki to perform this swimmer’s turn decently when there is no ball. But when we try to add a ball in he runs straight up to it, comes to a full stop while triggering the box, and then oftentimes has to chase the ball down since he doesn’t always get his mouth in the right spot to catch the ball as it flies out.
But that doesn’t keep him from running the race correctly, it just makes him very slow. The other big challenge that Loki is working on right now is passing other dogs. Like with most relay races, the closer you can get each participant to pass at the start/finish line, the faster the overall time will be. But it can be quite intimidating running towards a hurdle with another dog running full speed seemingly straight at you. This angle shows a little better how close the dogs pass each other:
Loki did get to try running in two heats at the tournament, but both times he got intimidated by the dog running at him and veered wide, skipping the first hurdle. But both times he then got back on course, retrieving the ball and jumping over the rest of the hurdles, which is pretty impressive even if it doesn’t count! We’ll be working on that pass with Loki for the next few weeks for sure, I know he’ll get it figured out eventually.
The current world record for a four dog flyball team is 14.768 seconds, but my impression from watching the races at the tournament is that a decently fast 4 dog team at our competition level might finish the course in 19 seconds. Or at least I saw some pretty experienced teams, but I don’t think I saw any team go below 19 seconds at the tournament. The tricky part is that you generally want a short dog to run with 3 other tall/fast dogs, because the height of the jumps is based on the height of the shortest dog (aka the “height dog”) on the team. I’m sure there’s some optimization that goes on, but theoretically if you could get a dog that stands 12″ at the withers (which gives you the shortest possible jump height of 7″) and 3 speedy bigger dogs, you could get splits of something like 4 seconds for each of the tall dogs and 5 seconds for the short dog. Even if there was zero time lost on the passes, that would still be a 17 second race time, which makes the current world record even more impressive. Then again that world record team had 2 whippets on it, and I imagine they have very fast splits. 🙂 We do have a whippet training on our team, but he’s even newer than Loki, so we’ll have to see how he progresses. Our team is actually a bit short (no pun intended) on height dogs at the moment, so Loki definitely has a good role on the team if we can get him trained up the rest of the way.
Most of our team is made up of border collies, but at one point we had quite a few Danish Swedish Farmdogs (all of whom were related to each other) and Belgian Tervurians (I think at least some of these were also related). There were also quite a few Belgian Malinois that I saw across the various teams at the tournament. I guess when you hang out a lot with similarly-minded dog owners and you’re thinking about getting a new sports dog, it makes sense to keep it in the family, so to speak. 🙂 But there were tons of really cool mix/rescue dogs that were awesome at Flyball too.
I didn’t manage to get any video of the two heats Loki attempted at the tournament, but here he is at practice a few weeks ago. For practice we use training gates to either side of the jumps to make it really really obvious to the dogs where they should be going. Loki isn’t exactly a speed demon, but he’s running the whole course!
Love it! what trooper. 🙂

Antenna Action
We don’t have any sort of cable or satellite TV subscription, as we’ve decided we much prefer streaming stuff on Hulu (or marathoning an entire season on Netflix) rather than trying to watch our favorite shows during their actual air time. Every once in a while though, we find we want to watch something that isn’t available live online in good enough quality, like the World Series or Sunday Night Football. So we bought an ugly little antenna that sits on our TV console and mostly works:
What, you can’t see past the cute baby? 🙂 It’s the silver thing sitting up on the top left-hand side of the console table in the background.
Unfortunately, for some stations if you walk too close to the antenna the picture gets messed up for a few seconds. And for NBC, we only get signal if we stack a bunch of books (or board games, in this case) underneath the antenna:

So we bought an outdoor antenna, which requires a coaxial cable to run from the roof to the TV. When we first moved in, there were already two coaxial cables running through the wall from the outside. One at least has an attempt at an actual outlet box, though it wasn’t very nice looking. The other was (not) charmingly shoved through a hole in the floor trim:
Easy, long-overdue cleanup… Add a real outlet box and a cover:


All better! Well except for the drywall dust to clean up. And we don’t actually need the cable coming through the floor trim, so I’m going to just cut the connector off and shove it back down.
The other side of the wall (on the outside of the house) looked like this:

The cable that comes up through the floor trim on the inside runs up the outside of the house and straight over the yard to the nearest telephone pole, so presumably that’s the cable TV line from back when a previous owner actually paid for that stuff. The other cable came out of the side of the house and just sat on the ground. Though it looked like it had also gone up the wall at some point, based on the house-colored paint on it.
To install the antenna, Dave cut a piece of plywood the exact size of the antenna base, attached that to the bargeboard, and then screwed the antenna base onto the plywood.

Don’t worry, he was lying on a towel, so no manly chests were burned or scraped during this installation. 😀
Then he hooked the cable up, (actually, I believe he had to attach a new connector onto the end of the cable, but since I didn’t get a picture I have no proof that this occurred) and amazingly enough, everything worked! I was so sure that the cable would be shot or something, but we were immediately able to watch NBC without a pile of board games and accompanying indoor antenna sitting on the TV console.
With proof that it was working, Dave attached the cable to the outdoor wall, next to the already attached other cable thing:

And this project is done!


