Category Archives: organization
Picture Book Shelves
Dakota’s books have been haphazardly piled on the TV console in the living room. It was nice to have them out in the middle of everything, but they were pretty messy, and since Dakota could only see the spines, they didn’t really grab her attention.
So Dave built some shelves. It was so quick and easy that I didn’t even take any progress pictures. Here’s the finished product:
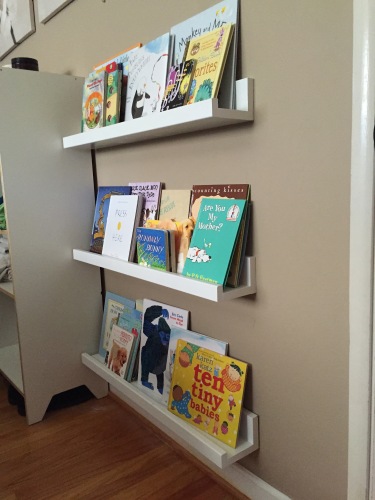
We used these plans, and it was basically the simplest construction project ever. I measured the space and figured I wanted three ~32″ wide shelves. So we made them 31 7/8 inches so we cut them out of 8-foot boards. I’m pretty sure it took longer to paint them than it took to cut and assemble the pieces! It’s so nice when an “easy” project actually is as quick and easy as it’s supposed to be.
I wanted to hang them pretty low so Dakota could access them easily:
The top shelf is still a little high for her, but we were able to screw straight through the backs into the wall studs, so at worst she’ll probably just crack them if she tries to hang off them. And since these are actually in our bedroom instead of the living room, she likes to bring her stool over from the bathroom so she can use it to reach the top shelf.
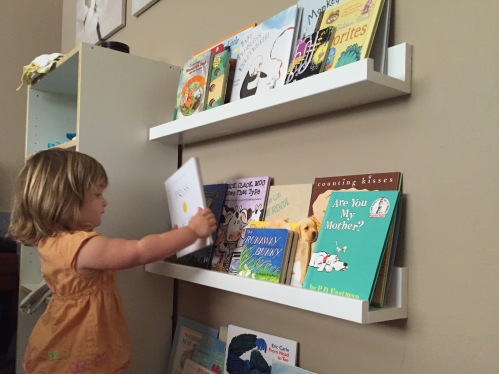
I was a little indecisive about moving the books out of the living room since we do a lot of reading in there. But there’s not a really a good place to display the books so prominently there, and we’re in and out of the bedroom enough that Dakota notices the books and will often pull a few off the shelf and carry them out. Here they are with a little more of the room visible:
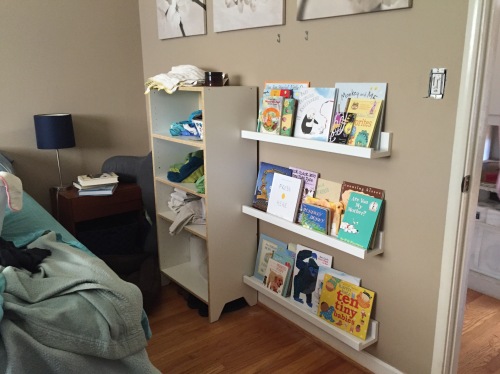
I like how they’re close to the door. The bookshelf unit thing to the left of them is our current cloth diaper storage/access setup, since we do diaper changes right on the bed. The three big picture canvasses above the shelves make it look less weird that the shelves are so low. Looking at this photo reminds me that someday I really want to make cool bedside tables with built in wall lamps, but in the mean time what we have works. 🙂
Lower Cabinet Pull-Out Mod
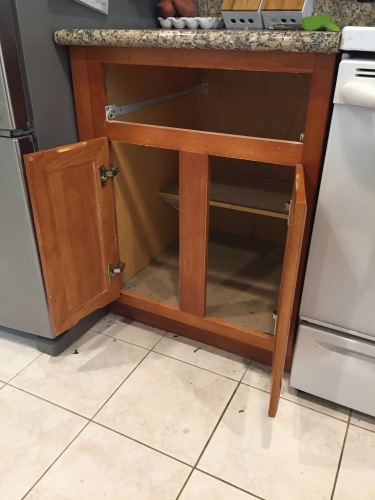
Pretty much since the day that we moved into this house I’ve lamented the kitchen cabinet situation. On the one hand, for such a small kitchen the layout is nice and open and functional. On the other hand, whose idea was it to put narrow little doors with vertical facing pieces in between them on the cabinets!? I even wrote a blog post just to complain about them right after we first moved in. I’ve reorganized enough times now to mostly make things work, but the one lower cabinet that held the big pots, lids, and cutting boards still required a pivot, twist and shimmy to extract anything.
But since we are mad geniuses, we finally fixed it! Behold!

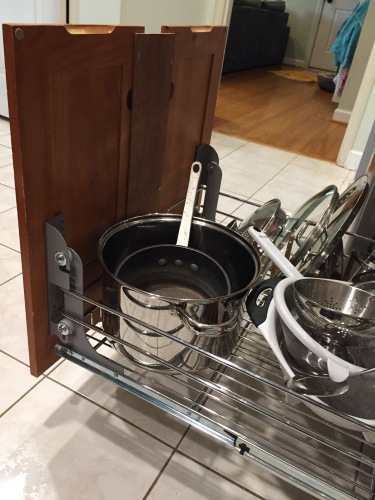
What’s that you say? It looks the same? Well see what happens when I open it all the way (in case it’s not clear, the upper metal shelf can slide out independently):
Yes! We bought a kit that allows you to install heavy duty metal pull-out shelves and attach a cabinet door to the front. Now of course we have two cabinet doors and a stupid vertical frame piece, so this is where we got clever. Here’s the cabinet as it looked before:
Dave then cut out the vertical piece ever so carefully:
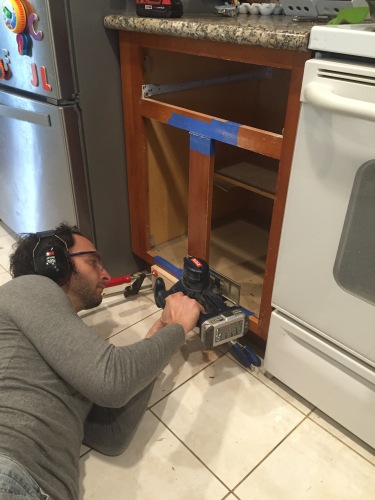
And lucky us, we had some long pieces of 1/8″ thick wood already stained to match that was left over from a previous owner installing the toe kick boards. So Dave cut some down and attached it between the two doors and then attached the whole double door thing to the bottom slide out shelf.
It took a lot of finicking to get everything to line up right, and I think we may do a little more adjusting to see if we can get an even more exact fit, but really already it’s pretty hard to notice, and it’s oh so incredibly functional. Yay!
Miter Saw Table and Garage Shelves
Dave took the momentum from building the shed and is totally running with it to make the garage much more organized and useable.
I looove our miter saw because it is compound, meaning it can cut really wide boards. Unfortunately it also needs a really deep worktop to sit on. The existing counter top that I assume was from our kitchen pre-remodel wasn’t really deep enough. So I found some plans that are technically for a portable worktop, (that one could take to construction sites and such) complete with an inset area for the miter saw so that any boards being cut are supported all along their length. Dave modified the plans to fit our space and….
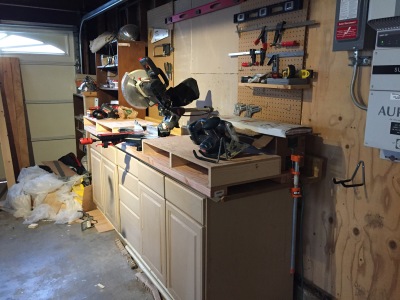
Tada! Super secure miter saw setup, bolted into the original counter top.
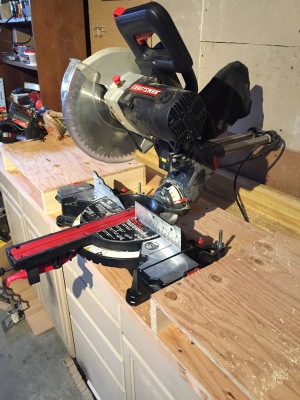
I’m not sure what I want to put in the little cubbies, maybe scrap wood? If nothing else they’re a convenient place to clamp things…
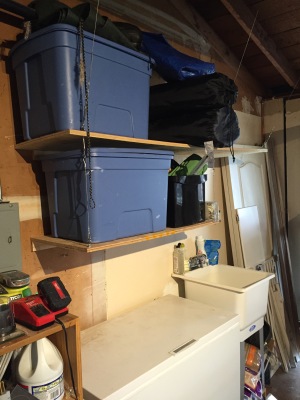
Dave also set up some deep shelves on the other side of the garage above the chest freezer and sink. It used to look like this:

And now it looks like this!
He got all fancy and hung them using aircraft cable in the front, so he didn’t have to put legs underneath them. The cables connect to the rafters up top:
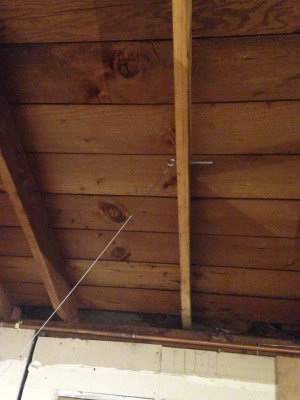
And the shelves are also screwed into horizontal cleats in the back:
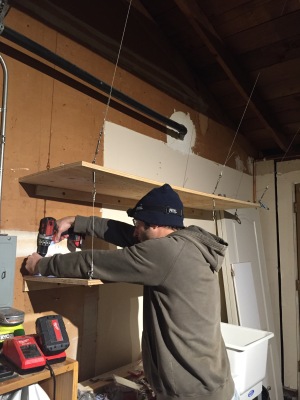
I immediately threw all our camping stuff up there. It feels so nice to get that up and out of the way! We still need to figure out more efficient storage for some of our bigger construction stuff, like the air compressor and the shop vac. But we’re making a lot of progress!
Small Updates
We finally got around to a bunch of small updates around the house to improve functionality and/or make things slightly more stylish. 🙂
In the kitchen, I got a hanging basket thing to corral all the fruit that was constantly taking up way too much counter space. Here it is hanging to the left of the sink:

I also got some wire mesh baskets to tidy up the coffee making supplies. This area used to just be a big jumble of fruit and coffee filters and such:
The knob on the pantry door busted, so we took the opportunity to switch from chrome to oil rubbed bronze:
We’re slowly switching over the remaining door knobs in the house, but I’ll spare you a bunch of door glamor shots.
We also finally switched out the chrome-and-rust light fixture for oil-rubbed bronze in the hallway bath:

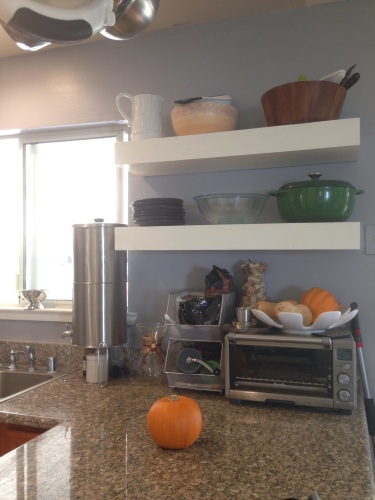
Back in the kitchen, we re-hung the magnetic knife holder vertically on the side of the refrigerator. Much more functional. And I got these little white containers (to the left of the stove) to hold garlic, but I’m still not sure what I want to do with the onions:
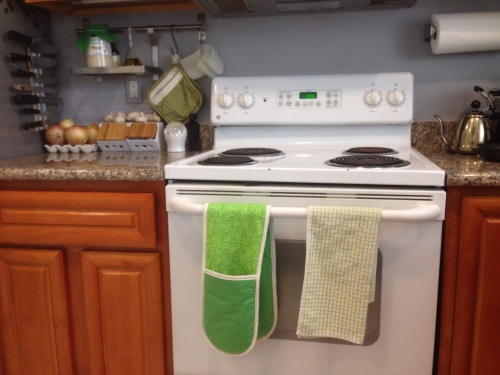
And I made that fun green double oven mitt that’s hanging off of the oven door. It’s mostly just there to look good, but it does actually work… Plus, Dakota likes to steal it and run around giving everyone high fives while wearing it:

So I think it was definitely a worthy sewing project. 🙂
Clothespin Board
I made a thingy. To hold coupons. Or perhaps it could hold other things, but for now it holds coupons. Behold! Clothespins on a board:
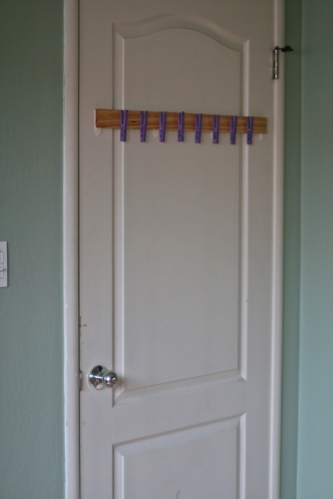
I found the board in our supply of scrap wood and stained and sealed it using some leftover stuff we had lying around. I probably would have gone darker with the stain if I was buying stuff specifically for this project, but I actually like how it turned out with the lighter stain.
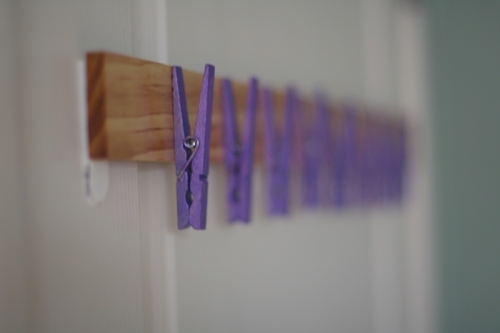
I spent way too long scouring Pinterest trying to figure out the optimal way to color wooden clothespins. Spray paint, RIT dye, food coloring? Finally I realized I was waaaaayyyyy over thinking it, and dug through my box of old craft supplies. I found a 10+ year old bottle of metallic purple acrylic and a little paintbrush, and just slapped it on, not worrying about it.
I wasn’t sure if wood glue would work with the polyurethane on the board, but the backs of the clothespins are still raw wood and I guess the glue is holding up okay.
Anyway, I’m using this to keep track of my coupons, since they didn’t do me much good stuffed in a drawer:
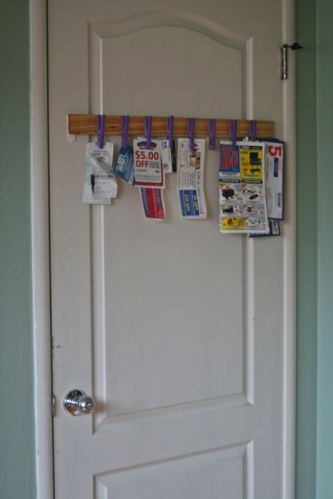
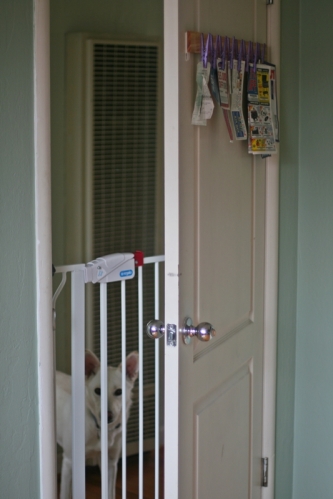
And I hung the thing on the back of the door so I don’t have to look at the inelegant coupon display if I don’t want to. Instead I can look at sad puppy-dog eyes:
Anyway, I bought some of those command strips to attach it to the door since I didn’t want it to be permanent, and eventually I’m going to paint the beige door so it’s white. So I didn’t quite manage to spend zero dollars on this project, but I’m still pretty proud of my thrifty scavenging around the house for most of the supplies. 🙂
Garage Update!
It’s funny, we had started out the weekend with plans to build this miter saw table thing, and instead we ended up doing a bunch of other garage updates that we talked about doing months ago and then forgot about. Not that I mind… These were all relatively low-hanging fruit: easy fixes with big impacts.
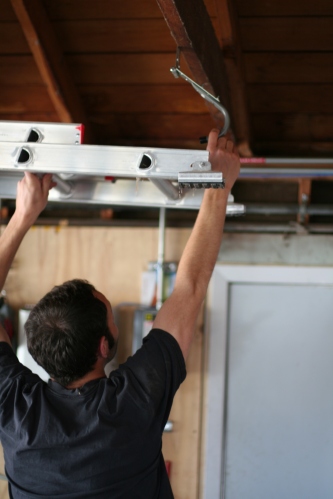
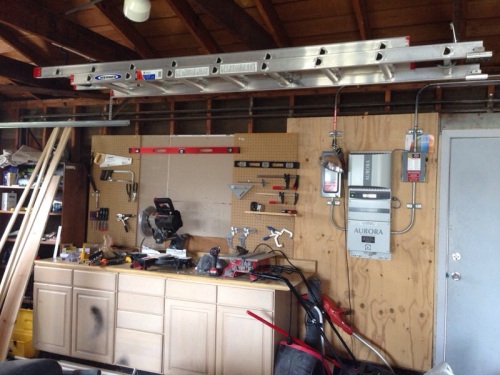
First up, the big ladder now hangs from the rafters!
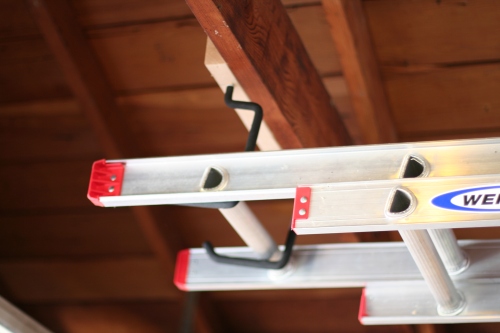
Dave found some solid hooks, and then he came up with this ingenious idea of attaching one of the hooks to a strap hinge to make it super easy to get the ladder down…
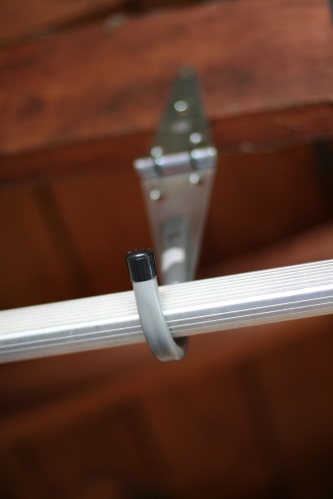
If you’re tall like him and not too short like me. 🙂
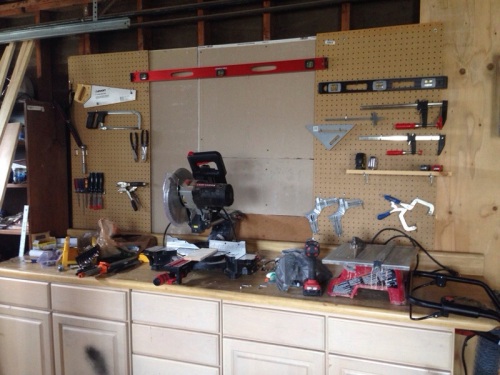
Next… Peg boards! Dave put up some leftover drywall behind the miter saw to hopefully reduce the amount of sawdust getting behind/under the counter, and then he put pegboards up on either side. For the moment I pretty much just threw tools up there without too much planning. Hopefully now that I can actually see what we own I can come up with a better organizing scheme and buy more hanging hooks.
Lastly… Utility sink!
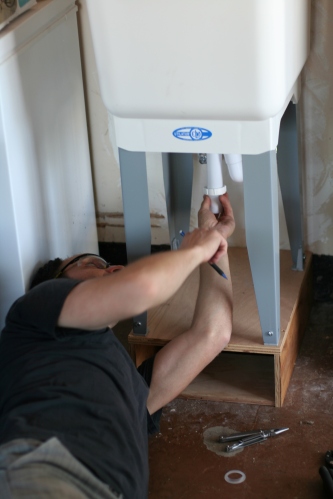
Clearly a previous owner had a sink in here at some point, we even made sure the hookups were all functional when we got the whole house re-piped.
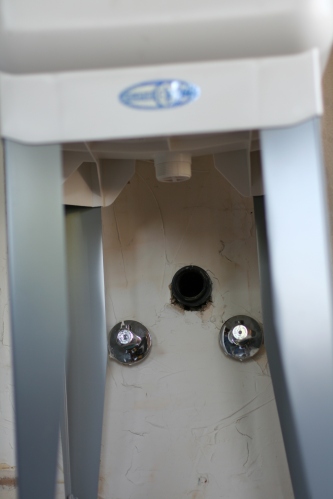
However, the placement of the drain pipe in the wall is quite high and can’t really be lowered (just take my word for it) so we would have had to get a really shallow sink. Orrrr Dave could build a platform for the deep-basin utility sink that we wanted!
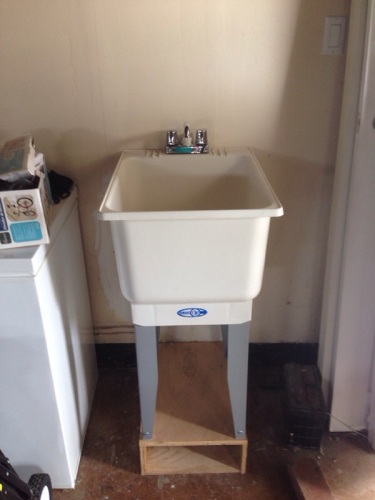
Yessss… No more rinsing paint brushes in the kitchen sink! Now I need to decide what I want to store in that little cubby underneath. Maybe mason jars would fit?
We still want to add a lot more in the way of shelving in here, and of course that miter saw table is still in the works. Oh and we’ll hopefully be setting up a shed on the side of the house soon, so that should get the lawn mower and other random stuff out of the garage. But for now I’m already loving these changes!
New Projects
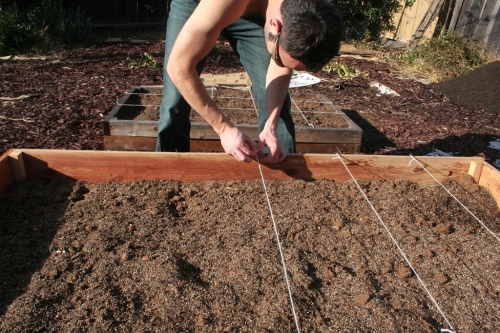
I was originally just going to blog about the vegetable garden, but there’s not too much to say yet. I made another, taller raised bed so I can plant onions and carrots and such. I also resurrected the bed from two years ago. Dave kindly tied the strings so I could plant stuff Square Foot Garden style. Not too much is planted yet though.
In other new project news, I’m going to add some coat hooks to the wall by the front door. I was thinking I could put some trim up on the lower half of the wall and paint it all white, creating a faux board and batten wainscoting. The blue horizontal tape shows where the chair rail would go and the short verticals are where the “battens” would be spaced, going all the way to the baseboard.
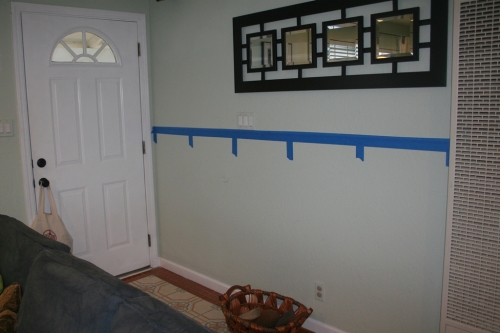
Although… Now that I’ve actually measured the space, it’s a little less than eight feet wide and a little less than four feet tall. So I could just buy a bead-board panel and a single piece of trim for the chair rail and make things a lot simpler. Hmm.
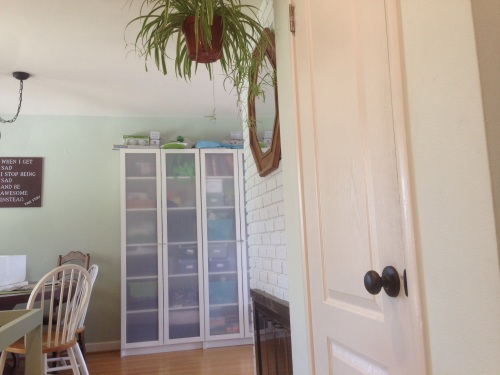
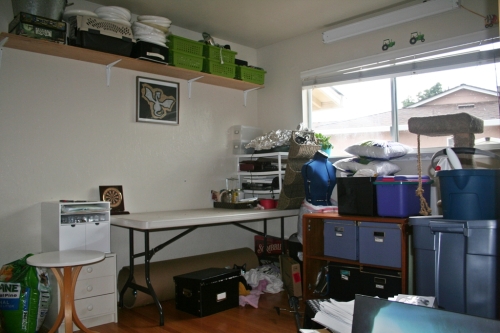
Last up, I finally think I’m ready to turn our spare room into a functional space. I’d like it to be an office and crafting/work space, because currently all computer stuff, bill paying, sewing machine usage, etc happens on the dining room table:
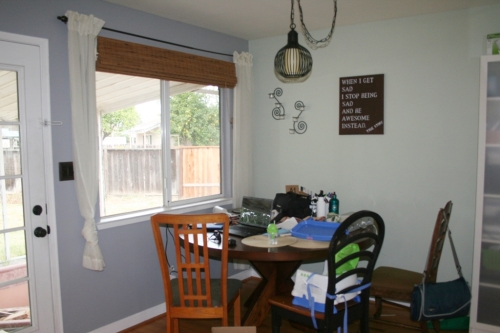
(Oh, and I got a bamboo roman shade for the window. I’m trying to decide if I want to buy more for the living room windows.)
The spare room is a lot cleaner than it used to be, but it still has a way to go before it can become functional. Here’s the view from the door:
And here’s the rest of the room:
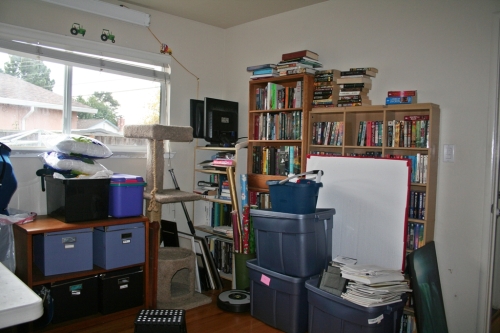
The big question is whether I have the motivation to paint it right now or not. 🙂 obviously not a required step in terms of functionality, but it would be super nice to be able to get rid of the last of the beige walls in the house…
Small Improvements
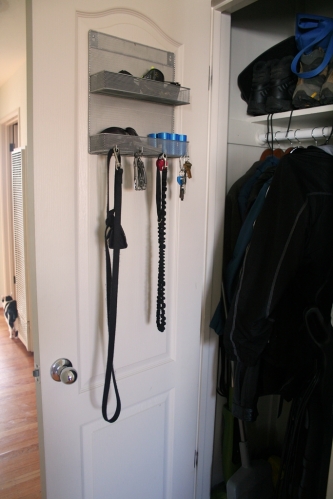
Ah January. A good time to fix some small things that have been annoying me. Behold, the door to the coat closet now has some lovely hooks to hang keys and dog leashes, and some small shelves for things like sunglasses and doggy cleanup bags. This thing actually claimed to be a spice rack when I bought it, but whatever:
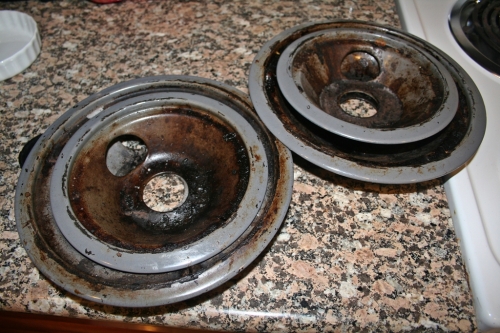
Next up, we inherited some nasty drip pans with our stove:
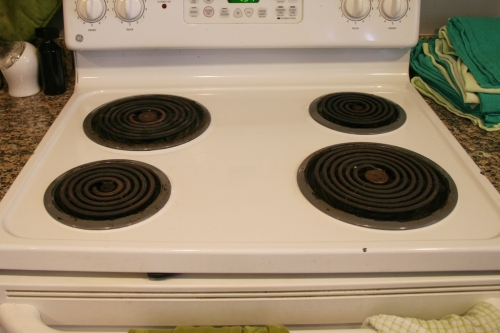
And it took me almost three years of useless soaking and scrubbing to realize that I could buy new ones for pretty cheap:
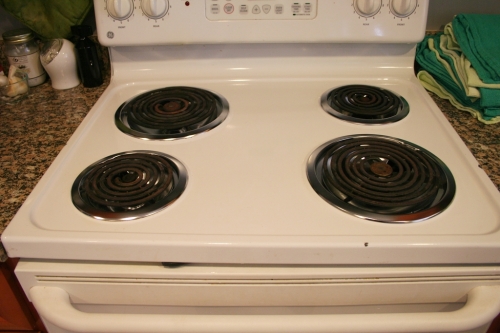
It’s hard to see the improvement in the picture since the actual heating elements aren’t super nice either, but trust me. Here are the drip pans that I gleefully threw in the trash:
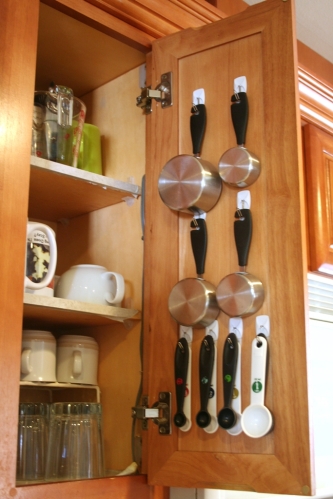
Moving on, I think I saw this idea on Pinterest for organizing the measuring cups and spoons. We aren’t 100% certain that we’ll stick with this setup, but it’s a fun change to try out:
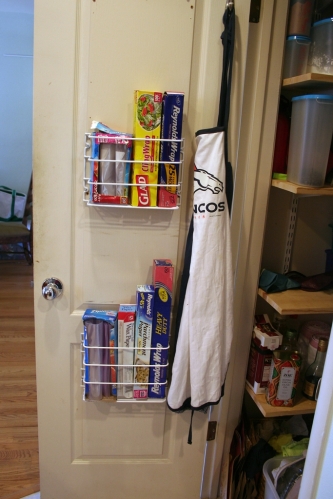
And I’m quite pleased that we now have a home for all our cling wrap, aluminum foil, freezer bags and such. They now live on the inside of the pantry door, super easy and accessible:
Here’s our chief QA engineer making sure everything is to spec:
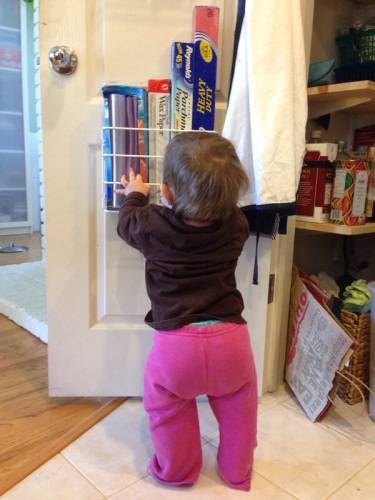
We keep this door closed since it’s where we stash the recycling, but it’s good to know the screws hold up at least a little.
That’s all for now. Bring on 2014!
A Little Shopping Goes a Long Way…
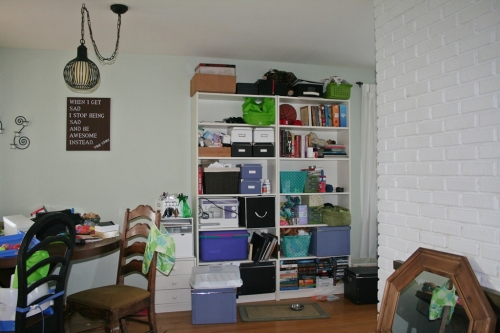
We are forever in need of more storage space, so I bought these bookshelves from Ikea a while back to try and make some use of the walk space between the dining area and the living room:
They hold a lot of stuff but they’re super messy. Here they are as seen from the kitchen/dining area:
Last weekend we made a “babyproofing” trip to Ikea, and we picked up doors for these shelves as well as some door inserts for the TV console. So here’s how the shelves look now:
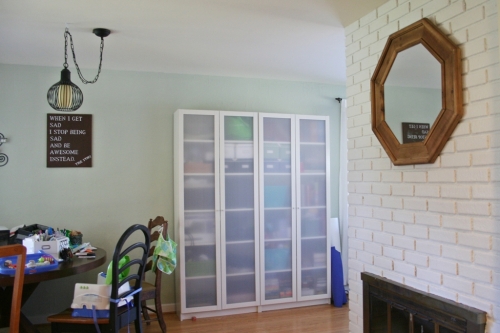
So much neater, though I had to find new homes for a lot of stuff that was sticking out too far to fit behind the doors. And so the “not enough storage” shuffle continues… We’re thinking of maybe trying to stick some sort of decorative paper behind the doors since they’re translucent and rather white and boring at the moment. We’ll see.
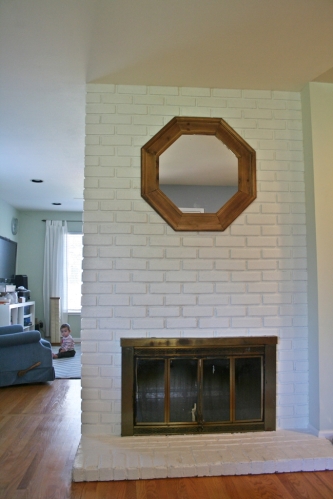
And perhaps you noticed the AWESOME mirror we have hanging over the fireplace now? A new Home Goods opened up nearby, so we stopped in and made a few purchases that I’m super pumped about. The mirror is one:
And we also got this great storage bench/ottoman which is a little too tall and a little too blue, but totally amazingly useful. We can set food trays on it super easily, I can vacuum under it, and it’ll be pretty nice for Dakota once she’s pulling up on things. I’m thinking maybe I’ll try reupholstering it once the cats inevitably claw it to shreds? it’s probably the easiest shape possible for a novice reupholsterer, so it should be a fun challenge:
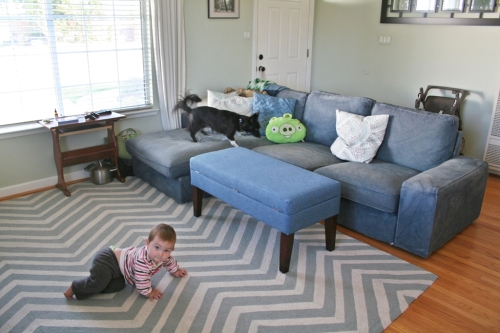 The white patterned pillows were also Home Goods finds, and I didn’t get a good picture but they go great with the couch and rug. Yaaaay pillows.
And to finish things off, here’s the living room as seen from the front door:
 I hung my biggest frame (cool picture of a waterfall) on this side of the fireplace. It looks a little sad and small, but I bet it would look great with a chunky mantel and a few candlesticks or something on either side of it. The bookshelf doors are looking pretty slick from this angle too, so I’m just all around in a good mood about our living space at the moment.
Next up, replacing the fireplace grate that’s begging to be pulled over, and finish up making the TV console all nice and baby friendly!
Closet Storage Happiness
Closets aren’t the most exciting thing to read about, nor are they terribly photogenic, but our house has so little built-in storage space that I am now going to spend an entire blog post gushing about the improvements we made to the master bedroom closet. You have been warned.
First, here’s a little recap of how the closet used to look, complete with pictures from old blog posts. When we bought the house it was a reach-in closet with sliding doors, accessed via a mini hallway that also had the door to the bathroom on the opposite side from the closet. Here’s the closet as it looked on the day we got the keys, right after I removed the sliding doors and pried out the waist-height shelf:
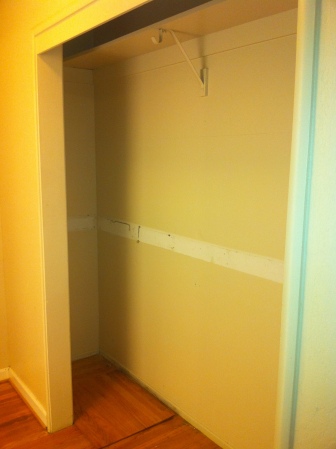
That mini-hallway is really just wasted space, so almost from day one we were talking about moving the bathroom door and making a small walk-in closet when we remodeled the master bathroom. Check out this short post showing the before and after floorplans if you need the visual.
In the mean time though we added some modular wire shelving that we had bought for a reach-in closet in a previous apartment and kept with us when we moved. And for about a year the view from our bedroom into the closet/mini hallway looked like this:
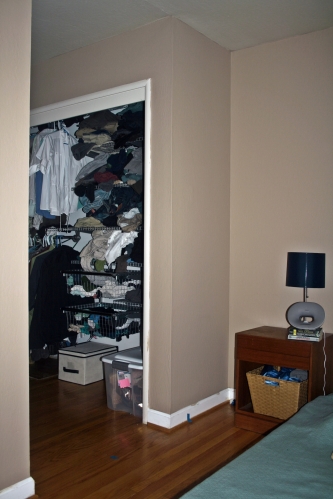
In the picture above you can see a piece of blue painters tape on the floor and one on the floor trim, marking where we wanted the eventual walk-in closet doorway to be. Anyway, fast forward yet another year and we finally got around to tearing the bathroom down to the studs, moving the bathroom doorway out of the mini-hallway and over to the bedroom proper, and framing a doorway for the improved closet. We actually bumped the bathroom out into what used to be the back of the mini-hallway to make more room for the shower, and this left a 30″ wide, 40″ deep cubby in the back of the new walk-in closet. This is because that’s the access point to the crawlspace under our house (you can see the raised square of hardwood in the first picture of this post) so we didn’t want to build a shower over top of it.
The closet is probably as small as you can make it and still call it a “walk-in”. With a 2-foot wide doorway, it’s just wide enough to fit 12″ deep shelving on the left and 24″ deep hanging room for dress shirts and such on the right.
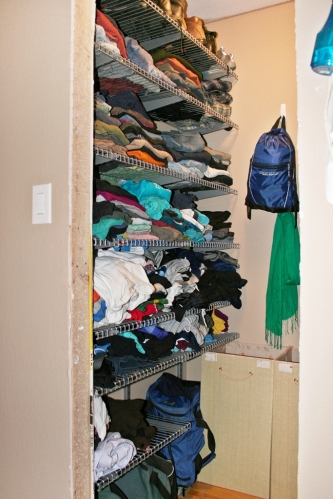
Yup, we’re still using that same modular wire shelving, it reconfigured from a reach-in to a walk-in closet quite nicely.
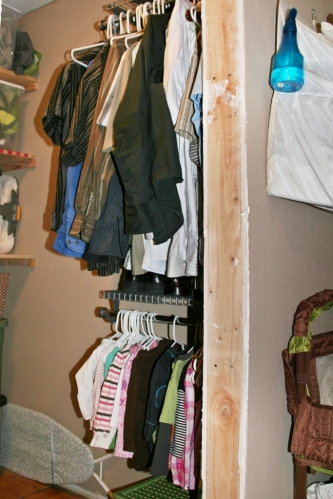
I’m not a big fan of hanging clothing, so we’re fine with having just a tiny bit of rack space. Though in a weird (for me) twist, I actually prefer to hang Dakota’s clothing for now, it’s much easier to see everything that fits her and even hang stuff in order from smallest to largest, so every few weeks I can grab the smallest stuff off the hangers and pack it away in the “too small” box.
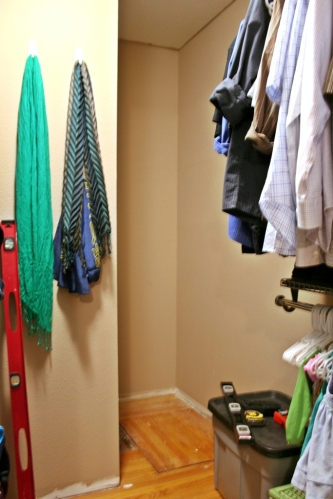
We aren’t completely settled on what we want to do with the back wall. For now we have our laundry hampers there, along with some hooks for hanging small bags and scarves and such. We could potentially put a full length mirror there, or perhaps some sort of wall-mounted necktie or shoe storage. Or we could just add a lot more hooks.
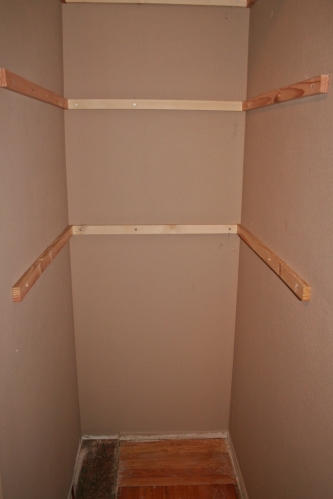
On the back right is the aforementioned cubby with crawlspace access. Here it is still empty:
It’s a good size for storage tubs and we can fit them two-deep if we turn them longways, so I added 1×2 boards (they were labeled as furring strips) as cleats:
And then we cut some 3/4″ plywood to make some heavy duty shelves, and filled them with big ol’ storage tubs (2 deep, so there are actually 10 tubs there even though you can only see 5):

We do occasionally need to access the crawlspace, so I actually didn’t screw the shelves into place. That way we can move some of the tubs and remove one or two of the shelves if someone needs to go in and out of the crawl space a lot and doesn’t want to have to worry about ducking to avoid hitting the shelves.
There are still a few small todos for this space, not counting deciding what we want to do with the back wall. First, the ceiling was primed but not actually painted. On the one hand, I’m glad we got the closet filled and usable as quickly as possible after getting the drywall up, on the other hand, clearing everything out to actually paint the ceiling is probably going to be a pain in the butt. The other thing we need to do is finish the doorway and add floor trim. We sized the doorway to fit a standard sized 2-foot door, but we’ve lived with cats long enough to know that we’d never actually shut the closet door anyway, so we plan to just add trim and not bother with a door. Trim shouldn’t be that hard, but we just have to work up the motivation to break out the nail gun. I’m thinking I probably want to paint those plywood shelves at some point as well.
But in the meantime, this closet is fully functional!

