Monthly Archives: February 2014
Shipping Pallet Compost Pile
Dave recently (and perhaps foolishly) mentioned that there are occasionally abandoned shipping pallets at his work that he could abscond with. I had to immediately show him a sampling of the insane number of “make X out of a shipping pallet” tutorials there are on Pinterest and pretty much all over the internet.
He gets a reprieve though, as I’m not actually very into the whole reclaimed wood look (yet…) but I did recall seeing examples of shipping pallets being used as bins/fences for composting. And especially now that we have chickens it seems silly to not have a compost pile, especially as this is the third year in a row where I’ve gone out and bought compost for gardening.

So yes, behold! Compost. I’m not trying very hard, I suppose I should do some reading, as I hear that there’s brown stuff and green stuff that you’re supposed to layer or something. Anyway, I figure I’ll go buy a pitchfork and turn it occasionally. And keep adding the stuff I clean out of the coop and trimmings from the yard, and hopefully the whole brown/green thing will work itself out. Here’s a better shot of my veggie garden with the compost lurking in the background:

And here’s the view of the whole side yard from the back patio:

The shipping pallets are in the back right of the photo. They look halfway decent from this view!
I have started separating out raw veggie scraps from the stuff that we put in our city compost bin, which still gets discarded meat from dinner and Starbucks cups and such. But I figure I should be offering the veggie scraps to the chickens? I guess if I do they’ll still eventually end up in the compost pile… In a sense. 😀
Speaking of chickens, I’ve finished framing the coop and moved it into place in the back yard. Now I just need to add the siding and the roof:

I’m planning to build a small (four feet long) outdoor run off the right side of the coop, and also enclose the part underneath the platform with hardware cloth for a little more secured outdoor space. You can see the remains of the old fencing slats piled up behind the coop, after I pulled out the pieces I wanted for siding, which are in the garage being cut down to size.
Lucky me, Dakota still really likes hanging out in the back yard and is decently good at keeping herself entertained!

Beadboard and Coat Hooks
The way our house is set up, the front door is the one we all use to leave and enter the house, so we are totally missing a side door or a “mud room” type of dumping ground for jackets, shoes, bags, etc. Our coat closet is a sad, tiny thing that pretty much just serves as a place to stash our off-season outerwear. We did manage to set up these inelegant but very functional tip-out shoe cabinets to at least keep the footwear situation mostly under control:

But bags and sweatshirts and such tend to end up in one of three locations: the fireplace hearth, the back of the couch, or the recliner chair. And invariably a cat will decide to lie on top of them, because that’s what cats do. 🙂
Because of how we’ve configured the living room and because the front door is right up against the corner, there isn’t really a good place to stick a console table or a storage bench that wouldn’t be completely in the way. So I finally settled on a row of coat hooks as the best organizing solution. I didn’t want to just stick them in the middle of the wall all alone, so I decided to try some sort of paneling to make them look more intentional instead of just being an afterthought. The space is a little less than 8 feet wide, so we bought a single 4’x8′ panel of beadboard and cut it in half so the lines would be vertical. Here’s Dave trimming down the edges a smidge using his handy new circ saw guide:

We also bought a single 8′ 1×4 board to serve as a “chair rail”. Dave routed a notch along one side so it would overlap the beadboard a little bit. (I didn’t catch a picture, but I imagine it would have looked similar to the one above.)
And then we nailed everything in! Sooo easy.

Well there were a few other steps like cutting a hole for the electrical outlet and caulking and painting, but honestly, this was such a simple project. I was a bit nervous that the seam between the two panels would be super obvious, You can see it running down the middle in the picture below, after caulking and priming but before putting the real paint on:

But by the final coat of paint the seam had completely disappeared. Here it is looking all spiffy. I went ahead and freshened up the front door with a new coat of paint too:
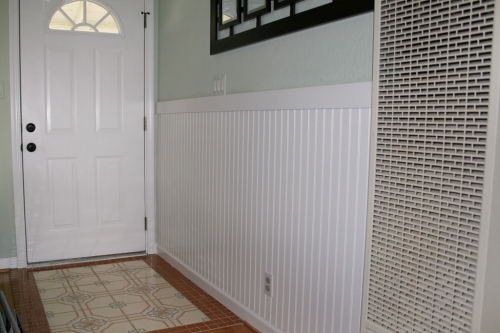
We decided we had enough space for eight hooks, and I decided I preferred the smaller “robe hooks” rather than the more traditional coat hooks. It’s a little more difficult to hang bags with thick straps on the smaller hooks, but I don’t feel like I’m going to impale myself on one…

And the hanging stuff doesn’t really get in the way of the path to the door, so it’s working quite well.

The view from the rest of the room isn’t quite as swanky now that there’s lots of random stuff hanging from the hooks, but I’ll take function over photo-worthiness. 🙂

Now we just need to move that hanging four-paneled mirror thing, it looks really weird being off center above the beadboard.
Busy Board for Dakota
I think I once made an off-handed mention of the idea of a “latch board” for little kids to Dave. I’m pretty sure it was many months ago, but the idea obviously took root because after we got back from the holidays he was suddenly very gung-ho to make one. Maybe because we do so much rough carpentry work that he hardly ever gets to use the router? Whatever the reason, he came home one day from a hardware store trip with a bag full of random latches and hinges and a nice looking scrap of hardwood. Here it is with the handle/hanging hole already cut out:

Then Dave routed the rest of the edges:

And then he slapped on some primer, but was obviously unenthusiastic about painting, so I took over that part, using one of the rejected test paint pots from our kitchen paint decision-making process. I also applied two coats of a non-toxic sealant.
Then it was time to add the latches!
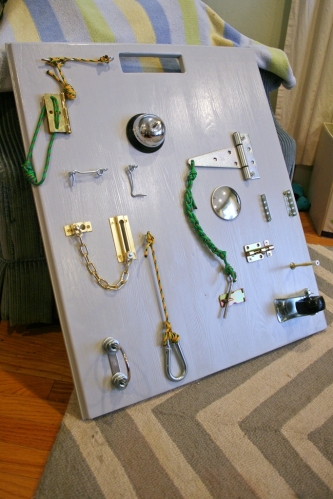
I looove the ropes. When I first saw the bag full of goodies to be attached I wasn’t sure how the ropes figured in to the master plan, but they’re fun and colorful.

So far the biggest hit is probably the springy door stop. The door stops in our house are all wall shields, which is a good thing for my clumsy feet… but clearly we are depriving our baby of much fun by not having spring door stops all over the house for her to play with.

When I first described the project to my dad, his comment was something along the lines of, “so you can teach her how to open kid-proof gates and locks, right?” Yup, that’s right. 😉
Anyway, I’m not sure how long this will actually keep her entertained, but it was really nice to switch gears and work on a smaller, more polished (for us) project. I think we’ll pick a low spot on the wall to hang it so it’ll be pretty secure and stable, but this isn’t really a toy that she’ll be playing with unsupervised… at least for a while.
Now back to storage benches and chicken coops and such!
Chicken Coop Plans
We have chicks!

But they’re actually not that exciting at the moment, so this post isn’t really about them. It’s about the chicken coop that I need to have ready for them in about a month.
They say you can build a chicken coop out of pretty much anything, especially here in California where it rarely gets below freezing or above 80 degrees. But our suburban lot is less than a quarter acre and we share fences with 5 different neighbors, so I want to have something neat and tidy looking to hopefully minimize the likelihood of complaints as much as possible. I also figured that trying my hand at a nice-ish little coop would be a fun project, and maybe good practice for a future kid’s playhouse or something.
I did some poking around the internet, and holy cow are there tons of gorgeous DIY chicken coops out there! I did my best to keep track of what would work best for my situation, and then I started drawing up my own plans. Here’s what I came up with:

I wanted to keep costs down at least a little and also try to keep the thing from being super heavy, so I’m going with 2×3 studs and trying to keep the number of boards for framing to an absolute minimum. A lot of coop plans I saw used 2x4s AND plywood for the walls, but that sounded like crazy overkill for my situation. I also have a pile of old but serviceable fence slats in my back yard from a previous owner, so I’m going to grab a bunch of them to use as siding.
The chickens will only be “free ranging” around the back yard when I’m here to keep an eye on them, so I’m also drawing up plans for a secure run for them to hang out in during the day. I want to get the coop finished first though.
I managed to get a little bit of building done in the last few days, so here’s the base! I’m planning on sticking it directly on the ground. It’s made out of pressure treated 2x4s, so hopefully it won’t rot away too fast…

I’ve started work on the walls, but I’m going to need a day without rain (and with Dave available) so we can pull the table saw out and cut the plywood, since I’m using it for the floor and the walls will then get screwed down after the floor is attached.
Gotta get on it, the clock is ticking…
New Projects
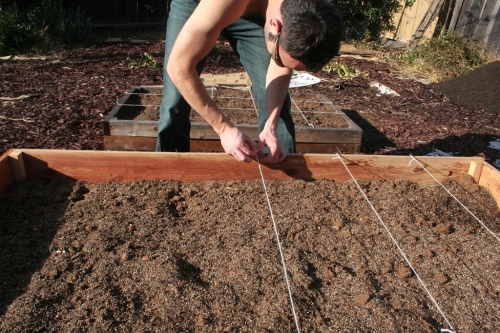
I was originally just going to blog about the vegetable garden, but there’s not too much to say yet. I made another, taller raised bed so I can plant onions and carrots and such. I also resurrected the bed from two years ago. Dave kindly tied the strings so I could plant stuff Square Foot Garden style. Not too much is planted yet though.
In other new project news, I’m going to add some coat hooks to the wall by the front door. I was thinking I could put some trim up on the lower half of the wall and paint it all white, creating a faux board and batten wainscoting. The blue horizontal tape shows where the chair rail would go and the short verticals are where the “battens” would be spaced, going all the way to the baseboard.
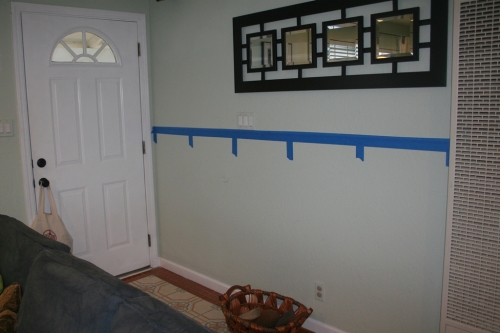
Although… Now that I’ve actually measured the space, it’s a little less than eight feet wide and a little less than four feet tall. So I could just buy a bead-board panel and a single piece of trim for the chair rail and make things a lot simpler. Hmm.
Last up, I finally think I’m ready to turn our spare room into a functional space. I’d like it to be an office and crafting/work space, because currently all computer stuff, bill paying, sewing machine usage, etc happens on the dining room table:
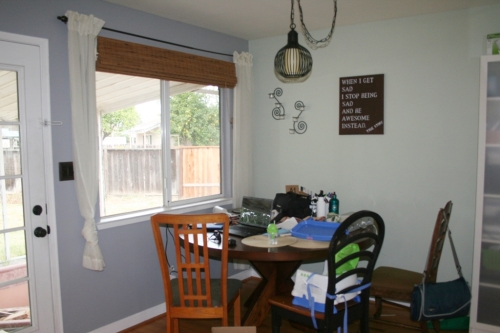
(Oh, and I got a bamboo roman shade for the window. I’m trying to decide if I want to buy more for the living room windows.)
The spare room is a lot cleaner than it used to be, but it still has a way to go before it can become functional. Here’s the view from the door:
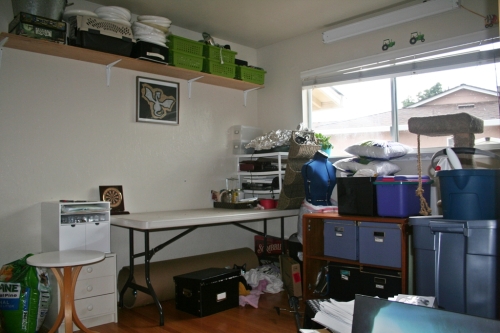
And here’s the rest of the room:
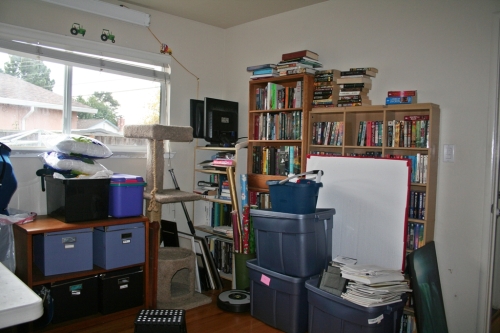
The big question is whether I have the motivation to paint it right now or not. 🙂 obviously not a required step in terms of functionality, but it would be super nice to be able to get rid of the last of the beige walls in the house…

