Monthly Archives: March 2014
Dakota: 12 Months Old
Wow! She’s a year old! I figure I should write out my thoughts on this whole monthly photo thing… or something… but for now, here’s her 12th photo!

And here are the past even months:


I have decided that I will keep going with the monthly photos, but I will try a different setup for year two!
Oh, and here are the odd numbered months.
The Coop!
The chicken coop is… functional!

I won’t quite declare it done because it needs a roof that’s a bit more weatherproof. We’re also going to dig in a mesh apron around the base to discourage digging predators, and I’ll probably paint it and add trim to pretty it up at some point. But the chickens are moved in and doing great, so yes, it’s quite functional. To refresh your memory, here’s my post with my original plans. Picking up from there, I got the frame for the coop built and moved it into place in our back yard:

I made the nesting box by just gluing some OSB together:

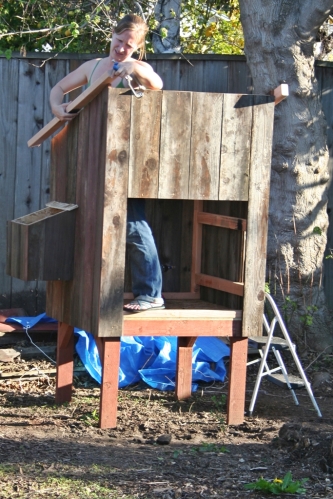
And then I started adding the old fence slats to the sides. You can actually see the pile of slats that we inherited when we bought this house in the background of some of these outdoor photos. It turns out we had 4(!) different varieties in that pile… some had lapped sides instead of tongue and groove, some had V-shaped grooves, some had U-shaped grooves, and some were a good 1/4″ thinner than the rest. Sigh. It was an adventure finding enough pieces in good enough condition that actual fit together for each side.
For the sides that sloped at the top, I cut the slats longer than needed and attached them, then had Dave come through with a portable circular saw to cut the diagonal line all the way across:

Then I attached the boards to support the roof directly onto the siding, thus avoiding having to figure out any angles for miter cuts:
The roof for both the main part of the coop and the nesting box is just OSB for the moment. I’m going to add some sort of vinyl roofing or something eventually, but it rains so rarely here that it isn’t much of a priority at the moment. Although it is actually raining as I type this, so I guess the joke’s on me… Anyway, here is the coop with the siding completed, roof attached, and even the doors in place:

Here’s the inside as seen from the main door. That’s the nesting box in the back, and the roost overhead. For the roost I used a big wooden closet rod from when we re-did our closet, but I may need to rethink it since I don’t think the chickens are actually using it currently. I’m pretty sure they’re both just sitting in the nesting box to sleep at the moment. Well maybe the rod won’t be too high once they’re a little bigger. And they won’t be laying until July so I guess it’s not a big deal if they sleep in the nesting box for now…

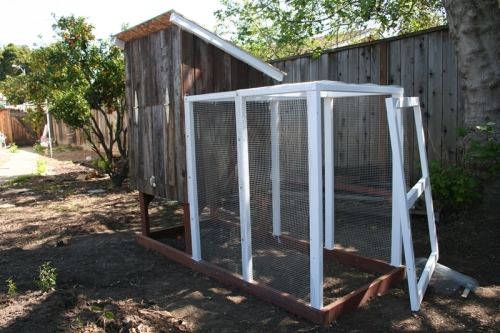
After finishing the coop, it was on to the run! I ran 2×4’s along the ground (we’ll see how long they last…) And even unrolled the hardware cloth around the 2x4s so the chickens could get some sun while I worked:

Unfortunately I was way too focused on the getting the run put together to take progress pictures, but I attached 2x3s to make a frame and then painted them with some white exterior paint I had. Since they aren’t treated I’m hoping the paint will help them last a little longer…
I did get this one picture of Dave helping me attach the last of the hardware cloth. It was a bit of a pain, though we found that screws and washers worked quite well to get it attached, and hopefully they’ll keep raccoons out…

Here’s a shot from the end of the run looking back towards the coop:

The entire end is actually a door so I can get into the run if needed:

I put hasps and twist-lock carabiners on all 4 of the outside doors to the run and the coop. The twist carabiners are pretty stiff, I have to work at it a little to get them open, so I hope they’ll stump the raccoons.
Here’s the other run door, it’s to access the food and water, which hang underneath the coop:

And here’s the “pop door” which allows the chickens access to the run from the coop:

Hopefully you can see there’s a string running from an eyebolt in the door to a bolt high up on the coop to keep it open. This allows me to open the pop door without having to actually go into the run. Here’s the pop door when it’s closed:
 I drilled a hole through the frame and added another hole in a board on the other side of the door. The plan was to have some way to secure the dowel in place, (perhaps yet another hasp that closed over the outside hole?) but for now I give the dowel a good twist and it’s actually quite a tight fit.
So that’s it! Yes, we still need to do the anti-digging apron, a better roof, a window for more ventilation, and perhaps some paint, but for now I’m taking a break. Whew! Here’s how it looks from across the yard:

Maybe I shouldn’t paint it, it blends so nicely! In person the white run with the unpainted coop looks a little weird though. Hmmm.
For posterity and anyone else trying to figure out if this is something they want to try, here’s a breakdown of costs:
- 6 Pressure treated 2x4s – $28 (3 for the coop platform, 3 for the base of the run)
- 16 regular 2x3s – $26 (8 for the coop walls/roof, 8 for the framing for the run)
- 1 4′ x 8′ sheet 7/16″ x OSB – $9
- 2 25′ rolls of 2′ wide 1/2″ hardware cloth and 1 10′ roll – $70
- 4 hasps, 4 carabiners – $25
- 5 sets of exterior grade hinges of various sizes – $30
- washers for securing the hardware cloth – $9
- Exterior grade screws of various sizes – maybe $10?
- Fence slats, paint, primer, closet rod – already owned
The hardware cloth total includes enough for a two foot wide apron around the whole thing, which adds a lot to the cost. Hopefully nothing will eat my chickens though!
 I think they agree. 😉
The kid still loves water
In the vein of letting everyone know that I don’t feel the need to DIY everything, I thought I’d share a recent purchase I made for Dakota. A water table:

I’ve been outside a lot the last few days trying to finish up the chicken coop, and we’ll probably be outside a lot this year in general. It’s tough trying to keep Dakota occupied and in the shade while wrestling with power tools and lumber and screws an such. And I still had a gift card from xmas burning a hole in my pocket. I crossed my fingers that Dakota would like this thing, and oh boy she sure does!

In fact she was quite annoyed at me when I took her inside when it got a bit windy and cold yesterday evening. This morning she was at it again pretty much as soon as we went outside.

I showed her how to put the balls in the top so that they roll down the spiral. And once she mastered it herself… endless entertainment.

Now if you come anywhere near her while she’s playing with it she’ll offer you a ball to drop into the top.

The table is just high enough that I can fit my watering can underneath the drain and fill it to water my garden. Win win.
Unfortunately, this has made her all the more determined to play with the toilet water while she’s inside. Needless to say we’re being pretty vigilant about keeping the bathroom doors closed. 😛
P.S. in case you do want to DIY a water table, here are some plans.
March Outdoor Chores
I should probably just title this post “Outdoor Procrastinating”, because whenever I think about getting some work done outside, I think about how I’m STILL not done with the chicken coop, and then I decide to go read a book or bake cookies or something instead of face up to my own slowness.
Okay, that’s a little unfair, here’s the coop as it looks today, and I really am almost done, at least with the functionality:
And I finally got around to trimming back the magenta bougainvillea (and the giant privet that was growing behind it):

See the poor rosemary bush on the far right side? It looks all lopsided because it was almost completely covered. And despite all the neglect, it still was providing us with delicious fresh flavor for dinner a few nights each week.
Speaking of herbs, here are my mostly ignored herb boxes:

I think maybe I need to trim back the parsley somehow? That’s the big leafy one in the middle. And the garlic is probably close to ready to be harvested, I’ll have to double check with mister Google on how one determines such things. But why is the garlic to the right of the parsley so much bigger than the garlic to the left of the parsley? Slightly more sun? Slightly better drainage? who knows!
Here’s the main garden box, I finally got around to planting little strawberry plants, hopefully they won’t die horribly, I’m at least watering them a few times a week:
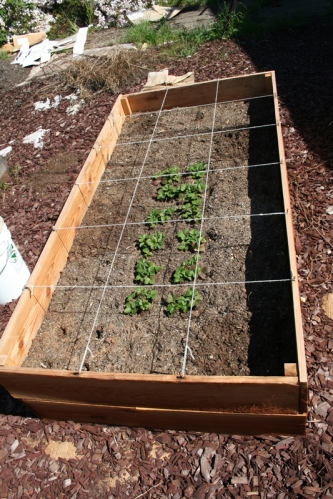
The onion seeds I planted are just starting to break through the soil on both sides of the strawberries, so that’s cool I guess.
Here’s the last big thing I need to prune back, the middle jasmine:

It’s the giant white mound. Since it’s furiously blooming at the moment I figure I’ll let it have its fun. I cut back the jasmine on the far right of the picture before it started blooming, so no flowers from that one this year. 😦 Oh and that fence is SO GETTING REPLACED this year. I know I say that every year, but it’s happening for real this time.
Let’s see, to finish things off, here’s the front yard. The lavender just loves being completely ignored and is looking fabulous:

The hydrangea is also doing well despite being completely ignored. I didn’t even cut off the dead flowers from last year. I’m a horrible plant mom. 😉

I got yet another fuchsia in a hanging pot last week. It’s looking a little droopy, despite the fact that I HAVE been water it! Booooo. Maybe I’m over-watering? Sigh. All previous fuchsias died off after a few months, but they at least looked good while they lasted…

And thus ends my report on the outdoor happenings this month. Wish me luck on finishing the coop!
Dakota: Eleven Months Old
I went 10 months straight without forgetting to take a picture on the actual day of Dakota’s monthly birthday, but alas my streak has ended. So yes, sadly this picture was taken a day late. (and the actual blog post is two days late! Horror!) The world didn’t come to an end and I’m not being booed in the streets, so I guess it’s not really a big deal. 😉

Previous odd numbered months:


It’s hard to get a picture of her grinning while holding still, as evidenced by this foot-flailing shot. I wanted to include it to show off her lovely teeth though:

I’ve loved doing this so I definitely plan to continue the monthly photos beyond one year. I’m tossing around a few ideas to hopefully simplify the process and maximize my chance of actually succeeding… I’m definitely not getting any more leg warmers though. 12 is plenty, even for me!

