Monthly Archives: November 2013
Colorful Advent Calendar

I think it’s safe to say that I barely knew what an advent calendar was before Pinterest came along. Now I can’t live without one! Darn you, Pinterest! 😉
Anyway, last year’s calendar was a bit late and not too exciting looking, but we still thought it was awesome. This year I stuffed my pockets with coupons and headed out to Michael’s… Not exactly with a plan, but with some vague ideas of what I wanted to do. Here’s what I ended up with:

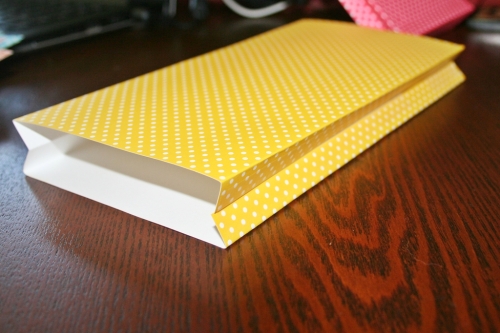
Three dollars worth of colorful card stock and some quick googling on how to fold a piece of paper into a baggy. And since the camera was handy, here is my garbled attempt at explaining how to fold a paper bag…
Fold in half and tape the edge opposite the fold:

Fold both of the long sides in a little bit (I cut a piece of scrap paper as a guide to keep the fold sizes consistent):

Unfold and refold the sides so the middle folds point inward. You know, like the sides of a paper bag:
Now fold the bottom up (I used the long side of my piece of scrap paper to keep this fold a consistent size):

And brush off your mad origami skills to press open the bottom so it looks like this:

Then fold the open edges in so they overlap, and tape them together:

Now you have a bag! Mine is tall and narrow so I can fold the top down:

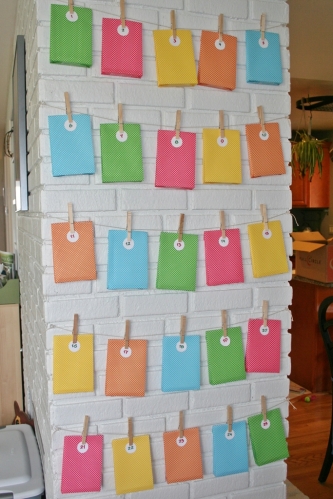
I also picked up a number stencil while I was at Michael’s, and after some contemplation I put the numbers on little circles of white card stock. I used a shot glass to trace the circles.

To hang, I knew we had plenty of ribbon and twine around the house so I didn’t have to buy anything. We settled on twine… And I have tons of clothespins, so that was a no-brainer.
For now we’re just putting chocolate in the bags for us grownups, but maybe I’ll add more fun stuff in future years. Whatever will keep this little one entertained!


Dakota: Eight Months Old
She’s getting really good at crawling (still no teeth though!) but she is still content to stare bemusedly up at the camera when we whip it out for these monthly updates.
I really need to buy a bigger onesie before next month’s photo though…

Previous even numbered months:


Here’s last month’s photo, in case you’re interested…
Weekend Painting
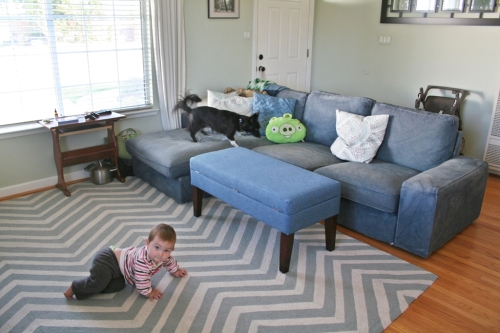
You can file this one under “unexciting weekend”… I actually managed to get some painting done! Painting isn’t generally an activity that allows lots of easy stopping and starting (though I did manage it with the fireplace…) but the baby seemed relatively content to hang out in the play pen:
 And I had actually managed to clean up a portion of the garage, meaning I knew where a fair amount of our painting supplies were to be found. So I finally (FINALLY!) painted the ceiling in the master bathroom, which had only been primed:

I actually painted the ceiling with the exact same paint we used on the walls. I’ll pretend it’s because I’m keeping up with the latest design trends, but really it’s just way easier to cut in and not worry about wall drips if everything is the same color, and I already had that paint on hand anyway. It’s a taupe-y gray, something you don’t really even notice is not white unless you’re really looking for it, or say the walls are one color and the ceiling is a different color. 😛 So basically the purpose of this paint is to just be not very noticeable. Mission accomplished!
I’m also working on making a storage bench for the foot of our bed, and I actually painted the pieces of plywood before the assembling step, which will hopefully happen this week:

It was super quick to go over everything with a roller, no paint brushing of awkward corners required. I’m planning on trying to do this project with the nail gun, so there will still be holes to cover and paint, but I still think overall the job will be much easier with the pieces pre-painted.
And the above picture is proof that the garage has a floor! Well, there’s a floor under the pieces of plywood anyway. I managed to get all of the paint, plumbing, tiling, and electrical supplies grouped in a logical fashion and stowed away in the cabinets along the far wall. Hopefully it will be easier to get more small projects done now that I know where everything is…
Baby-Friendlifying the House
It’s hard to blog about projects that aren’t already exactly how I want them to end up, but then I think that baby-friendlifying (I’m calling it that rather than “baby proofing”, because I doubt I’ll be able to make anything completely baby proof) the house is going to be a continually evolving project anyway. So, keeping in mind that I’m watching baby closely and improving/altering things as needed, here’s how things stand currently.
The TV console (aka Expedit unit from Ikea) needed the most immediate work since the floor in front of the TV is the primary play zone. Here is a picture from an old post that shows pretty much how it’s looked for the past year or so:
![]()
Across the top we had board games, the PS3, and the media computer taking up two cubbies, so we left out the vertical divider on that side when we assembled the unit. Across the bottom there are two storage cubes holding various extra controllers and blankets, and then a whole bunch of DVDs. So far Dakota has been ignoring the upper cubbies and mostly just playing with the DVDs, but in preparation for more vertical interest, here is how the unit looks now:

The bins along the bottom all hold baby stuff now, some of it is baby blankets and jackets, but I imagine that we’ll continue to accumulate more toys and these will be overflowing soon enough. The DVDs and board games have all been moved to the bookshelves between the living room and dining room. The new doors on the top left two cubbies are an add-on accessory for the Expedit that we picked up on our last Ikea trip. They come with an insert (I believe made of pressboard) that covers the left, back and right sides of the cubby and gets screwed into the sides of the main unit. you need the added pressboard on the sides so the door fits evenly and opens/closes correctly, but since I’m hoping we can stuff most of our electronics behind these doors I cut off the back of the inserts so there will be a lot more ventilation. Also, since I wanted the doors to close towards each other, I didn’t finish screwing in the sides of the pressboard insert on the right. I’m pretty sure the screws from the two inserts would run into each other, so I’m going to need to offset the screws on the right-hand insert. sigh. I’m not sure any of that made sense, but I’ve already spent too much time describing what I hope will be a small and quickly fixed setback, so I’m not going to try and clarify any more. 🙂
The media computer is still there taking up two cubbies on the right, but it will be going away soon. We’re just waiting the arrival of a newly ordered single-board computer that can hopefully handle our non-PS3 video streaming needs. The PS3 itself still fits behind the door even with the inserts, I just had to stand it up on its side. I also have the power strip that’s full of exciting electrical plugs tucked behind the doors. Once we have everything finalized I plan to tie up the cables that are currently hanging loose but clearly visible behind the console, and that double-cubby space can hold stuffed animals or something.
To complicate things, we finally have our sound system most of the way set up. The receiver is for now sitting on top of a shelf in the right-hand corner, over the subwoofer. (Partially visible behind the cat scratching post in the picture above) So far baby has ignored it, but I haven’t decided exactly what my plan is if she starts trying to fiddle with it. Sigh.
Moving along… not super exciting visually, but here’s the dog bed:

I need to secure the antenna cable behind it to the wall, but more importantly this is the dog-priority zone. Loki is getting a bit uncomfortable with Dakota becoming more mobile and grabby, so we’re focusing on rewarding him when he responds to a stressful situation by moving away from her. I could probably write a whole separate blog post on this, but basically if he growls or barks at her we call him to his dog bed and give him treats. If Dakota approaches him in his dog bed, we pick her up and move her away, so it’s a space where he can feel comfortable. I wish we could put it in a more out of the way spot, but he still wants to be in on the social scene even when he doesn’t necessarily want a baby up in his face. So tucking it behind the chair means Dakota doesn’t notice it too much, but Loki still has a pretty good view of everything.
The fireplace was a bit of a problem, the side facing the living room had this freestanding screen:

Pretty heavy so there’s no way to knock it over accidentally, but I imagine a determined and fairly heavy baby might manage to pull it over on herself. I debated just screwing it into the facade directly, but honestly I’m not very fond of the thing, and the big metal curlicues aren’t particularly baby-friendly in there own right. I shopped around a bit for a replacement, but everything was either ugly or really expensive, so I have this temporary solution for now:

Yeah we just had an extra plastic baby gate that made a pretty good tight fit in the opening. The fireplace is non functional right now anyway, so it’s not like I need something fire-safe. Dakota finds the weird wooden owl thing pretty entertaining, and I got it on clearance, with a coupon stacked on top of the clearance price, so I don’t mind if she scuffs it up a bit.
The other side of the fireplace has a frame with glass doors that’s permanently installed, with the doors glued shut even. Not very elegant looking, but not something we need to rush to change at the moment. Here’s the problem, as Dakota decided to demonstrate while I was typing this post up:

This is where we keep the dog’s water dish. The food dish isn’t a problem because we feed him after Dakota goes to bed and pick the dish up first thing in the morning. For now I’m picking the dish up when I notice her going for it and trying to remember to put it back down if we’re going out. I think I’m mostly just going to resign myself to a certain amount of water mess here though.
Another problem area is the dining table, where I work on the laptops:

I found that outlet cover in the baby-proofing section, and the little clear cable clip attached right under the window sill seems relatively sturdy. So I figure if baby starts tugging on the electrical cords at least they won’t come out of the socket, and the clip will break first before she can pull the adapters on her head. With any luck this will be enough of a delay for me to realize what she’s up to and swoop in to save the day. Long-term we hope to build a banquette along this wall, so maybe we can figure out some way to keep the outlet accessible for adults but less obvious for little ones? Hopefully we will also someday have a somewhat functional work space for computers and such in the cat room (which already has a baby gate in the doorway) but the dining room has the best table space AND the best view in the house, so I imagine there will frequently be a laptop there no matter what…
Moving to the kitchen, most of our lower cabinets have pots and tupperware, so we just added these catches to the cabinet under the sink.
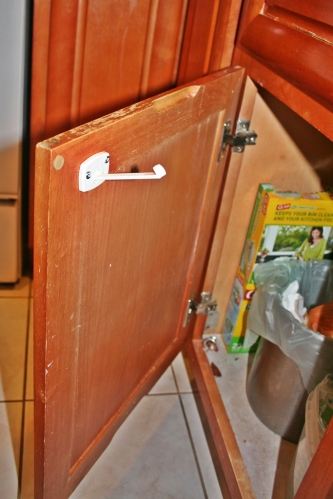
Right in the front of that cabinet there’s the compost pail, the dishwasher detergent, the all-purpose cleaning spray, and the bucket that holds dirty rags/cloths, so it definitely needed locks/catches. These are working great, I can still open them one-handed and they close and lock without any extra effort. Dakota hasn’t tried opening any doors yet (we’ll have to decide how we want to secure the doors of the TV console and the bookshelves when she does) but it’s good to know that these catches work well.
There’s also this set of drawers:

The top one holds the silverware, the middle holds all the random kitchen tools (some of which aren’t baby-friendly, like the vegetable peeler) and the bottom drawer holds random rarely used stuff like a roasting pan and some salad serving utensils. I’m thinking I’ll reorganize so the bottom drawer holds baby-friendly tools like measuring cups and such. The upper two drawers will need to stay off-limits, but they aren’t super easy to open, and I can always transfer everything to a bin on top of the counter for a few days if Dakota takes an interest and we don’t instantly have a baby-proofing solution.
To finish up, we keep our shoes in these thingies:

They tip out like so:

Dakota loves chewing on shoes. Mmmm delicious shoes. I try to get them put away, and I can only hope that she outgrows her shoe-chewing ways by the time she figures out how to open these guys.
Yard Work To-Dos
I didn’t really have anything I wanted to blog about, so I decided to walk around the back yard and take pictures of all the stuff I have NOT been doing… See, I’ve managed to keep up with mowing the lawn, but not too much else has been happening with the back yard. The white rose bush is back to behemoth size:

That’s it on the right, probably around eight feet tall? I’m pretty sure I’m going to cut it down to about a foot tall, for real this time. This thing grows like crazy even with horrible neglect, and I can’t keep up with it when it’s taller than me. The jasmine has pretty much completely engulfed the red rose bush, (on the left in the above picture) so I’ll take a swat at that too. I’m thinking at least one of those jasmines just needs to go. Or maybe I should nix the red rose bush? It’s always been the least healthy of the roses I’ve inherited. It makes me cringe even contemplating killing a rose bush though…
The apple tree is looking just pathetic:

I keep thinking I should at least spend a few hours picking apples off it so hopefully those collapsed branches can recover, but there always seems to be something higher priority that I’d rather do instead.
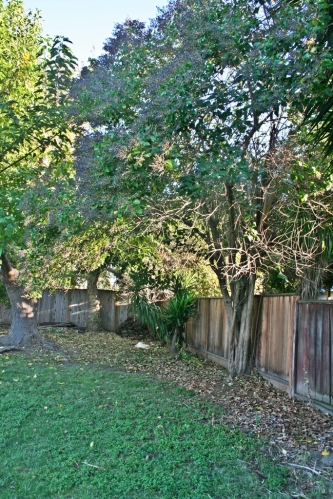
The rest of that fence line is doing a bit better, here it is with the apple tree just visible in the distance:

I managed to unearth the two pink roses from the mounds of weeds they were drowning in. They’re to the right just in front of the magenta bougainvillea in the above picture, they’re hard to see because there aren’t any blooms at the moment. These two roses don’t get any water from the automatic sprinkler system (I should totally remedy that) and yet they STILL keep on trucking.
I hacked back the purple bougainvillea and got a good start in on its jasmine buddy, (in the foreground of the above picture) but I still need to attack the magenta bougainvillea. (back near the apple tree) I’m going to give myself one more year to try to keep up with them, but if they get overgrown again I’m going to call it quits and uproot them.
Moving along…
The stump that the power company left us when they cut the huge yucca tree down has gone and sprouted:

It no longer looks like a decaying stump, at least.
The privet flowered and fruited:
Sorry this picture isn’t super helpful, the privet is the “tree” with the cluster of “trunks” right up against the fence, and there are a bunch of dark berries and leaves in the upper part of the pixture. I’m like, 90% sure it hadn’t produced fruit since we moved in, so maybe it has some sort of multi-year cycle? Anyway, I don’t like it. Really I don’t like any of the trees along the back fence and I want them to go away. But I do like shade and privacy, so I guess I’ll have to figure out my priorities at some point. Blah.
The far side of the house has managed to stay mostly weed-free thanks to my cardboard and mulch laying efforts:

Aaaannnddd the mulberry tree is currently shading the solar panels for part of the day. We got the thing pollarded less than two years ago, and I don’t think I can stomach the expense and hassle of yearly pollarding, so we are having serious discussions about cutting it down. 😦 On the one hand the shade is lovely. On the other hand it grows too fast, and the roots have put cracks in the patio and are probably close to attacking the foundation of the house. Sigh.
Baby in the Pool!
Dave managed to sit and observe one of our baby swimming water learning classes, and he brought the camera along. Taking pictures from a distance of an indoor pool is not the easiest, but he did his best. I combined most of the photos into little action sequences, so it’s hopefully not too big of a deal that they’re a bit fuzzy. Anyway, here we are, ready to go:
 I got her a washable swim diaper, bit I’m way too lazy to stuff her into an actual swim suit. She doesn’t look too scarred for life yet…
One of the main things we work on is supported back floats. I think the blue foam thing is to give the babies something to look at as they’re floating around:

Another thing that we worked up to and now do every week is quick, but complete, submersions. We taught them a cue (“Ready, down!”) so they knew they are about to get water in their faces. It’s pretty cute and also amazing to see how quickly she learned to prep when she heard the cue.

Going into this class I knew I wouldn’t push anything if Dakota looked unhappy, but thus far she’s seemed pretty unperturbed by the dunkings. She sputters a little when she comes back up, but then she goes right back to looking around and/or chewing on whatever toy is in her hand.
Something new and exciting for this class was a little foam slide! I’m glad Dave was there to document the experience. The babies in the class range in age from Dakota (7 months) up to I believe an almost 2 year old. It’s pretty neat to see how much the older and more experienced kids love the slide. Dakota gets a lot of teacher assistance until she’s old enough to control herself:

I’m really enjoying the classes. Based on what I’ve heard from other moms, the experience is vastly improved by having a very knowledgeable and engaged instructor and a nice facility like the one we’re at. I think Dakota has the right disposition for it too, and I think since she was sitting up unassisted so early it worked out really well to have her start as early as she did. We’ve already signed up for the next session!

A Little Shopping Goes a Long Way…
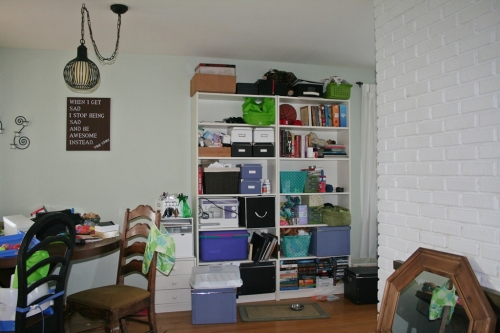
We are forever in need of more storage space, so I bought these bookshelves from Ikea a while back to try and make some use of the walk space between the dining area and the living room:
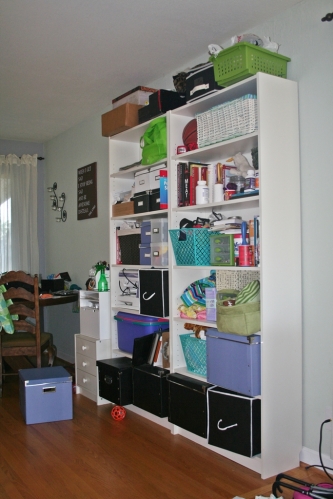
They hold a lot of stuff but they’re super messy. Here they are as seen from the kitchen/dining area:
Last weekend we made a “babyproofing” trip to Ikea, and we picked up doors for these shelves as well as some door inserts for the TV console. So here’s how the shelves look now:
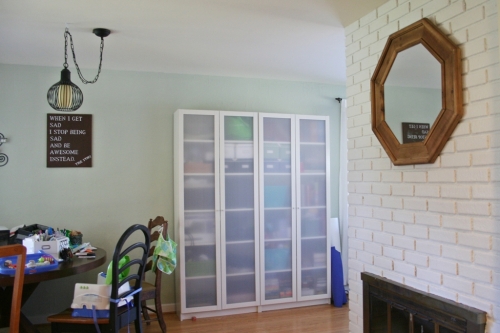
So much neater, though I had to find new homes for a lot of stuff that was sticking out too far to fit behind the doors. And so the “not enough storage” shuffle continues… We’re thinking of maybe trying to stick some sort of decorative paper behind the doors since they’re translucent and rather white and boring at the moment. We’ll see.
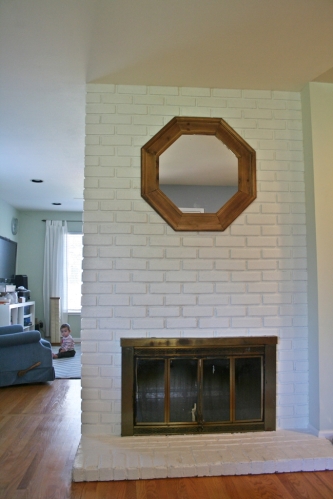
And perhaps you noticed the AWESOME mirror we have hanging over the fireplace now? A new Home Goods opened up nearby, so we stopped in and made a few purchases that I’m super pumped about. The mirror is one:
And we also got this great storage bench/ottoman which is a little too tall and a little too blue, but totally amazingly useful. We can set food trays on it super easily, I can vacuum under it, and it’ll be pretty nice for Dakota once she’s pulling up on things. I’m thinking maybe I’ll try reupholstering it once the cats inevitably claw it to shreds? it’s probably the easiest shape possible for a novice reupholsterer, so it should be a fun challenge:
 The white patterned pillows were also Home Goods finds, and I didn’t get a good picture but they go great with the couch and rug. Yaaaay pillows.
And to finish things off, here’s the living room as seen from the front door:
 I hung my biggest frame (cool picture of a waterfall) on this side of the fireplace. It looks a little sad and small, but I bet it would look great with a chunky mantel and a few candlesticks or something on either side of it. The bookshelf doors are looking pretty slick from this angle too, so I’m just all around in a good mood about our living space at the moment.
Next up, replacing the fireplace grate that’s begging to be pulled over, and finish up making the TV console all nice and baby friendly!
Pikachu Costume Complete
I blogged earlier this month about how I was in the midst of sewing a Halloween costume for Dakota. To recap: I decided on making a pikachu costume by modifying a Simplicity costume sewing pattern. I was able to sew the body of the costume out of yellow fleece by just following the pattern instructions, so what was left was to modify the ears and add a face, tail, and back stripes. Modifying the ears was pretty straightforward:

I just drew right on the tissue paper to extend the original ears a bit. The red lines are for where I wanted to switch from yellow fabric to black.
I needed to move the ears farther back on the hood to make room for Pikachu’s face, so I pinned them on and then spent a while shifting little tissue paper circles around on the hood until I had everthing more or less where I wanted. George the stuffed animal served as my costume model:

I used the exact same fleece fabric in different colors for the eyes and cheeks, and just left the edges raw since fleece doesn’t fray. I hand sewed them (and the brown stripes for the back of the costume) in place using a running stitch in a matching color thread. This actually worked amazingly well and went pretty fast, even with my sloppy hand-sewing. You have to get your nose up close to even really see the individual stitches, and even then the unevenness doesn’t really detract in any way. And as advertised, no fraying! I may just use fleece instead of felt for future craft projects, since I’ve had bad experiences with felt coming apart when I try to sew with it. And actually I probably could have machine sewed the pieces directly on, but the pieces were so small it probably would have taken me longer to wind the bobbins and thread the machine than just sewing it by hand.
Finished pictures in a moment, but first I want to talk about the tail. After much waffling I decided to add a pipe cleaner inside for support and make it detachable from the costume. Here’s my free handed sketch that I used as a pattern:

And here’s the finished tail:
I machine sewed the two sides together inside out along the top, turned it right-side out and inserted the pipe cleaner and bent it in the right spots, and then hand sewed the bottom closed. In hindsight I probably should have machine sewn the whole thing right-side out and left the raw edges visible, because trying to get all those sharp corners to turn right-side out cleanly was a pain in the butt. I attached two yellow buttons to the tail, one at the top corner and one at the base, and attached two loops of yellow cord to the body of the costume.
Unfortunately, but not unexpectedly, the tail was a bit of a flop, literally it just flopped over to one side while attached. Ah well, I did get a few cute pictures with it on, after detaching the top button:

Oh, for the mouth I just hand-sewed using a back stitch, and then I sewed another line of back stitches right next to it to make it thicker. Anyway, here you can see the back of the costume:

And then I took the tail off and we went to various Halloween parties. 🙂
Here’s a close-up of Dakota sitting. The costume is a little large on her, especially since it was warm enough that she didn’t need to wear much underneath it:

And here she is still not quite crawling, but at least demonstrating that she has decent mobility in this thing:

In that picture you can see the little yellow cord loop where the tail was attached to her butt.
The fleece was a little warm during the day since the temperatures got up into the 70s, but she was able to wear the costume pretty comfortably for pretty long periods without complaint. I liked the way the elastic along the top of the hood worked out, it kept the hood mostly in place without really getting in her way. And in case it wasn’t already obvious, I really loved working with fleece, and I definitely plan to use it again in future projects. The tail was a little bit of a bummer, but this isn’t my first time dealing with floppy costume appendages, so I wasn’t at all surprised by the failure and I don’t think the missing tail really detracted from the overall costume much at all. Now I can’t wait for next year!

