Category Archives: home improvement
home improvement
New Kitchen Sink
Since moving in we’ve had ye olde double basin sink and boring chrome faucet. I maniacally plotted replacing the faucet from the beginning, but for some reason I assumed that sink basins weren’t interchangeable, so since we weren’t replacing the granite counter tops, I assumed we were stuck with the current sink. WRONG!

Since the faucet was perfectly functional, replacing it never quite made it to the top of our to-do list. But recently it was starting to leak a bit, so I started contemplating replacements more seriously. While I was at it I measured the rough dimensions of the basin, and I discovered that it’s actually a fairly standard size after all. I was still a bit nervous about things not fitting, so while we ordered the new faucet online, we picked the new basin based on what was available locally, so we could return it quickly if things weren’t fitting.
Here’s the hole in the counter after removing the old sink:

And here’s the new single-basin sink and fancy faucet:

We were able to re-use the disposal, and since the new drain hole is farther back there suddenly feels like there’s a lot more room to store stuff under the sink. On the negative side, this type of faucet has a counter-weight on the hose to make it retract by itself, and that was catching on the disposal unit under the sink. So for now we’ve left the counter-weight off, but honestly the lack of auto-retracting on the hose hasn’t bothered me in the slightest. Maybe we’ll revisit later.
Ceiling Paint is Happening
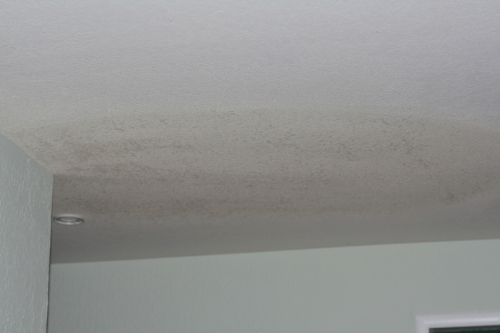
I’m doing it. I’m painting the ceilings. The catalyst is that I want to put in crown molding sometime soon, but I can’t just spiff up the edges of the ceilings when they’re really just a mess everywhere else… Like in the bedroom where the smoke detector is now on the wall above the door, but clearly it used to be on the ceiling:

(Um, were the ceilings tan-colored at some point?)
And in the living room there used to be a (non-structural) crack with a mismatched patch job. I got the drywall guy in to redo the texture so it’s waaaayyyy less noticeable, (This picture was taken with the camera flash, which makes it stand out way more than it does in person) but now it’s just bare spackle with no paint at all:
And let’s not forget the weird different color ceiling in the kitchen:

Oh, and did I mention half the ceilings in the house have semigloss paint? The glare drives me to distraction.
So I pulled out all the light colored paint test pots we had and did a bunch of samples in the living room:

None of them are quite right so I carted home a bunch more paint sample cards and taped them up. We’ve narrowed it down a lot, but I’m pretty sick of comparing “slightly purplish white” with “slightly bluish white” and “different slightly bluish white”, so I’m just going to leave them up while I finish prepping and then make a snap decision and have NO REGRETS!!!

My next post will hopefully be about how tired my shoulders are and how I can’t see because of the paint splatters in my eyes. Oh yes. 😉
Apologies for not bothering to white balance the pictures. I realize in this instance a bit of white balancing might have actually been helpful since we’re dealing with many shades of not-quite-white, but I just can not be inspired to spend much time spiffing up a bunch of pictures of my ceilings.
Beadboard and Coat Hooks
The way our house is set up, the front door is the one we all use to leave and enter the house, so we are totally missing a side door or a “mud room” type of dumping ground for jackets, shoes, bags, etc. Our coat closet is a sad, tiny thing that pretty much just serves as a place to stash our off-season outerwear. We did manage to set up these inelegant but very functional tip-out shoe cabinets to at least keep the footwear situation mostly under control:

But bags and sweatshirts and such tend to end up in one of three locations: the fireplace hearth, the back of the couch, or the recliner chair. And invariably a cat will decide to lie on top of them, because that’s what cats do. 🙂
Because of how we’ve configured the living room and because the front door is right up against the corner, there isn’t really a good place to stick a console table or a storage bench that wouldn’t be completely in the way. So I finally settled on a row of coat hooks as the best organizing solution. I didn’t want to just stick them in the middle of the wall all alone, so I decided to try some sort of paneling to make them look more intentional instead of just being an afterthought. The space is a little less than 8 feet wide, so we bought a single 4’x8′ panel of beadboard and cut it in half so the lines would be vertical. Here’s Dave trimming down the edges a smidge using his handy new circ saw guide:

We also bought a single 8′ 1×4 board to serve as a “chair rail”. Dave routed a notch along one side so it would overlap the beadboard a little bit. (I didn’t catch a picture, but I imagine it would have looked similar to the one above.)
And then we nailed everything in! Sooo easy.

Well there were a few other steps like cutting a hole for the electrical outlet and caulking and painting, but honestly, this was such a simple project. I was a bit nervous that the seam between the two panels would be super obvious, You can see it running down the middle in the picture below, after caulking and priming but before putting the real paint on:

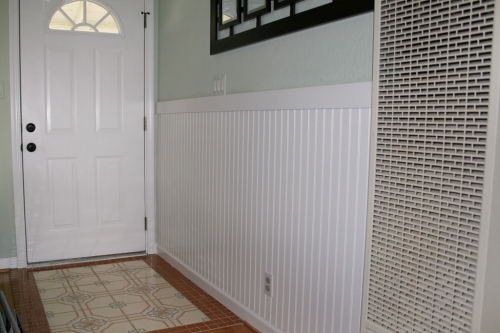
But by the final coat of paint the seam had completely disappeared. Here it is looking all spiffy. I went ahead and freshened up the front door with a new coat of paint too:
We decided we had enough space for eight hooks, and I decided I preferred the smaller “robe hooks” rather than the more traditional coat hooks. It’s a little more difficult to hang bags with thick straps on the smaller hooks, but I don’t feel like I’m going to impale myself on one…

And the hanging stuff doesn’t really get in the way of the path to the door, so it’s working quite well.

The view from the rest of the room isn’t quite as swanky now that there’s lots of random stuff hanging from the hooks, but I’ll take function over photo-worthiness. 🙂

Now we just need to move that hanging four-paneled mirror thing, it looks really weird being off center above the beadboard.
Weekend Painting
You can file this one under “unexciting weekend”… I actually managed to get some painting done! Painting isn’t generally an activity that allows lots of easy stopping and starting (though I did manage it with the fireplace…) but the baby seemed relatively content to hang out in the play pen:
 And I had actually managed to clean up a portion of the garage, meaning I knew where a fair amount of our painting supplies were to be found. So I finally (FINALLY!) painted the ceiling in the master bathroom, which had only been primed:

I actually painted the ceiling with the exact same paint we used on the walls. I’ll pretend it’s because I’m keeping up with the latest design trends, but really it’s just way easier to cut in and not worry about wall drips if everything is the same color, and I already had that paint on hand anyway. It’s a taupe-y gray, something you don’t really even notice is not white unless you’re really looking for it, or say the walls are one color and the ceiling is a different color. 😛 So basically the purpose of this paint is to just be not very noticeable. Mission accomplished!
I’m also working on making a storage bench for the foot of our bed, and I actually painted the pieces of plywood before the assembling step, which will hopefully happen this week:

It was super quick to go over everything with a roller, no paint brushing of awkward corners required. I’m planning on trying to do this project with the nail gun, so there will still be holes to cover and paint, but I still think overall the job will be much easier with the pieces pre-painted.
And the above picture is proof that the garage has a floor! Well, there’s a floor under the pieces of plywood anyway. I managed to get all of the paint, plumbing, tiling, and electrical supplies grouped in a logical fashion and stowed away in the cabinets along the far wall. Hopefully it will be easier to get more small projects done now that I know where everything is…
Painting the Fireplace
I’ve been talking about redoing our double-sided faux brick fireplace almost since we moved into this house. Someday I’d really like to rip the brick veneer off entirely and maybe tile it, but when it comes to actual construction we have many higher priority projects waiting to happen. So I finally decided to just paint the sucker. I figure that I actually kinda like the look of painted brick, so if we never get around to tiling I’ll at least have something that I don’t hate. And painting is a fairly easy project to do by myself, and I can start and stop it fairly quickly for those times when the baby’s naps are shorter (or longer!) than expected. As a refresher, here’s how the fireplace has been looking, as seen from the front door:

And here’s the dining room side:

I snapped these shots during the late afternoon, thus the weird sunlight pattern going on…
Anyway, the urge to get rolling on this project came over me somewhat suddenly, so I grabbed the primer and a discarded paintbrush that we had sitting in the garage and slapped on the first coat over the course of maybe three Dakota naps. Then I did a single coat of semigloss latex paint, the same stuff I’ve been using to ever-so-slowly repaint the beige trim and doors all over the house. I think it ended up taking about a half a gallon to completely cover both sides, in a single thick coat. I tend to actually paint coats on too thinly when doing walls, but the brick is so textured that after the primer coat it was easy to see that brush strokes really wouldn’t stand out at all, even with semigloss. So I really loaded up the paintbrush and did my best to get paint into all the nooks and crannies. The paintbrush was kaput by the end of it all:

And even with all the smooshing, there were still quite a lot of dark crevices that really stood out once the whole fireplace was white:

See the black spots around some of the bricks? Since these weren’t real bricks stacked on top of each other, there were a bunch of spots that had gaps between the brick veneer and the backsheet thing that they were attached to. So I picked up some paintable caulk and went to town caulking the worst looking cracks. Here’s that same angle after caulking:
 I quickly discovered that the caulk blended really well. It has a slightly different finish, but you basically have to have your nose an inch or so away from the bricks to see it. So there isn’t even any need to paint over the caulk, and I can just caulk over a spot or two at a time as the mood strikes me.
Anyway, here are the finished shots!

And from the other side of the living room:

and from the dining room:

And even from the kitchen!

It’s amaaaaazing. Especially from the living room, which is on the north (i.e., dark) side of the house. The room is just so much brighter.
Now of course I need to decorate the darn thing. I have the perfect framed photo for the living room side ready to go. For the dining room side I’m thinking some sort of mirror, since there aren’t any mirrors over there and the room is a bit on the small side. I’d like a non-rectangular mirror with a cool frame, but Dave has vetoed any and all “sunburst”-style mirrors, which is cramping my choices a little. 🙂 I think he saw way too many of them in the staged homes we visited while we were house-hunting. He’s otherwise almost always open to my weird decorating inclinations, so I’m okay with him having this one hard veto, no matter how much I like sunburst mirrors. I’m also debating whether we should build a mantle… I like boring straight lines anyway, so we could almost just mount a single chunky piece of lumber without any adornment and call it “modern” and/or “rustic”. That would mean figuring out what’s going on behind the brick veneer though, so we’ll probably just leave a mantel on the wishlist for now.
My final to-do on this would be to install a gas fireplace thingy in there. The gas line is actually already set up, but there just isn’t an insert at the moment. Along with that I’ll probably want to replace the covers on both sides, since the one on the living room side is a bit too ornate for me, and the one on the dining room side is really beat up and kinda ugly in general.
Anyway, since I promised to my family members that there would be Dakota pics in all my posts, here’s Dakota enjoying (ignoring) the new fireplace color:

Functioning Bathroom Sink
We still have to finish tiling and install trim and a door, but we have a functioning vanity, complete with electricity! Behold:

We really wanted a double sink, but there just wasn’t quiiittteeeee enough space. But then we discovered this hybrid… two faucets, one drain. The actual vanity is screwed into the wall and doesn’t touch the floor, and it has drawers instead of cabinet doors, which I’m seriously loving. Here’s another angle:

We’re hoping to add some glass tile (matching what we’re putting in the shower) as a backsplash and possibly add a frame to the mirror. I love the lights, found them in the outdoor lighting section. (And only later recalled that Young House Love used the same light in one of their bathrooms.) And while we don’t need a functioning shower vent yet, I’m happy with this switch that we got:

The light switch is on the left. On the right is the vent switch… you can preset how long you want it to run and then just hit the button each time you use it. It shuts off automatically after the designated time has passed. Okay, so it’s not really that exciting, but I love steamy showers and hate mold, so shower vents are important to me. 🙂
The jury’s still out on our other “innovation”:
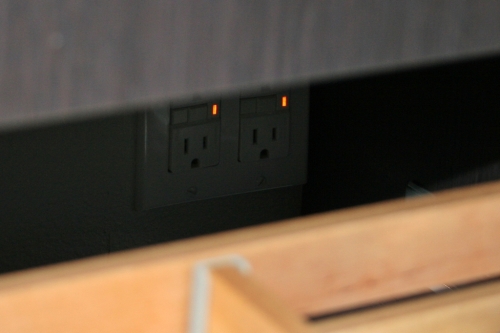
That’s a set of electrical outlets hidden behind the lower drawer of the vanity. My theory is that we can plug in things like razors and electric toothbrushes without electrical cords running all over the bathroom. And we can leave the razors and toothbrushes in the drawers while they’re charging, so there’s less clutter on the sink. There’s enough of a gap between the back of the drawer and the wall for this to work, but I haven’t actually had a chance to set everything up yet. Possibly it will be a miserable failure, but I’m feeling optimistic.
Now if only the shower was done!
Not-so-fun plumbing
I figure we had more than enough plumbing excitement when we had our house re-piped, but I guess our house wasn’t through with us because we’ve had two completely unrelated plumbing issues just a month later.
First, our kitchen sink clogged up. Dave made a few attempts to clear it, including replacing the P-trap, (which was looking gross, but apparently not the issue) but he finally admitted defeat and called a plumber. The guy showed up with a nice big electric-powered pipe snake and went to town. He showed us that we actually had a very convenient clean-out for the kitchen drain on the outside of our house:

It’s that black (ABS) thing in the middle of the picture. Actually it was originally galvanized steel painted to match the rest of the house, but the guy had to use a HUGE pipe wrench to get it off, so he was nice and replaced it with an extra ABS cap he had in his truck. So we can hopefully get it off using a normal wrench if we ever need to.
Anyway he pulled out a massive amount of gunk and made a huge mess on the patio. Luckily it hosed down pretty easily. (You can just barely see a bit of discoloration in the picture above.) We chatted while he worked, and I guess as houses like ours settle over time, the angle of the drain pipe running under the house tends to flatten out, making it much more likely that gunk will just sit and build up there. If that’s the underlying issue, we could always get the pipe replaced, or we could just get it cleaned out every few years. It’s also possibly that the previous owners just liked pouring grease down the drain, in which case this will hopefully be a one-time deal since we try to be pretty good about keeping grease out of there.
Moving on, here’s our other, ongoing, plumbing issue:

That patch of extra-healthy looking grass means there’s a leak somewhere under our front lawn. We were hoping it was the irrigation system, but when we turned off the main valve for the irrigation and checked a few days later, that patch of grass was still wet and swampy looking. And if you draw a straight line from the water meter by the street to our main inlet valve on the side of the house, you run right through that patch of grass. We tried turning off our main water valve for a few hours and then checking the water meter to see if it moved. I’m pretty sure it moved a bit, though it’s hard to tell.
Anyway, the fix for this involves turning off the water at the street and digging a big hole. We have no idea how deep we’ll have to dig, but hopefully not too far considering the ground doesn’t really freeze here…
Ahhhh the joys of home ownership. But taking pictures of random house stuff isn’t nearly as fun as taking pictures of babies. So here’s a bonus baby picture to make this post more interesting:

Last Open-Walled Bathroom Update
I’m a little bored of taking pictures of wall studs. But I did want to document this process after all, and the drywaller is here today so this was my last chance to show the work we’ve been putting into this project up to this point.
First up, the doors, all framed! Here is a picture taken from right by our bedroom window. The closet door is on the right, the bathroom door is on the left:

This isn’t a load-bearing wall, so the big header boards (I believe they’re 4×6’s) are total overkill. But we just re-used them since they were in there originally.
Here’s the bathroom, looking in from the doorway:

Sorry for the picture quality… early morning camera work. 🙂 The shower is on the right, the toilet goes under the window on the left, and the sink will be out of the shot on the left. And Dave added insulation to all of the exposed exterior wall shortly after I took this. So at least this one little piece of wall will be warm in the winter, I guess?
And here’s the shower floor: (Oh man, so not exciting)

If you’re feeling really enthusiastic, you can compare it to this picture, which was how it looked before we moved the drain and added the curb and plywood.
Moving along, here you can see a bit of PEX tubing peeping up from underneath the house before it switches over to copper for the shower water supply lines:

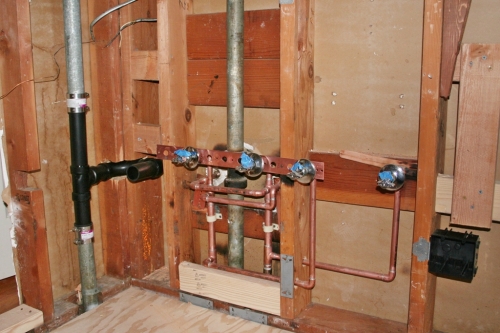
And here’s the rest of the plumbing work for the shower:

It’s going to have a rainfall shower head, so the attachment point is extra high. Directly below that we have the diverter for the handheld shower, which will come out of the wall to the right side of the main valve. On a side note, if you get a new valve installed, make sure you install the cartridge and close the valve, otherwise your hot and cold water will mix and you won’t be able to get any hot water ANYWHERE IN THE HOUSE. The plumber came back first thing in the morning and fixed it when we called and said we didn’t have hot water. He was very sheepish and apologetic.
Okay, so turning around back towards to bathroom entrance, here we have the sink! Or at least, where the sink is going to go:

Wooo. Pretty much right after I took that picture Dave crawled up into the attic and ran the electrical wire for the vanity lights and boxes, in case you were wondering. He’s been a busy bee! Here’s a closer shot of the new plumbing:
The new sink has two faucets and only one drain. The plumber was able to tie the new hot and cold lines into the ones that already go to the hallway bathroom sink on the other side of the wall. It looks like a crazy game of Pipe Dream, but hopefully it will all work correctly…
Unfortunately we weren’t able to tie the drain in with the existing drain for the hallway bath, so instead we were able to notch the studs and bring the old drain around the corner. yeah, that took awhile. Adventure! Or something.
It’s a “floating” sink, so we added some extra 2×4’s for blocking so all of our anchoring screws will be going into actual wood and not just drywall.
So that’s the state of things. The drywall is going up as I type this, and everything should get mudded and textured tomorrow. Hopefully we can start painting a day or two after that! We still need to buy a light fixture for the closet, but even without a light, once it’s painted we will have storage space again!!! Meanwhile, Dave will get to start on the final big project: tiling. Well actually first he gets to make a shower pan, so we will still be a single-shower household for a little while yet. Perhaps we could install the sink first?
Floorplan Fun
This is just a little visual aid that I whipped up a while back using Floorplanner.
Here’s the master “suite” plus the hallway and hall bathroom as they looked before we started redoing the master bathroom:

The closet on the top left was a reach-in closet with sliding doors that we immediately removed. (I hate sliding closet doors.) There was a random open area between the closet and the bathroom that was just a waste of space in my mind. The bathroom itself had an itty bitty corner shower and an awkwardly placed linen closet with doors that blocked the main bathroom door when opened.
Here’s our new (well, in progress) layout:
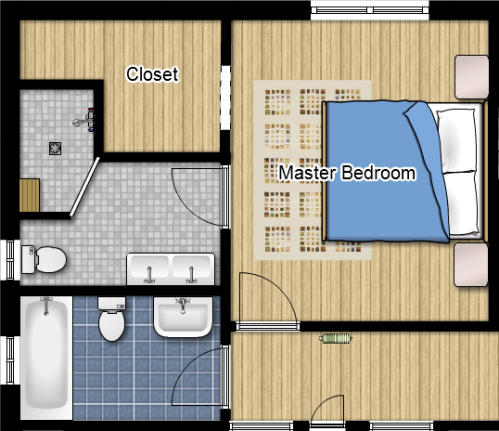
We’ve moved the bathroom door so we can close off the closet and make it a walk-in. We’ve moved the sink to a different wall and are replacing it with a bigger one. We’re stealing a bit of closet space to bump out the shower and make it more spacious. Hopefully the loss of the linen closet will be offset by the additional storage space under the sink. (The original sink was a pedestal without any storage space underneath at all.) The tiling will actually be a bit different than what’s pictured, in the shower the floor tiles will be 1″ square and in the main bathroom area they’ll be 12″. Also the new sink is just one long basin with two faucets but only one drain. But hopefully you get the idea.
There are about half a dozen guys here today efficiently tearing out our old pipes and installing new ones. Unfortunately we goofed and didn’t buy the new rough-in valve that we need for the hallway shower. I foolishly thought we’d find the one we needed at the home improvement store. I’m getting one shipped overnight so hopefully it’ll show up tomorrow in time for them to install it, otherwise we’ll be doing a bit of plumbing work ourselves after all.
Bathroom Update: Plumbing and More Framing
For a while there it seemed like we were in some sort of plumber communication black hole. Of course it didn’t help that we waffled indecisively for a long while before even attempting to contact anyone, but even when Dave started leaving voice mails, he wasn’t getting any responses! Perhaps it’s because what we’re looking for is actually a pretty big job…
We knew even before we put an offer on this house that the plumbing was a bit of a mess. First, we knew the hot water heater would need to be replaced fairly soon. (it’s still trucking at the moment, but I’d rather replace it before it fails completely.) Also, at some point some enterprising person had gone through and replaced some of the original galvanized steel piping with copper piping, probably as they did things like update the kitchen and add the shower in the hallway bath. The problem with having both copper and steel in the same plumbing system is that you get an electrolysis effect (think battery electrodes) that corrodes the pipes. It’s not like this issue is a big secret in the plumbing world or anything, and the way you’re SUPPOSED to deal with this is to install a little adapter between the two metals instead of letting them contact each other directly, but no one bothered to do this on our house. Unfortunately, our weird piping has clearly been in place for a while, so the corrosion is pretty far along. Here’s where the copper piping from our water heater connects to the steel pipe leading into the house:

I’m not entirely sure, but I believe the rust stains running down from the connection are a bad thing. And I’m told that the pipes under the house are ten times worse than this. Long story short, almost from day one we were saving up to re-pipe the whole house with PEX tubing. We’ve been a bit enamored with PEX since we started seeing it used in home improvement shows a few years ago. It’s a little funny to me that we’re planning on switching to plastic while living in California (aka the heartland of OMG PLASTIC IS EVIL) but Dave is a polymer scientist/engineer after all, so he did his research and we’ve decided we’re a-okay with it.
The nice thing about the amount of foot-dragging we’ve been doing on this bathroom remodel is that we’ve had a whole extra year to save up for the re-piping, and we can get the plumber to move the fixtures that we need for the bathroom at the same time as he’s doing the re-pipe, which will save us a little money. And all of the bathroom pipes are completely exposed at the moment, which will make his life easier too. The downside to our procrastination is that we didn’t even really get the option of trying to do the plumbing ourselves. (PEX is a bit easier than copper for brave DIYers; check out these awesome people for example.) Actually, considering the potential for massive failure, some might consider being forced to hire a professional to be an upside, not a downside. 🙂
Enough background. So we finally got an estimate that we’re happy with for replacing the water heater plus the re-pipe plus moving the bathroom fixtures. That last bit will entail putting the sink on a different wall and adding a second faucet, moving the shower drain and fixtures about 2 feet, and replacing the shower valve in our hallway bath. Here’s the existing shower valve for our hallway bath, conveniently accessible since the two bathrooms share a wall:

The plumber says whoever installed this was very flux-happy but couldn’t be bothered to clean up the excess, thus the corroded green areas. We’re actually replacing the valve anyway because the new valve trim we’ve been wanting to add isn’t compatible with this valve. Don’t worry, the new trim is still big enough to hide that weird-shaped hole in the tile. Sigh… Anyway, the main cost for actually moving/replacing bathroom fixtures will be moving the shower drain and the sink drain, since the rest of the fixtures were essentially being replaced with the re-pipe anyway. We’re pretty comfortable with installing toilets, sinks, shower heads and such, so the plumber will only need to do the rough-in portion.
Enough plumbing, the title of this post implies that I have something to say about how the framing is going! We’re almost completely done with the shower, which now boasts a pony wall separating it from the toilet:

The toilet will be to the left of the picture above, under the window, while the opening to the shower is on the right.
Dave even managed to cut and cap the old shower pipes, so he could remove those last few studs and we can really visualize how awesome our new shower space is going to be. The main thing left for the shower framing now is to frame out the built-in bench. Oh and Dave’s going to reinforce the pony wall with a sheet of 1/2″ plywood, because it’s going to be tiled on one side and we don’t want that sucker to move AT ALL. Here’s how things are looking right now:

The thing covered in green tape is the old shower drain, the pony wall is to the left, and the beginnings of the built-in bench are at the top. You can see the holes in the floor a foot or so to the right of the drain where the shower pipes used to be. The new shower is about 3′ by 5′, minus the angled doorway. The drain will be centered, so it needs to move about 2 feet to the right in the picture above.
We had a bit of a scare with a cracked hot water pipe when Dave removed the old shower fixtures, so we left the old sink fixtures in place pending the re-pipe, meaning that we still can’t frame out the new bathroom doorway since one of the pipes is in the way. But hopefully our experience framing the new closet door will allow us to get the bathroom door framed pretty quickly once the pipe is out of the way. Here’s the current opening:

I was standing in the shower looking back at the master bedroom to take this picture. The old sink pipes are on the bottom right, with the left-most pipe juuusst in the way of where the king stud needs to go for the new doorway. The new sink will be along the wall out of the picture to the right.
The plumbers will supposedly be completely done by next Tuesday! Next up: Ummm I think laying the plywood subfloor?

