Blog Archives
New Kitchen Sink
Since moving in we’ve had ye olde double basin sink and boring chrome faucet. I maniacally plotted replacing the faucet from the beginning, but for some reason I assumed that sink basins weren’t interchangeable, so since we weren’t replacing the granite counter tops, I assumed we were stuck with the current sink. WRONG!

Since the faucet was perfectly functional, replacing it never quite made it to the top of our to-do list. But recently it was starting to leak a bit, so I started contemplating replacements more seriously. While I was at it I measured the rough dimensions of the basin, and I discovered that it’s actually a fairly standard size after all. I was still a bit nervous about things not fitting, so while we ordered the new faucet online, we picked the new basin based on what was available locally, so we could return it quickly if things weren’t fitting.
Here’s the hole in the counter after removing the old sink:

And here’s the new single-basin sink and fancy faucet:

We were able to re-use the disposal, and since the new drain hole is farther back there suddenly feels like there’s a lot more room to store stuff under the sink. On the negative side, this type of faucet has a counter-weight on the hose to make it retract by itself, and that was catching on the disposal unit under the sink. So for now we’ve left the counter-weight off, but honestly the lack of auto-retracting on the hose hasn’t bothered me in the slightest. Maybe we’ll revisit later.
Lower Cabinet Pull-Out Mod
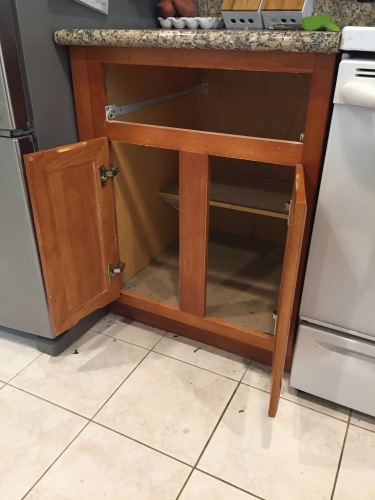
Pretty much since the day that we moved into this house I’ve lamented the kitchen cabinet situation. On the one hand, for such a small kitchen the layout is nice and open and functional. On the other hand, whose idea was it to put narrow little doors with vertical facing pieces in between them on the cabinets!? I even wrote a blog post just to complain about them right after we first moved in. I’ve reorganized enough times now to mostly make things work, but the one lower cabinet that held the big pots, lids, and cutting boards still required a pivot, twist and shimmy to extract anything.
But since we are mad geniuses, we finally fixed it! Behold!

What’s that you say? It looks the same? Well see what happens when I open it all the way (in case it’s not clear, the upper metal shelf can slide out independently):
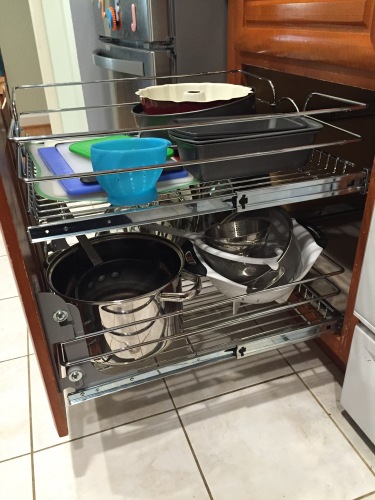
Yes! We bought a kit that allows you to install heavy duty metal pull-out shelves and attach a cabinet door to the front. Now of course we have two cabinet doors and a stupid vertical frame piece, so this is where we got clever. Here’s the cabinet as it looked before:
Dave then cut out the vertical piece ever so carefully:
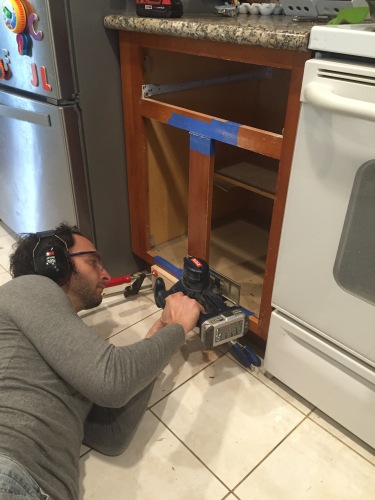
And lucky us, we had some long pieces of 1/8″ thick wood already stained to match that was left over from a previous owner installing the toe kick boards. So Dave cut some down and attached it between the two doors and then attached the whole double door thing to the bottom slide out shelf.
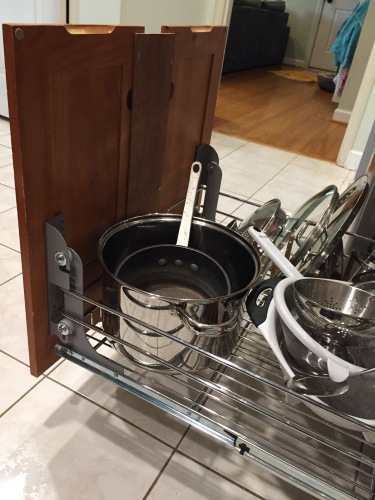
It took a lot of finicking to get everything to line up right, and I think we may do a little more adjusting to see if we can get an even more exact fit, but really already it’s pretty hard to notice, and it’s oh so incredibly functional. Yay!
Small Updates
We finally got around to a bunch of small updates around the house to improve functionality and/or make things slightly more stylish. 🙂
In the kitchen, I got a hanging basket thing to corral all the fruit that was constantly taking up way too much counter space. Here it is hanging to the left of the sink:

I also got some wire mesh baskets to tidy up the coffee making supplies. This area used to just be a big jumble of fruit and coffee filters and such:
The knob on the pantry door busted, so we took the opportunity to switch from chrome to oil rubbed bronze:
We’re slowly switching over the remaining door knobs in the house, but I’ll spare you a bunch of door glamor shots.
We also finally switched out the chrome-and-rust light fixture for oil-rubbed bronze in the hallway bath:

Back in the kitchen, we re-hung the magnetic knife holder vertically on the side of the refrigerator. Much more functional. And I got these little white containers (to the left of the stove) to hold garlic, but I’m still not sure what I want to do with the onions:
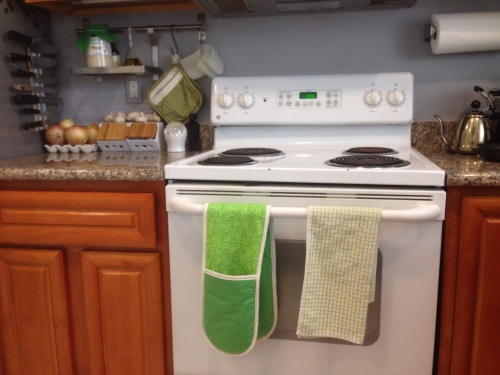
And I made that fun green double oven mitt that’s hanging off of the oven door. It’s mostly just there to look good, but it does actually work… Plus, Dakota likes to steal it and run around giving everyone high fives while wearing it:

So I think it was definitely a worthy sewing project. 🙂
Helper Tower
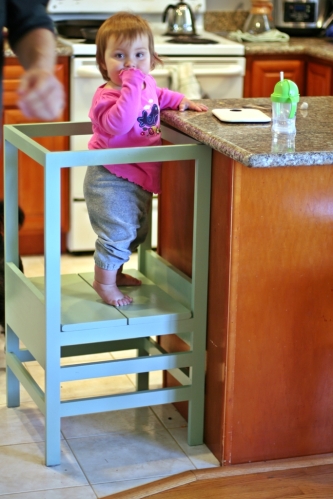
Various companies make these things with names like “Learning Tower” and “Kitchen Helper”, and they seem to generally cost between $100 and $200. But DIY plans exist, and this one in particular seems quite popular and successful.
Of course me being me, I immediately started modifying the plans. I skipped the curved rails and lowered the overall height to 34″ so it would fit under the counter overhang and be more out of the way when not in use. Since it’s shorter, I skipped the highest rail for the platform floor to rest on, so hopefully Dakota can climb in without bumping her head.
At that point I measured out how many boards I would need, and realized that if I used all 1x2s instead of having some of the horizontals be 1x3s, I would only need four 8-foot 1×2 boards, plus one 6-foot 1×8. That brought the cost of lumber down to about $26. I even shelled out for the “select pine” instead of my usual rough-cut furring strips. Fancy.

I screwed all the joints with pocket holes using my Mini Kreg Jig, which I’m liking quite a lot, and I’m not regretting getting it over the full Kreg Jig setup. The Kreg face clamp that I splurged on was pretty key though, and I’m using it for way more stuff than just pocket holes, so it was a good purchase. I have some more normal screw-to-tighten clamps, but they’re 12″ wide and I think I need at least one 18″ wide clamp if I do another project similar to this one. I was able to make it work with what I have though, i think attaching the two sides with the 1×8’s first was the key trick:

Just bringing the boards home my overbuilding self was worried that this would end up too flimsy, but it’s solid like a rock! The 1x3s were definitely not necessary.

For now the platform floor sits on the tallest rail, but we can lower it as Dakota gets taller. I didn’t cut it to be super snug, but it doesn’t move at all once I set it in place. I pulled it off in this picture so you can see how it’s not attached:

Dakota figured out how to push the thing around the kitchen right away, but she hasn’t figured out how to climb in and out of it yet.

She’s super happy when I just set her in it though. It was getting really tough to make dinner or clean dishes because she always wanted to be up in my arms so she could see what was going on. Now I’m already way more productive.
We haven’t had any issues with her stepping sideways and slipping, in fact she looks very coordinated and confident with her hands on the rails, I almost forget that she can’t stand/walk unassisted yet!

Just briefly, my mods call for the following cuts… Cut one 34″ piece and one 16.5″ piece each off of the four 8-foot 1×2 boards. Then cut ten 15″ lengths out of the remaining 1×2 pieces, you should be able to fit three per board, and you have a ~30″ piece left over in case you crack a board or something. 🙂 Then cut two 18″ lengths and two 16.5″ lengths out of the 1×8, and you have all your pieces! You can pretty much follow the original plans that I linked to above after that, just skip the rail that’s 19″ off the ground. Here it is all screwed together, but before I filled the pocket holes with wood putty:

I painted this with leftover matte paint from a tester pot I had purchased (I’m probably going to be painting the spare room that color). It’s the darker shade on the same color card as our living room walls, so I figured it wouldn’t clash. I sealed it with some nontoxic glossy topcoat stuff I already had. I used the same paint plus sealer on the busy board, and it’s holding up great so far… The helper tower is going to be getting a lot of abuse though, so we’ll see how it goes. It wiped up great after a run-in with some smushed strawberries, so that’s promising…

Overall I’m just amazed at how quickly and easily this project came together. The painting was by far the most annoying part, but then again I’m not a very patient painter. I’m actually going to try making another one for a friend, so hopefully my success the first time around won’t turn out to just be beginner’s luck or something.
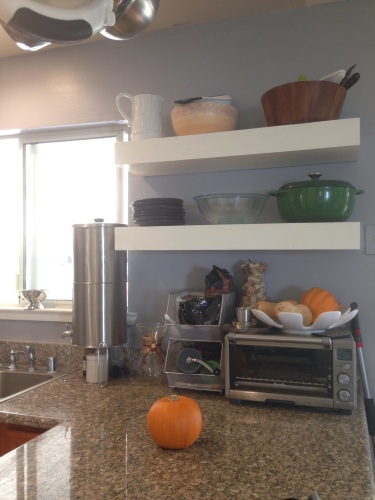
Spice Storage
Hm, I searched through the archives, but it turns out I’ve never actually blogged about our spice storage in the kitchen. Shame on me, as I’m sure that there are people out there that are just DYING to know all of the minutia I have to share on this subject.
I’m not super fond of just leaving spices in their original containers, because once they start to accumulate it’s hard to see what is what and I’m not good at keeping track of just how long ago I bought them. Actually, my biggest pet peeve is that I can’t stick a measuring spoon directly in most standard spice containers.
We don’t have much storage space in the kitchen, so for my first organizational attempt I bought a bunch of wide-mouthed cylindrical containers with magnets on the back, and I stuck them on the side of the refrigerator. I didn’t actually take a picture at the time, but here’s a rough reenactment that I threw together for this post:

This setup had a few issues. For one, some of the magnets were pretty pathetic, so after a few hours the containers would slide down to the counter. For another, it always looked a little cluttered and messy, and I’m not obsessive enough to whip out rulers and levels and line everything up evenly. Most importantly though, we don’t like putting anything on the actual refrigerator doors, so this side of the refrigerator got taken over as a space to post up notes, reminders, various magnets and such, crowding out the spice containers.
For my next attempt, I stuffed all of the spices in the drawer just visible in the bottom of the above picture, one of the very few drawers in the entire kitchen:

This drawer had various utensils that were useful to have near the stove, which I squished over to the right side. It also had oven mitts, which we have since hung on hooks on the back wall above the counter, which is working fine for us. I liked this setup because I could see very easily how much of each spice we had, and they spent most of their time tucked out of the way. The problem is that since the jars are so squat-shaped they take up a lot of room, so we quickly ran out of space and had to start leaving some spices in their original containers, making it much harder to see what exactly we had. Given the depth of the drawer, the low height of the metal containers didn’t really make sense. They were too short, and it just wasn’t a very efficient use of space. But I still wanted something I could stick a measuring spoon into and label the top of. So I spent a while searching around on the internet, and I eventually ended up settling on some taller oval-shaped containers:

I had a pretty difficult time making a decision, because very few jars for sale listed much in the way of dimensions besides actual total volume. I needed to know the exact height, (to know that it would fit upright in the drawer) as well as the dimensions of the opening, to better judge whether a spoon would fit inside. Anyway, it’s a tough life, yada yada, but I eventually took the plunge and ordered a pack of 12. They fit very nicely in the drawer:

And one of our tablespoons even fits inside:

The other tablespoon we have doesn’t quite fit, but really I’m okay with it as long as most of the other measuring spoons work. 🙂
For now I’m writing the purchase dates for the various spices on the side of the container with a grease pencil, as seen in that first close-up a few pictures higher up in this post. (It says “Jan 2013” in green, in case you couldn’t tell…) I’m also using some labels that we had lying around to write the name of the spice on the top. These labels are by no means waterproof, but we have a whole lot of them and are unlikely to use them for anything else. For now I’m using them as a proof-of-concept, and I can buy more suitable labels once I’m sure this new setup is working for us. Here’s another shot of the spices in the drawer for your viewing pleasure:

We’ll give it a week or two, and if this is still making us happy, I’ll probably shell out for another dozen or so of the same containers, so we can transfer the rest of the random spices into lovely matching containers.
More Pantry Improvements
Dave’s away on a business trip for the week, so I decided to distract myself by tackling an easy construction project to fix something that’s been a small annoyance in the back of my brain for awhile now. One of the things we improved in the early months after we moved in was our kitchen pantry storage situation. Those deep shelves that we added to the left-hand side of the pantry are still awesome and still working great:

But the right-hand side of the pantry was not working for me. I had originally envisioned it filled with hanging baskets and hooks, but instead it’s pretty much been looking like this for the past year:

Now, neither of the above pictures really show the depth of the problem, because I took them after I had already pulled out a whole lot of food and set it all on the counter. Yes somehow, all of this was getting stuffed in the existing shelves and baskets:

My new vision for the right-hand wall of the pantry was floor-to-ceiling shelving, just deep enough to fit a single 15 ounce can of food. When I measured how much space I had to work with given the placement of the actual pantry door frame, I discovered there was just enough clearance for 3.5 inch shelves. 3.5 inches, how perfect is that!? So I quickly formulated a plan involving 1 x 4 boards with 1 x 2 boards as cleats to support the shelves.
All of the food items in the picture above had a maximum width of 3.5 inches or less, and were therefore candidates for these new shelves. I laid them out like this to group them by height and make decisions on how far apart to put these new shelves. Once I had all of my measurements, I jumped right in:

Here you can see the 1 x 2 cleats getting screwed into the wall. This project was just my speed because it was pretty much all mitre sawing, drilling, and a bit of measuring and leveling. We even had the studs already marked since we screwed those metal baskets into them last year.
The only hitch was when I had to cut out notches in the shelves for the weird bump-out we have going on at the back of the pantry. It was my first time using our swanky new portable jigsaw. (I’ve decided I’m NOT a fan of a laser guide on a portable jigsaw, but I didn’t really bother to take the time to figure out if there was a way to turn it off.) And then I had some trouble jimmying the notched shelves into place since I had foolishly already screwed in all of the cleats:

I ended up having to unscrew those upper cleats to get the notched shelves into place. Ah well, it was still a pretty quick process. My other problem was that I had measured and planned out for nine shelves, but I only had enough wood on hand for six shelves. Boo. I decided going out and picking up 2 more boards was way too much effort, so I just left the pencil marks on the wall and I’ll add the last three shelves at some later date. Six new shelves were enough to hold everything I had laid out on the counter with room to spare:

And they don’t really take up any previously useful space, so the pantry can suddenly hold a lot more. I especially love how easy it is to see all of the different food items, something with which I had been struggling with the deeper shelves on the left-hand side.

Julie is pretty happy too, since she’s been stuck storing pretty much all of her food in a big wire basket on top of the refrigerator ever since she moved in with us. We went out and bought a few cheap plastic baskets today and used them to help organize some of the smaller things that are still on the left-hand shelves in a bit less haphazard fashion. (This was after I finished taking pictures, sorry.) Julie buys a lot more canned goods than I do, so now I just need to get those last 3 shelves in on the right-hand side and I think the top of our refrigerator will actually be pretty much completely freed up again.
And all of this while 20 weeks pregnant! Does this count as nesting? 🙂 Really the only time being pregnant came into play during this project was that while sitting inside the pantry screwing the cleats into place I could smell this faint whiff of something rotting. My powers of scent have been greatly enhanced, so I’m pretty sure this is something that I wouldn’t have even noticed before getting pregnant. But I took a break from drilling to pull everything off of the floor and scrub it down, and the smell went away. I guess this will just be a reminder to myself to make sure that I occasionally give the pantry floor a good cleaning in the future.
Dishwasher Upgrade
We were pretty happy when we bought the house that it came with a dishwasher already installed. And even though it was pretty tired-looking, it more or less got the job done. This seems to be the closest thing I have to a picture of the thing:

We did learn during the inspection that the dishwasher installation wasn’t up to code since the drainage tied in to the sink disposal directly, without an air gap. And we eventually learned exactly what that meant, because any time the sink was draining a bit slowly due to food stuff in the disposal, the dishwasher got an inch or two of standing water at the bottom. Nothing ever leaked out, and we quickly learned to run the sink disposal early and often. But still… ick.
last week, the dishwasher I had been eying for a while went on sale, so we went right in and bought it. It came with free delivery and free haul-away of the old dishwasher, but we decided to do the installation ourselves.
I”ll spare you the details of the installation, but rest assured that every stereotypical conversation and plot twist played out exactly as you’d expect, from, “We’ll get it delivered Monday, so we can get it completely installed Monday night,” to 5 separate trips to the hardware store for just one more item, to the cursing and swearing at pinched fingers and scraped knuckles. We finally got it completely installed and functional on Saturday, 5 days after the delivery, and ran our first successful load of dishes on Saturday night. I say “we”, but really all of the credit for our (eventual) success goes to Dave, who managed to work past the crazy old setup, drill a new hole in the sink for the air gap, wire up the cord, and probably half a dozen other things that I just slept through. 🙂 For all his cursing, he’s pretty happy he did it himself, and he will have a thing or two to say if we ever re-do the cabinets and want to change how the hoses are run to the dishwasher…
Anyway, here’s the dishwasher in all it’s functioning glory:

And at last, here’s a wide view of the kitchen in its current configuration.

We may eventually replace the range too, and then things will match a bit better. 🙂
Kitchen Counter Space
I’ve only occasionally put thought into different options for getting things organized on the kitchen counter in the past. But now that we actually have counter space that we use a lot and would like to keep neat and tidy, I find myself thinking about it waaay too much.
One of the things that I’ve finally decided just takes up too much space is a drying rack for the stuff that we wash by hand. We don’t produce a ton of dirty dishes as it is, and most of them can go in the dishwasher. So we finally settled on a little folding wall-mounted drying rack:

You can see what it mainly gets used for: wine glasses and knives. 🙂 And when we don’t need it, it folds up against the wall:

And there is stays tucked up next to our mini espresso machine. To the right in this picture you can also see the other “up off the counter” modification we made… it’s a wire rack that holds the soap and sponges so they aren’t sitting in puddles on the edge of the sink all the time.
So far this has been working really well for us. I’ll be curious to see over time if the drying rack wears away the paint behind it from being opened and closed… I’m also monitoring the water drippage on both of the racks, but it seems to be pretty minimal.
Sorry for the lack of wider angles, our kitchen is a pretty big mess right now as Dave struggles to get our replacement dishwasher installed. I can’t wait.
Kitchen: Painted!
The painting action actually happened 2 or 3 weeks ago, but there’s a very limited time of day where the kitchen has good natural light, so I only got around to taking pictures today. If you’ve been following along, we knew we wanted to paint the living/dining room green from day one, and we wanted the kitchen a contrasting color. At first we picked up samples for what we thought were fairly greyish purple colors, but they turned out to be way too purple up on the wall. (See the end of this post.) So we went back for some even grayer samples, and finally picked a color.
And then we did nothing for 2 and a half months. The paint samples on the kitchen wall faded into the background (literally, I think you can see them in the background of 2 or 3 different blog posts) as we worked on other things. But finally we decided enough was enough, and we got ‘er done. I think we’re slowly improving at this whole painting thing, as we actually managed to finish all of the priming and painting in a single weekend for once. Or maybe we just had more incentive since we wanted our kitchen fully finctional? Anyway, enough delay, here are the pictures:

I love everything about it- the hue, the saturation, um, that’s all there is to color right? Heh. As best as I can tell, Dave loves it too, (he’s the one who suggested going this direction to begin with) but he feels the need to moan that it’s PURPLE. I reassure him that it’s a very manly color… the actual name of the shade is Gray Timber Wolf. What could be more manly? 🙂 Having this color on the walls really reinforces my desire to paint the cabinets white… I’m pretty sure they would look amaaazing…
Our favorite spot currently is where the gray wall meets the green in the dining room:

Sorry about the glare. >:| Here’s a view down at knee-level:

We actually left the wall by the pantry unpainted because I wanted it gray and Dave wanted it green. Dave’s right again, now that the rest of the kitchen is painted, I think this wall would look great in that same light green color as the living room and dining room.

Here’s a shot of that wall from the other side:

The urge to re-face the fireplace is rising…
Reclaiming the Pantry
We’ve known from day one that we needed to fix the pantry, but we hadn’t really planned to work on it any time soon. But for some reason on Friday night I suddenly couldn’t stand it any more, so we threw our other house plans out of the window and instead crafted a master plan to fix the pantry.
Here’s the problem. One of the past owners of this house installed an extra-deep media cabinet in the living room, complete with a little switch board.

(It used to have some weird-looking trim around the outside that we took off when we painted the walls.) I think it would have been really slick to put our media stuff there if we had decided to mount the TV over the fireplace. But since the TV is on a different wall, and especially since this is the first thing you see when you walk in the front door, setting up a lot of sound equipment there didn’t make much sense. We were just storing random stuff there in the meantime. What was really killing me though, was the amount of space it took up in the pantry. Since that wall is the back of the pantry, the fact that the media cabinet was over a foot deep meant that it claimed more than half of the actual pantry depth. And the existing shelves in the pantry made the extra space underneath the media cabinet largely inaccessible.

So bright and early on Saturday we started ripping stuff out. Since everything was bolted together, it was easier to remove the media cabinet first. It was a tight fit: the most effective method ended up being Dave bracing himself against the counter and launching side kicks at it. That thing is built like a rock! i think we’ll paint it and turn it into some sort of shelving for the office. 🙂

That’s the new window from the living room to the kitchen. We found some secret speaker wire hanging down from the attic, plus some loose insulation from who-knows-where. Here’s the view from the kitchen to the living room, once we removed the pantry shelves:

Please excuse the perpetual mess that is our living room.
We had already decided that we wanted to still have some built-in shelves to fill that hole in the wall, we just didn’t want them so deep. But pretty much as soon as we removed the existing cabinet we realized that it wouldn’t make sense to try to disassemble it, cut it down, and reassemble. So off to the hardware store we went to collect our building supplies.

That’s right, 8-ft boards fit in our little car… barely. Anyway, cutting and assembling went fairly quickly, though we were wishing for something besides a little hand-held circular saw, and we definitely need to use a flatter surface for assembly in the future.


I did help, by the way. I’m just not going to be able to be in the pictures if I’m the one taking them. 🙂 Anyway, after much frowning at the wall and glaring suspiciously at our level, we ended up with this:

And then we went to the hardware store and got a bunch of shims and did it over, but you get the idea. While we were out, we found some trim that matched the existing trim on our doors. Annnd we picked up some paint. Sadly we ran out of time this weekend since we also needed to put the pantry back together, but here is how the shelves look today:

We still need to attach trim to the front of the actual shelves, and then we just need to touch them up and paint them white. But this is a decent stopping point for the time being, and they’re already looking pretty darn cool.
Meanwhile, our food and paper products were forlornly waiting for a new and improved home…

We definitely wanted adjustable shelves, so after a little price comparison we settled on the “classic” metal track thingies:

Then we just cut some 1×12 boards down to size and loaded them up!

The best part is that’s only one side of the pantry. here’s the other side:

Finally! A space for the vacuum and broom. I’m probably going to add hanging baskets on the walls that are currently blank. We might even get around to painting the back “wall” (aka the back of the new living room shelves, only peeking out a tiny bit) eventually. I was originally planning to paint the pantry shelves, but they look fine the way they are for now… And the spices are moving somewhere closer to the stove once we get around to figuring out a better storage solution for them. Once that happens, maybe we’ll replace the pantry door with a bi-fold or something, because that door is just constantly in the way as it is right now.
All in all, I think it ended up being a pretty awesome Memorial Day weekend.

