Blog Archives
Full-Sized Loft Bed DIY
We’ve just had a full-sized mattress on the floor of our kid’s bedroom (really it’s just the playroom, shhhh) from the start. But I’m all about maximizing space, oh and I had a loft bed growing up so I’m sold on their fun-value. Thus the whirlwind decision to completely custom build a loft bed frame. And here it is completed!!

The room is pretty small, so I knew I wanted to save as much space as possible, with two sides bolted into the wall rather than freestanding on 4 legs. On the flip side I loved the idea of a hidey-hole and some different areas for playing and hanging out. Thus the idea to have stairs leading up to a platform, and then just a short ladder going the rest of the way to the bed.

The stairs have storage cubbies underneath of course.

And under the platform is the hidey-hole. I got some glow-in-the-dark stars for us to eventually add in there, and it could probably use some oversized floor pillows, but for now it’s just a blank slate.

I scoured the internet and Pinterest for ideas on how to construct the whole thing. I got some great inspiration, but in the end I pretty much made it up as I went along. Here are a few progress shots on the construction, but honestly even contemplating writing up a full how-to is overwhelming, so I’ll pass on that for now.
The initial bed platform:

Adding legs:

Bed and lower platform each bolted to the wall:

Adding trim to the stair cubbies:

The room already had yellow stripes on the ceiling, but Dakota loves purple. That back wall used to be a dark gray, but it was in need of some major touch ups before we started this project. So we decided to keep it dark but repainted it purple instead of gray, and then worked the yellow, purple, and white in for a super-colorful piece of construction!
I just plopped the road rug and some existing toy bins down for now, I guess we’ll see how this space evolves over time. Maybe some shelves or a small art table? The one thing for sure that needs to happen is some new lighting. I’ve already bought a flush mount ceiling light to replace the current drum shade, and we’ll probably get some sort of tube or twinkle lights for under the bed and inside the hidey hole.

And we’re contemplating some sort of covering/guardrail for the window, probably not too surprising considering the platform location and height. Also I need to give the closet area on the opposite wall a makeover; I’m leaning toward painting the trim white and the interior purple, kinda mirroring the stairs. Also, since I ditched the clunky closet doors, maybe I could add a curtain of some sort to hide the mess when we want to pretend to be tidy people. 😉

Bonus: the big green rug that’s been in there forever doesn’t fit anymore (it’s probably for the best because despite being very high quality, it really didn’t match the yellow and purple) so we’re trying it out in the living room. I’m expecting it to be ruined in short order like all our other living room rugs, but who knows? For now it looks great.

Picture Book Shelves
Dakota’s books have been haphazardly piled on the TV console in the living room. It was nice to have them out in the middle of everything, but they were pretty messy, and since Dakota could only see the spines, they didn’t really grab her attention.
So Dave built some shelves. It was so quick and easy that I didn’t even take any progress pictures. Here’s the finished product:
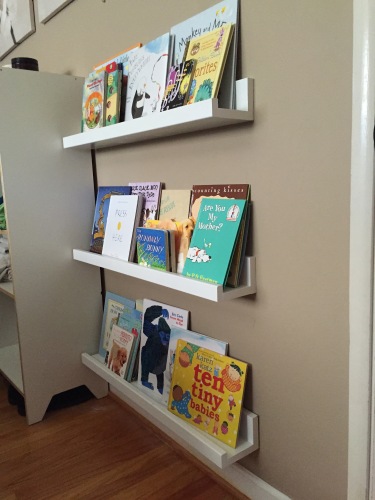
We used these plans, and it was basically the simplest construction project ever. I measured the space and figured I wanted three ~32″ wide shelves. So we made them 31 7/8 inches so we cut them out of 8-foot boards. I’m pretty sure it took longer to paint them than it took to cut and assemble the pieces! It’s so nice when an “easy” project actually is as quick and easy as it’s supposed to be.
I wanted to hang them pretty low so Dakota could access them easily:
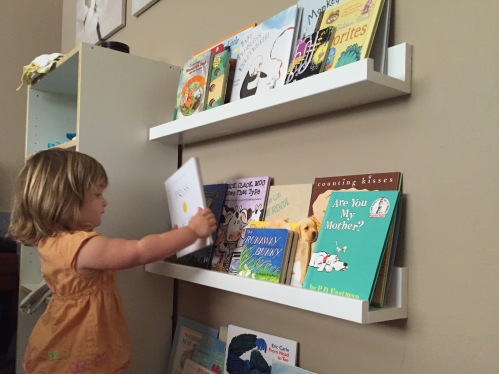
The top shelf is still a little high for her, but we were able to screw straight through the backs into the wall studs, so at worst she’ll probably just crack them if she tries to hang off them. And since these are actually in our bedroom instead of the living room, she likes to bring her stool over from the bathroom so she can use it to reach the top shelf.
I was a little indecisive about moving the books out of the living room since we do a lot of reading in there. But there’s not a really a good place to display the books so prominently there, and we’re in and out of the bedroom enough that Dakota notices the books and will often pull a few off the shelf and carry them out. Here they are with a little more of the room visible:
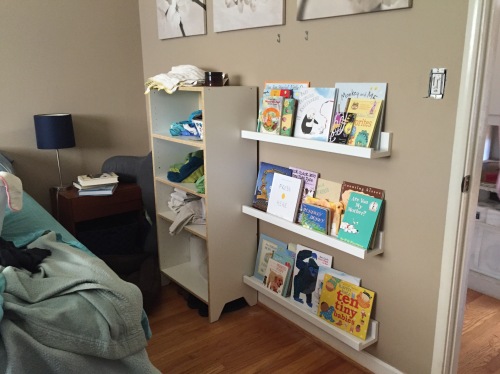
I like how they’re close to the door. The bookshelf unit thing to the left of them is our current cloth diaper storage/access setup, since we do diaper changes right on the bed. The three big picture canvasses above the shelves make it look less weird that the shelves are so low. Looking at this photo reminds me that someday I really want to make cool bedside tables with built in wall lamps, but in the mean time what we have works. 🙂
Yellow and Grey
Julie has been living with us for almost a year now, but I never got around to talking about her oh-so-stylish room makeover, mainly because it’s in that perpetual “not quite done” state. But it’s pretty darn close to done now, so I figured I should talk about what we did before I forget all of the details completely.
Our second and third bedrooms are both pretty small, and the one we stuffed Julie into is almost exactly 10 feet by 10 feet square with a built in closet cabinet thing. Until she moved in it served as our dumping ground for random household items and off-season clothing. I couldn’t find a picture, but hopefully you can imagine a room full of random junk. I did however find a picture of the ceiling on my phone, which is nice because pretty much the first design decision Julie made was to put yellow stripes on the ceiling, with grey walls. This ended up being a great compromise because while Julie loves bright wall color, the rest of the walls in the house are pretty muted. But a lot of people don’t even notice the ceiling right away, so it’s a nice surprise when you do finally look up at it. Here’s the blah beige before:

And here’s the finished look:

Julie actually picked out the curtain fabric first, (it’s a citrus-y lemon and orange pattern) and then we compared paint samples to the fabric until she found the right color yellow paint. Once we had the yellow, Julie decided she wanted light grey on three walls and dark grey on the final wall. Works for me…
When we pulled down the flourescent tube light we discovered that whoever had installed it hadn’t bothered to put in an electrical box. Tsk tsk. So as usual, the simple “replace the light” step became slightly more complicated. Ah the joys of home ownership. 🙂 The new light is one of those inexpensive paper things from Ikea, and it works great.
Onward! Here’s a shot of the room as seen from the doorway:

The bed frame is a simple DIY made pretty much entirely out of 2×4’s. The legs are painted black and we have plans to upholster the horizontal boards with yellow fabric. Thus the weird half-finished white batting and bare wood styling that is currently happening. 🙂 There isn’t really room in here for a dresser, so Julie got a bunch of fabric bins that fit nicely under the bed. I’m too lazy to spend much time tidying rooms up for pictures, so sorry Julie, some of your clothing is showing. 🙂 In fact all I did before whipping out the camera was open the curtains, crazy woman actually makes her bed. Weird.
The black and white prints on the walls were something I suggested that Julie try after reading about using engineering prints for big, inexpensive artwork. You can read through for details in that link, but basically it worked great for Julie. She ended up buying a 1″ thick white foam board from the hardware store and using red duct tape as the edging, since this stuff didn’t cut as cleanly as the pink insulation board that was used in the link. I like that she has something big and bold hanging over her bed, and I like even more that it’s made out of foam and super lightweight. When you live in earthquake country you have to take these sorts of things into consideration.
Moving along, here is a shot of the side table by the window:

We found the table and the lamp at the thrift store. The ittiest bittiest of side tables was a must for this room. 🙂 And you can see the citrus pattern on the curtains pretty well. Don’t ask me, Julie picked it out.
Here’s the other side of the room, on the wall with the doorway:

The desk is juuust deep enough to hold a laptop, built out of plywood and 1×3’s, and painted with the same stuff we used on the ceiling. Here’s how it’s supported:

Just some brackets against the wall and two desk legs that we bought at Ikea. The chair was a thrift store find. It looks pretty nice in the pictures but it’s actually badly in need of refinishing. Someday… maybe…
The little black bookshelf (as well as lots of random odds and ends on the desk and shelves) was something we had owned for awhile and were getting ready to donate, so Julie was able to grab it for free.
And here’s the final wall:

We keep going back and forth on the closet. The stain may very well be original to the house and is actually in fairly good condition. I’m not particularly fond of stained wood though, and it doesn’t make much sense to me considering how modern the rest of the room looks. We’ll probably leave it alone because we’re lazy and we have plenty of other things we’d like to get done.
The mirror is just something Julie grabbed (yet again) from Ikea. We could probably DIY some sort of snazzy modern-looking frame for it, but I actually like the simplicity of it, especially considering all of the stuff that’s going on everywhere else in the room.
That’s everything! So maybe some day I can do a post on upholstering the bed frame, but maybe we’ll just never get to it.
Bedroom Curtains
When our bed was pushed up against the window, our plan had been to put up some sort of decorative wood paneling on tracks that could be closed to completely block the light, sort of a faux headboard. But now that we’ve rotated the bed, we’re thinking about some sort of more traditional headboard, and with that, window paneling made less sense. The pictures of the finished bed made the window look particularly sad and bare:

So we headed out to the store for curtain fabric. I wanted to stay in the blue/white/brown color scheme, and I didn’t just want a single flat color. But I didn’t want too small of a pattern since our bedspread already has a fairly small pattern on it. Unfortunately, the only patterns we were really seeing in the right color schemes were stripes, and with blue and white that just looks way too nautical-themed for my taste. We were close to giving up entirely when we found this fabric:

Perfect! Or at least, close enough for me. I’m really not very decorative/creative in this realm, but this fit the color scheme and the requirements of 1) not too small of a print and 2) not nautical. So we bought five yards and carted it home, where I got acquainted with my new best friend, the rolled hem pressed foot:

I hate hemming. I’m convinced that I’m somehow making it harder than it should be, but I can’t seem to find a shortcut. So whenever I give in and hem something, I end up spending hours measuring, folding, pinning, ironing, folding again, ironing again, and then finally sewing. And that’s for each edge. But a few years back during one of my web searches for shortcuts, I stumbled across this gem of a device and immediately ordered one. It arrived and sat untouched in its package for a long time while I avoided any and all hemming. But I whipped it out today and, somewhat uncharacteristically of me, I actually practiced a bit before trying it on my actual fabric. It’s a good thing too, because it took a bit of practice to get the hem started. You have to make your best attempt at pre-rolling it and starting an inch or so down from the end of the fabric. But hopefully you can kinda see in the picture (sorry about the bad focusing) that the fabric is feeding into the front of the presser foot, rolling over on itself, and coming out the back as a very small, tidy hem.
I wont say it was easy as pie, since I still managed to sew a few wrinkles into the hem, but it’s so neat and narrow that you’d have to hold it a few inches from your face to see the imperfections. And while it still took a decent chunk of time to sew 12+ yards worth of hems, cutting out all of the ironing time made a huge difference. So yeah, I’m pretty proud of myself. 🙂 Here’s a gratuitous shot of me being industrious, either that or Dave really wanted to take a picture of our flowers:

Perhaps someday I’ll have a better spot to sew than the dining room table.
Moving along, the next dilemma was how to hang the things. We wanted the hardware to be pretty nondescript, so we decided we wanted white rings and rod. Internet searches quickly revealed that, especially for a six foot wide window, the most economical option was Ikea, even when you counted the $5 bridge toll it would cost us to get there. So a trip to Ikea (and a few extra dollars spent on “oh we could really use _____”) later, we had a white curtain rod, white brackets, and… Off-white ring clips. Sigh. You actually can’t tell that they’re off-white unless you know to look for them, (and who stares at curtain rings?) but if it starts to annoy me I’ll just spray paint them white. The finials on the rods were pretty silly looking, so I’m thinking I’ll pick up some wooden or plastic spheres at the craft store and make my own.

I still haven’t sewn the bottom hem on the curtains, and I may actually do the more laborious measure, fold, iron, etc method since the fabric is so light and a little extra weight on the bottom should help them hang straight. Here’s a nighttime shot:

As usual, sorry for the bad picture quality. Window photos are tough for clueless non-photogs like me, but I think I might be improving ever so slightly despite myself…
On the light-blocking front, the new curtains just barely cover the whole window when they are closed. I’m planning to eventually add a layer of (white) blackout fabric behind the patterned fabric to make these curtains fully functional at light-blocking. The stuff I’ve seen online that sells by the yard is 54″ wide, so I’m debating maybe leaving it that wide and hanging it so that it looks like there’s a stripe down either side of the patterned fabric. But maybe that will just look silly, so I’m leaving my options open.

