Blog Archives
Full-Sized Loft Bed DIY
We’ve just had a full-sized mattress on the floor of our kid’s bedroom (really it’s just the playroom, shhhh) from the start. But I’m all about maximizing space, oh and I had a loft bed growing up so I’m sold on their fun-value. Thus the whirlwind decision to completely custom build a loft bed frame. And here it is completed!!

The room is pretty small, so I knew I wanted to save as much space as possible, with two sides bolted into the wall rather than freestanding on 4 legs. On the flip side I loved the idea of a hidey-hole and some different areas for playing and hanging out. Thus the idea to have stairs leading up to a platform, and then just a short ladder going the rest of the way to the bed.

The stairs have storage cubbies underneath of course.

And under the platform is the hidey-hole. I got some glow-in-the-dark stars for us to eventually add in there, and it could probably use some oversized floor pillows, but for now it’s just a blank slate.

I scoured the internet and Pinterest for ideas on how to construct the whole thing. I got some great inspiration, but in the end I pretty much made it up as I went along. Here are a few progress shots on the construction, but honestly even contemplating writing up a full how-to is overwhelming, so I’ll pass on that for now.
The initial bed platform:

Adding legs:

Bed and lower platform each bolted to the wall:

Adding trim to the stair cubbies:

The room already had yellow stripes on the ceiling, but Dakota loves purple. That back wall used to be a dark gray, but it was in need of some major touch ups before we started this project. So we decided to keep it dark but repainted it purple instead of gray, and then worked the yellow, purple, and white in for a super-colorful piece of construction!
I just plopped the road rug and some existing toy bins down for now, I guess we’ll see how this space evolves over time. Maybe some shelves or a small art table? The one thing for sure that needs to happen is some new lighting. I’ve already bought a flush mount ceiling light to replace the current drum shade, and we’ll probably get some sort of tube or twinkle lights for under the bed and inside the hidey hole.

And we’re contemplating some sort of covering/guardrail for the window, probably not too surprising considering the platform location and height. Also I need to give the closet area on the opposite wall a makeover; I’m leaning toward painting the trim white and the interior purple, kinda mirroring the stairs. Also, since I ditched the clunky closet doors, maybe I could add a curtain of some sort to hide the mess when we want to pretend to be tidy people. 😉

Bonus: the big green rug that’s been in there forever doesn’t fit anymore (it’s probably for the best because despite being very high quality, it really didn’t match the yellow and purple) so we’re trying it out in the living room. I’m expecting it to be ruined in short order like all our other living room rugs, but who knows? For now it looks great.

Lower Cabinet Pull-Out Mod
Pretty much since the day that we moved into this house I’ve lamented the kitchen cabinet situation. On the one hand, for such a small kitchen the layout is nice and open and functional. On the other hand, whose idea was it to put narrow little doors with vertical facing pieces in between them on the cabinets!? I even wrote a blog post just to complain about them right after we first moved in. I’ve reorganized enough times now to mostly make things work, but the one lower cabinet that held the big pots, lids, and cutting boards still required a pivot, twist and shimmy to extract anything.
But since we are mad geniuses, we finally fixed it! Behold!

What’s that you say? It looks the same? Well see what happens when I open it all the way (in case it’s not clear, the upper metal shelf can slide out independently):
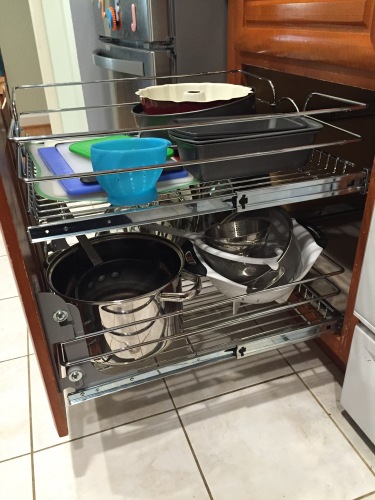
Yes! We bought a kit that allows you to install heavy duty metal pull-out shelves and attach a cabinet door to the front. Now of course we have two cabinet doors and a stupid vertical frame piece, so this is where we got clever. Here’s the cabinet as it looked before:
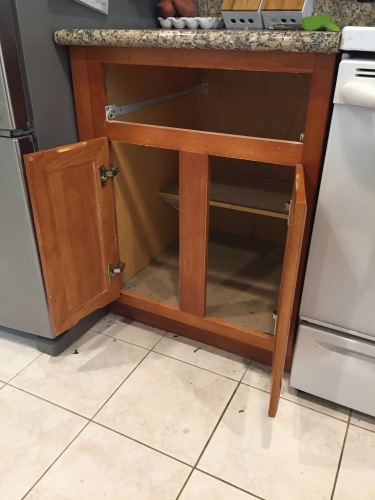
Dave then cut out the vertical piece ever so carefully:
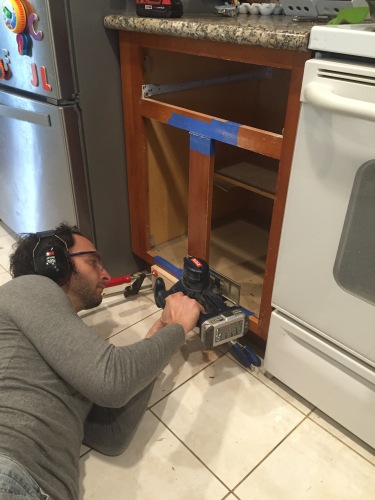
And lucky us, we had some long pieces of 1/8″ thick wood already stained to match that was left over from a previous owner installing the toe kick boards. So Dave cut some down and attached it between the two doors and then attached the whole double door thing to the bottom slide out shelf.
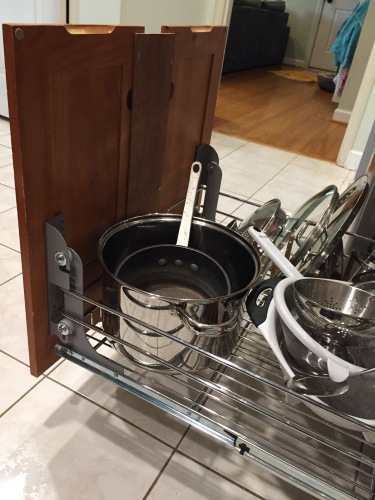
It took a lot of finicking to get everything to line up right, and I think we may do a little more adjusting to see if we can get an even more exact fit, but really already it’s pretty hard to notice, and it’s oh so incredibly functional. Yay!
Storage Bench (For the Foot of the Bed)
We left the foot of the bed frame open so we could store rarely-needed stuff (like newborn supplies and maternity clothes) underneath. But for a while we had an old ottoman stuffed in the opening to give Loki a step so he could get up onto the actual bed. Here was the odd-but-functional setup:

I’ve had vague plans to make a storage bench to match the bed frame, and I was finally able to work on it, in fits and starts. I designed it to be not quite as wide as the actual bed, but at standard chair/bench height. By making the top in two pieces, I was able to cut everything out of a single sheet of 1/2″ plywood. Here are the pieces after painting:

And here they are assembled, minus the top since that gets attached with hinges at the end:

Pretty boring, so I trimmed it out with the same stuff I used on the bed frame: 1×2 and 1×3 pre-primed MDF:

Then there was some puttying, caulking, and painting to make it all look seamless. And then there was this:

The simplest upholstering job in the world, though I still managed to mess it up a lot. Anyway, I didn’t take any pictures, but after a whole lot of bent staples and some cursing, I managed to get the batting and fabric attached.
I found some awesome hinges that were small enough, with short enough screws, to work with 1/2″ plywood. Dave caught a picture of me screwing them into place:

Although he had a lot of “help” that he had to work around. 😉
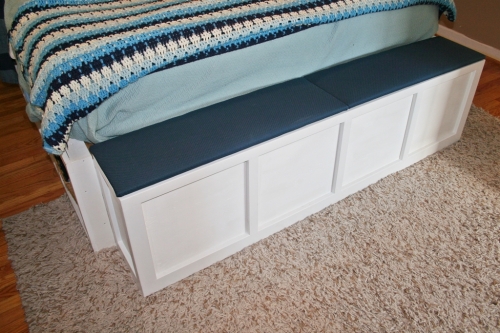
 Anyway, this was actually a fairly quick project in terms of actual work hours, it just took a long time working around baby and life and such. Here’s the finished bench in place!

I feel like it looks a little odd being slightly taller than the actual bed frame, but I guess it helps keep the mattress tucked in, and it’s perfect sitting height. Here’s another view:
I mentioned that the top is split in two so I could fit it all on one 4×8 sheet, but I actually really like having two smaller pieces to lift, it works great. Here’s all the stuff I’ve already filled it with:

And here’s Dakota checking things out while Loki tries to snooze:

Our bedroom is pretty small, but this bench is narrow enough that we can still move around just fine. It’s such a relief to have even this much more storage space to work with. Now I’m debating making another almost identical bench for the living room under the big window. Hmmm.
Small Improvements
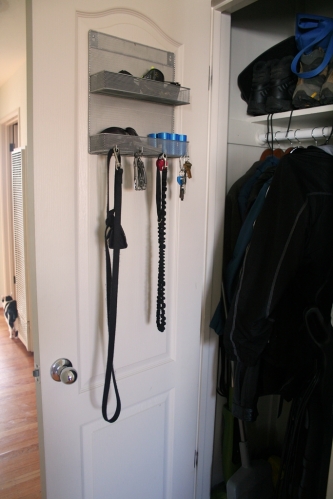
Ah January. A good time to fix some small things that have been annoying me. Behold, the door to the coat closet now has some lovely hooks to hang keys and dog leashes, and some small shelves for things like sunglasses and doggy cleanup bags. This thing actually claimed to be a spice rack when I bought it, but whatever:
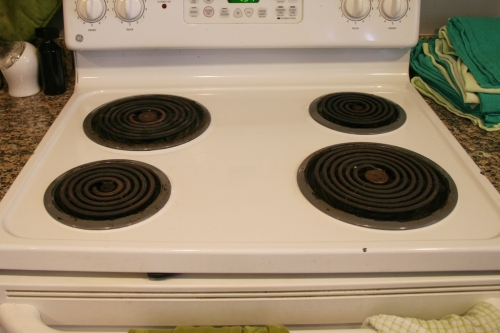
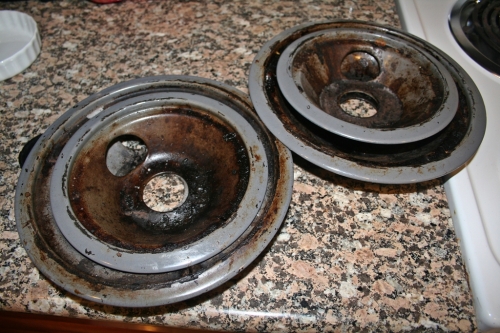
Next up, we inherited some nasty drip pans with our stove:
And it took me almost three years of useless soaking and scrubbing to realize that I could buy new ones for pretty cheap:
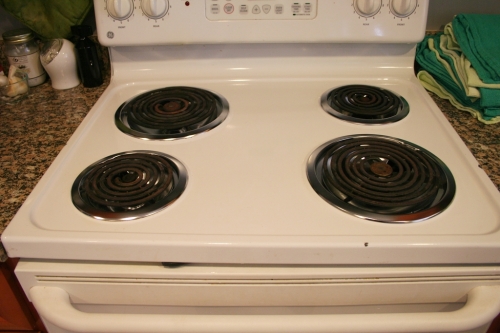
It’s hard to see the improvement in the picture since the actual heating elements aren’t super nice either, but trust me. Here are the drip pans that I gleefully threw in the trash:
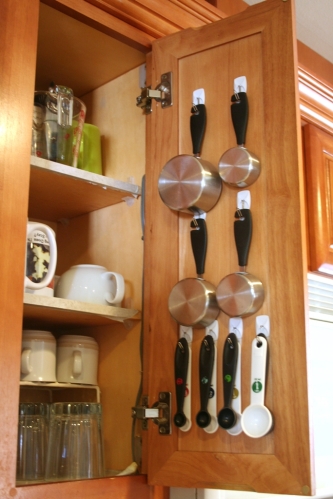
Moving on, I think I saw this idea on Pinterest for organizing the measuring cups and spoons. We aren’t 100% certain that we’ll stick with this setup, but it’s a fun change to try out:
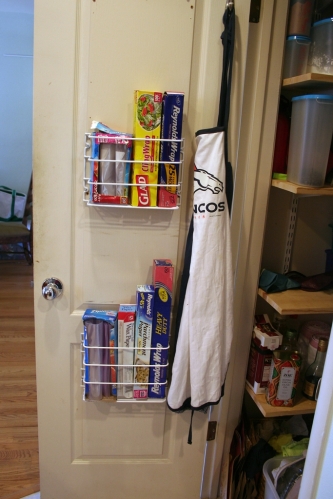
And I’m quite pleased that we now have a home for all our cling wrap, aluminum foil, freezer bags and such. They now live on the inside of the pantry door, super easy and accessible:
Here’s our chief QA engineer making sure everything is to spec:
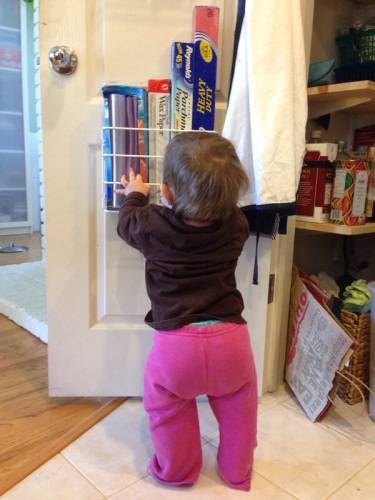
We keep this door closed since it’s where we stash the recycling, but it’s good to know the screws hold up at least a little.
That’s all for now. Bring on 2014!
Closet Storage Happiness
Closets aren’t the most exciting thing to read about, nor are they terribly photogenic, but our house has so little built-in storage space that I am now going to spend an entire blog post gushing about the improvements we made to the master bedroom closet. You have been warned.
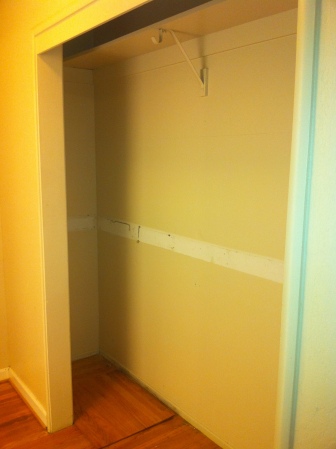
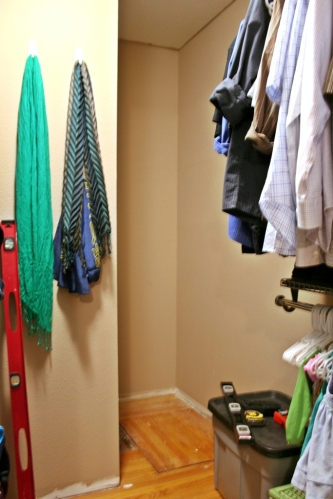
First, here’s a little recap of how the closet used to look, complete with pictures from old blog posts. When we bought the house it was a reach-in closet with sliding doors, accessed via a mini hallway that also had the door to the bathroom on the opposite side from the closet. Here’s the closet as it looked on the day we got the keys, right after I removed the sliding doors and pried out the waist-height shelf:
That mini-hallway is really just wasted space, so almost from day one we were talking about moving the bathroom door and making a small walk-in closet when we remodeled the master bathroom. Check out this short post showing the before and after floorplans if you need the visual.
In the mean time though we added some modular wire shelving that we had bought for a reach-in closet in a previous apartment and kept with us when we moved. And for about a year the view from our bedroom into the closet/mini hallway looked like this:
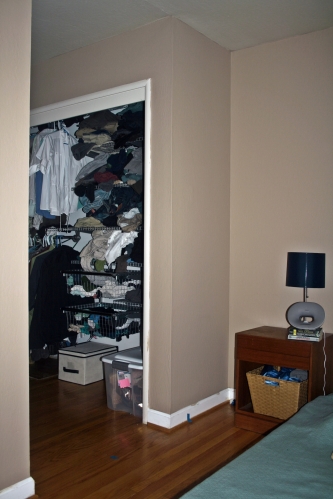
In the picture above you can see a piece of blue painters tape on the floor and one on the floor trim, marking where we wanted the eventual walk-in closet doorway to be. Anyway, fast forward yet another year and we finally got around to tearing the bathroom down to the studs, moving the bathroom doorway out of the mini-hallway and over to the bedroom proper, and framing a doorway for the improved closet. We actually bumped the bathroom out into what used to be the back of the mini-hallway to make more room for the shower, and this left a 30″ wide, 40″ deep cubby in the back of the new walk-in closet. This is because that’s the access point to the crawlspace under our house (you can see the raised square of hardwood in the first picture of this post) so we didn’t want to build a shower over top of it.
The closet is probably as small as you can make it and still call it a “walk-in”. With a 2-foot wide doorway, it’s just wide enough to fit 12″ deep shelving on the left and 24″ deep hanging room for dress shirts and such on the right.
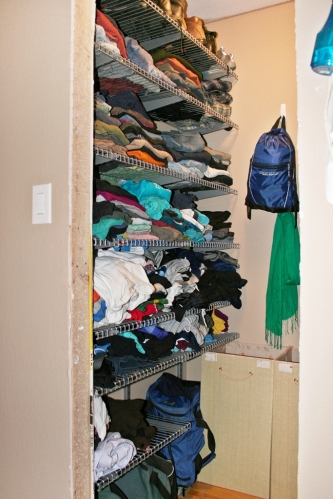
Yup, we’re still using that same modular wire shelving, it reconfigured from a reach-in to a walk-in closet quite nicely.
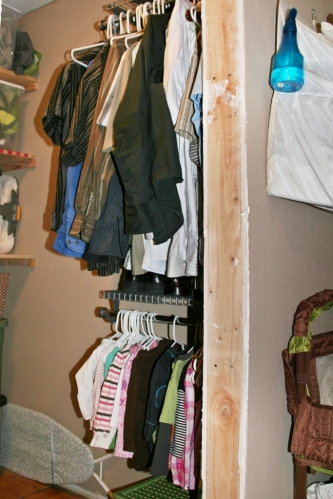
I’m not a big fan of hanging clothing, so we’re fine with having just a tiny bit of rack space. Though in a weird (for me) twist, I actually prefer to hang Dakota’s clothing for now, it’s much easier to see everything that fits her and even hang stuff in order from smallest to largest, so every few weeks I can grab the smallest stuff off the hangers and pack it away in the “too small” box.
We aren’t completely settled on what we want to do with the back wall. For now we have our laundry hampers there, along with some hooks for hanging small bags and scarves and such. We could potentially put a full length mirror there, or perhaps some sort of wall-mounted necktie or shoe storage. Or we could just add a lot more hooks.
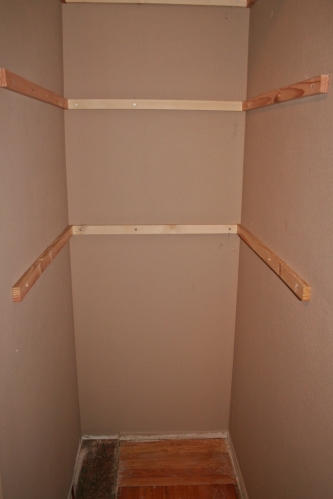
On the back right is the aforementioned cubby with crawlspace access. Here it is still empty:
It’s a good size for storage tubs and we can fit them two-deep if we turn them longways, so I added 1×2 boards (they were labeled as furring strips) as cleats:
And then we cut some 3/4″ plywood to make some heavy duty shelves, and filled them with big ol’ storage tubs (2 deep, so there are actually 10 tubs there even though you can only see 5):

We do occasionally need to access the crawlspace, so I actually didn’t screw the shelves into place. That way we can move some of the tubs and remove one or two of the shelves if someone needs to go in and out of the crawl space a lot and doesn’t want to have to worry about ducking to avoid hitting the shelves.
There are still a few small todos for this space, not counting deciding what we want to do with the back wall. First, the ceiling was primed but not actually painted. On the one hand, I’m glad we got the closet filled and usable as quickly as possible after getting the drywall up, on the other hand, clearing everything out to actually paint the ceiling is probably going to be a pain in the butt. The other thing we need to do is finish the doorway and add floor trim. We sized the doorway to fit a standard sized 2-foot door, but we’ve lived with cats long enough to know that we’d never actually shut the closet door anyway, so we plan to just add trim and not bother with a door. Trim shouldn’t be that hard, but we just have to work up the motivation to break out the nail gun. I’m thinking I probably want to paint those plywood shelves at some point as well.
But in the meantime, this closet is fully functional!
Coming Soon…
I’m setting a goal for myself to produce two blog posts per week from now until the end of the year. I’ve jotted down some ideas and I think it should be totally doable, I just need to commit to it. Some of the potential posts should be pretty easy… Like for instance this post totally counts as one of the two for this week. 🙂 But I don’t just want to post cute pictures of Dakota all the time, (too easy!) so I need to get cracking on some of these projects I’ve been talking about but never actually doing.
Since Dakota is almost crawling we need to get a lot of things picked up and stored away, so I really need to get moving on some of the built-in storage I’ve been planning… At the top of the list is a bench for the foot of our bed, because the bed frame down there actually has some exposed wood that probably wouldn’t be considered baby safe.
We currently have an old ottoman stuffed halfway under there because Loki needs the help so he can get up on the bed. We’ll make sure the bench is low enough for him to jump onto. 🙂
We’re also planning a built-in banquette for the corner behind the dining table, it’s the only way to fit seating all the way around our table, and I refuse to downgrade to a smaller table. And since it’ll be there anyway, the banquette will have some hidden storage too.
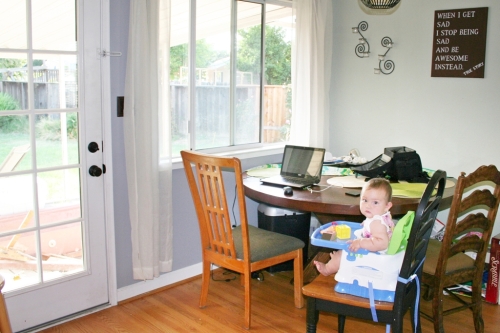
The banquette would provide seating under the window and also on the back wall.
The other thing I’ve been contemplating is some sort of storage under the window in the living room. I know the room is a bit small to begin with, but under the window is kind of a dead space right now that just accumulates extra blankets and PS3 controllers and such, so maybe a narrow hinge-top bench that fits between the couch and the wall and runs under the window? I could almost just re-use the plans for the foot-of-the-bed bench!

So what are the chances I can get any of these projects done by the end of the year? 😉
More Pantry Improvements
Dave’s away on a business trip for the week, so I decided to distract myself by tackling an easy construction project to fix something that’s been a small annoyance in the back of my brain for awhile now. One of the things we improved in the early months after we moved in was our kitchen pantry storage situation. Those deep shelves that we added to the left-hand side of the pantry are still awesome and still working great:

But the right-hand side of the pantry was not working for me. I had originally envisioned it filled with hanging baskets and hooks, but instead it’s pretty much been looking like this for the past year:

Now, neither of the above pictures really show the depth of the problem, because I took them after I had already pulled out a whole lot of food and set it all on the counter. Yes somehow, all of this was getting stuffed in the existing shelves and baskets:

My new vision for the right-hand wall of the pantry was floor-to-ceiling shelving, just deep enough to fit a single 15 ounce can of food. When I measured how much space I had to work with given the placement of the actual pantry door frame, I discovered there was just enough clearance for 3.5 inch shelves. 3.5 inches, how perfect is that!? So I quickly formulated a plan involving 1 x 4 boards with 1 x 2 boards as cleats to support the shelves.
All of the food items in the picture above had a maximum width of 3.5 inches or less, and were therefore candidates for these new shelves. I laid them out like this to group them by height and make decisions on how far apart to put these new shelves. Once I had all of my measurements, I jumped right in:

Here you can see the 1 x 2 cleats getting screwed into the wall. This project was just my speed because it was pretty much all mitre sawing, drilling, and a bit of measuring and leveling. We even had the studs already marked since we screwed those metal baskets into them last year.
The only hitch was when I had to cut out notches in the shelves for the weird bump-out we have going on at the back of the pantry. It was my first time using our swanky new portable jigsaw. (I’ve decided I’m NOT a fan of a laser guide on a portable jigsaw, but I didn’t really bother to take the time to figure out if there was a way to turn it off.) And then I had some trouble jimmying the notched shelves into place since I had foolishly already screwed in all of the cleats:

I ended up having to unscrew those upper cleats to get the notched shelves into place. Ah well, it was still a pretty quick process. My other problem was that I had measured and planned out for nine shelves, but I only had enough wood on hand for six shelves. Boo. I decided going out and picking up 2 more boards was way too much effort, so I just left the pencil marks on the wall and I’ll add the last three shelves at some later date. Six new shelves were enough to hold everything I had laid out on the counter with room to spare:

And they don’t really take up any previously useful space, so the pantry can suddenly hold a lot more. I especially love how easy it is to see all of the different food items, something with which I had been struggling with the deeper shelves on the left-hand side.

Julie is pretty happy too, since she’s been stuck storing pretty much all of her food in a big wire basket on top of the refrigerator ever since she moved in with us. We went out and bought a few cheap plastic baskets today and used them to help organize some of the smaller things that are still on the left-hand shelves in a bit less haphazard fashion. (This was after I finished taking pictures, sorry.) Julie buys a lot more canned goods than I do, so now I just need to get those last 3 shelves in on the right-hand side and I think the top of our refrigerator will actually be pretty much completely freed up again.
And all of this while 20 weeks pregnant! Does this count as nesting? 🙂 Really the only time being pregnant came into play during this project was that while sitting inside the pantry screwing the cleats into place I could smell this faint whiff of something rotting. My powers of scent have been greatly enhanced, so I’m pretty sure this is something that I wouldn’t have even noticed before getting pregnant. But I took a break from drilling to pull everything off of the floor and scrub it down, and the smell went away. I guess this will just be a reminder to myself to make sure that I occasionally give the pantry floor a good cleaning in the future.
Bedroom Organization
I don’t post too much about our bedroom, mainly because it gets pretty much the worst lighting of the entire house. I tend to take pictures with my iPhone because a) I know nothing about real photography and b) photos on the SLR just sit there forever and never end up being shared with anyone.
But now that we have the dedicated media computer, we also have an established system for getting photos off of the SLR and onto the internet in a reliable fashion. So that just left the issue of me being clueless about how to use real cameras effectively.
The bedroom is a pain because the one window is completely shaded by our patio roof, and the light bulb in our ceiling fan is a yellow, yellow halogen. While I love our yummy brown walls in person, in my photos they always look either dark and dreary (with the light off) or weirdly orange (with the light on). So in a fit of motivation, I unearthed our tripod, because I heard somewhere that those make photos better somehow. And I cornered Dave, who actually knows something about photography. More accurately, I made sure he saw me fumbling around with his SLR, so that he whisked it away and set it up for me. I win! Here are the results:

The point of this post is to reveal our slightly unconventional clothing storage. We decided when we finally moved out of Berkeley to not take our dressers with us, because we always over-stuffed the drawers and could never find anything. Instead we started collecting smaller baskets that let us separate out our clothing more specifically and keep things more organized.

So that leaves us with a bunch of baskets littered about the room. What a mess, and these pictures are after I tidied the room up! Anyway, our master plan all along has been to build a captain’s bed with storage cubbies to hold our myriad baskets. We also plan to build a storage bench that will hold the clothing in those three white baskets at the foot of the bed.
Of course that’s not all of our clothing. Most of it is stuffed into the closet off to the left.
Currently to get to the master bathroom you turn left into the closet, then left into the bathroom. Our hope is to close up the current bathroom doorway and instead have the bathroom open directly onto the bedroom. Then we can close off the closet area and make it a proper walk-in closet with way more storage space. (If you look closely in the picture above you can see the blue tape on the floor where we want put the new doorway leading into the closet.)

In the meantime, our closet gets to be a huge mess. Oh, and looking at these pictures makes me realize that I really need to decorate these walls!
Reclaiming the Pantry
We’ve known from day one that we needed to fix the pantry, but we hadn’t really planned to work on it any time soon. But for some reason on Friday night I suddenly couldn’t stand it any more, so we threw our other house plans out of the window and instead crafted a master plan to fix the pantry.
Here’s the problem. One of the past owners of this house installed an extra-deep media cabinet in the living room, complete with a little switch board.

(It used to have some weird-looking trim around the outside that we took off when we painted the walls.) I think it would have been really slick to put our media stuff there if we had decided to mount the TV over the fireplace. But since the TV is on a different wall, and especially since this is the first thing you see when you walk in the front door, setting up a lot of sound equipment there didn’t make much sense. We were just storing random stuff there in the meantime. What was really killing me though, was the amount of space it took up in the pantry. Since that wall is the back of the pantry, the fact that the media cabinet was over a foot deep meant that it claimed more than half of the actual pantry depth. And the existing shelves in the pantry made the extra space underneath the media cabinet largely inaccessible.

So bright and early on Saturday we started ripping stuff out. Since everything was bolted together, it was easier to remove the media cabinet first. It was a tight fit: the most effective method ended up being Dave bracing himself against the counter and launching side kicks at it. That thing is built like a rock! i think we’ll paint it and turn it into some sort of shelving for the office. 🙂

That’s the new window from the living room to the kitchen. We found some secret speaker wire hanging down from the attic, plus some loose insulation from who-knows-where. Here’s the view from the kitchen to the living room, once we removed the pantry shelves:

Please excuse the perpetual mess that is our living room.
We had already decided that we wanted to still have some built-in shelves to fill that hole in the wall, we just didn’t want them so deep. But pretty much as soon as we removed the existing cabinet we realized that it wouldn’t make sense to try to disassemble it, cut it down, and reassemble. So off to the hardware store we went to collect our building supplies.

That’s right, 8-ft boards fit in our little car… barely. Anyway, cutting and assembling went fairly quickly, though we were wishing for something besides a little hand-held circular saw, and we definitely need to use a flatter surface for assembly in the future.


I did help, by the way. I’m just not going to be able to be in the pictures if I’m the one taking them. 🙂 Anyway, after much frowning at the wall and glaring suspiciously at our level, we ended up with this:

And then we went to the hardware store and got a bunch of shims and did it over, but you get the idea. While we were out, we found some trim that matched the existing trim on our doors. Annnd we picked up some paint. Sadly we ran out of time this weekend since we also needed to put the pantry back together, but here is how the shelves look today:

We still need to attach trim to the front of the actual shelves, and then we just need to touch them up and paint them white. But this is a decent stopping point for the time being, and they’re already looking pretty darn cool.
Meanwhile, our food and paper products were forlornly waiting for a new and improved home…

We definitely wanted adjustable shelves, so after a little price comparison we settled on the “classic” metal track thingies:

Then we just cut some 1×12 boards down to size and loaded them up!

The best part is that’s only one side of the pantry. here’s the other side:

Finally! A space for the vacuum and broom. I’m probably going to add hanging baskets on the walls that are currently blank. We might even get around to painting the back “wall” (aka the back of the new living room shelves, only peeking out a tiny bit) eventually. I was originally planning to paint the pantry shelves, but they look fine the way they are for now… And the spices are moving somewhere closer to the stove once we get around to figuring out a better storage solution for them. Once that happens, maybe we’ll replace the pantry door with a bi-fold or something, because that door is just constantly in the way as it is right now.
All in all, I think it ended up being a pretty awesome Memorial Day weekend.

